Topics
- Introduction
- Logging In On Campus (through Secure Wireless)
- Logging In Remotely (outside of USC)
- Logging In
- Exploring the Xplore Dashboard
- Submitting Your Work for Grading
- Viewing Your Audio & Video Content
- Creating Subclips
- Creating Markers
- Downloading a Clip
- Publishing to Youtube
- Attaching Files to Media
- Creating a Shared Folder
- Searching Through Xchange
Introduction
Xchange is a media asset management system for uploading, sharing, and analyzing clips. Think of it as Blackboard for media content. Students will be able to upload their work to share with faculty and view work shared to the Annenberg community. Xchange is organized with bins that correspond to your Annenberg courses and includes a “My Media” bin for all uploaded work. This tutorial will cover how to access Xchange, upload media, creating markers and subclips, download files, and search through Xchange. *Important: Keep in mind that Xchange is NOT meant to be a back up system and all your media should still also be saved on your own external hard drive.
*Note: If using Google Chrome to access Xchange, you need to use an Incognito window in order for Xchange to open. To open an Incognito window, navigate to the toolbar on top of your screen, click File > New Incognito Window.
Logging In On Campus (through Secure Wireless)
Make sure you are connected to Secure Wireless.
Note: If you are running Windows 7, you may experience issues connecting to USC Secure Wireless. Please see our Windows 7 Secure Wireless Fix Handout.
Logging In Remotely (outside of USC)
When you are not at USC or not using USC Secure Wireless, you must use VPN to get into the network and access mcweb.usc.edu. To download VPN and connect to Secure Wireless remotely, see our instructions here.
Logging In
1) Visit mcweb.usc.edu (Make sure you are on Secure Wireless if on campus or using VPN if at home, see instructions above).
2) In the username field, type in the first part of your USC email (i.e. if your email is ttrojan@usc.edu, enter in ttrojan)
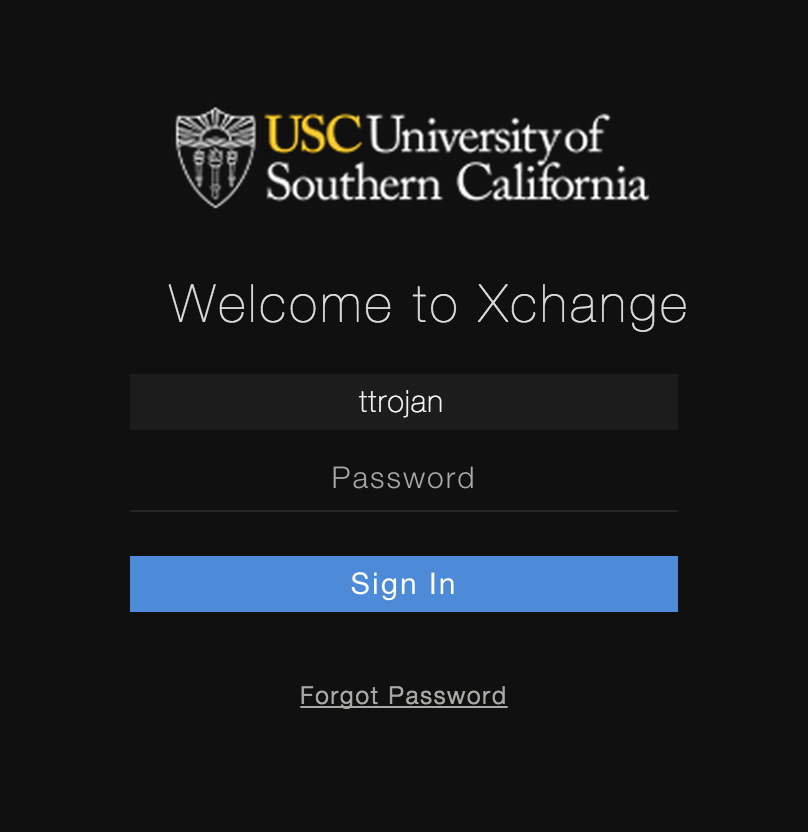
3) If this is your first time using Xchange, or if you’ve forgotten your password, please email asctech@usc.edu to receive your first-time login credentials. If this is not your first time logging in, click Sign In and skip the next step.
4) Check your USC inbox for an email with your new Xchange username and password. If you do not receive an email within 24 hours or experience any issues attempting to use these new credentials, please email asctech@usc.edu.
Exploring the Xplore Dashboard
Let’s get familiar with the Xplore Dashboard and the different sections.
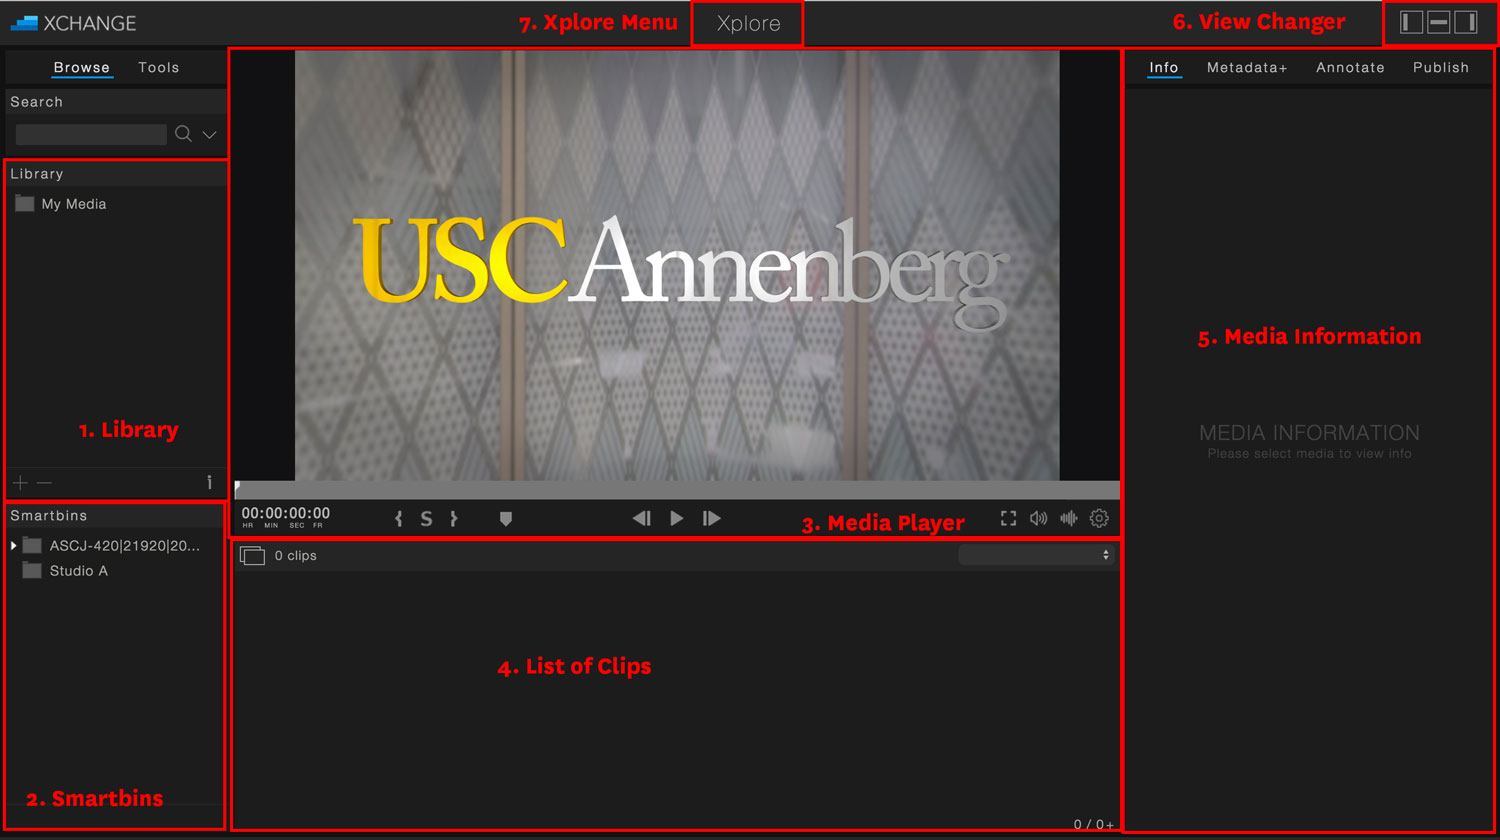
1) Library
The Library section is your personal organization for your media. The My Media folder stores all media that YOU upload to Xchange. In addition, using the + and – buttons in the bottom left corner allows you to add/delete folders to help you organize your files or share certain folders with other users in Xchange.
2) Smartbins
Smartbins contain all of your class folders that you are enrolled for this semester. Within each class, you’ll see 2 folders: Local Space & Student Space. Local Space will be the hub for sharing content with everyone in the class including the professor. Student Space will include your individual folder to show what you’ve uploaded to that specific course.
3) Media Player
The Media Player is how you will view all of your content (video, audio, images, etc.). It has a standard play, rewind, and forward buttons. We’ll explore the Media Player in depth later in this tutorial.
4) List of Clips
When you select a folder, you will see the list of clips inside this section.
5) Media Information
When you choose a clip from a folder, this section will give you information about the clip, allow you to annotate the clip, and give you the option to publish the clip to the web.
6) View Changer
To enhance the usability of Xchange, you can now change the view of your Dashboard depending on what you’re working on. Clicking on these three buttons will change your view – experiment with them to see what you can do!
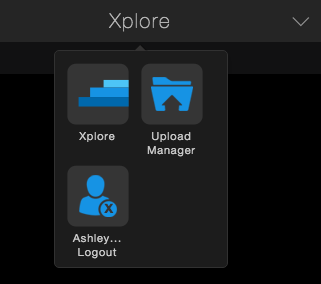
7) Xplore Menu
When you click on Xplore, you’ll find the Upload Manager and the option to Log Out. The Upload Manager is how you will upload media to your courses.
Submitting Your Work for Grading
Xchange allows you to upload a variety of media and supports most common file types. However, Xchange is primarily and best leveraged for audio and video based content. If you want to confirm your file will be supported by Xchange, look through the full list of supported file types and extensions here.
Again, please keep in mind that Xchange is not meant to be a back up system and all your media should still also be saved on your own external hard drive. Follow the instructions below or download the PDF instructions here.
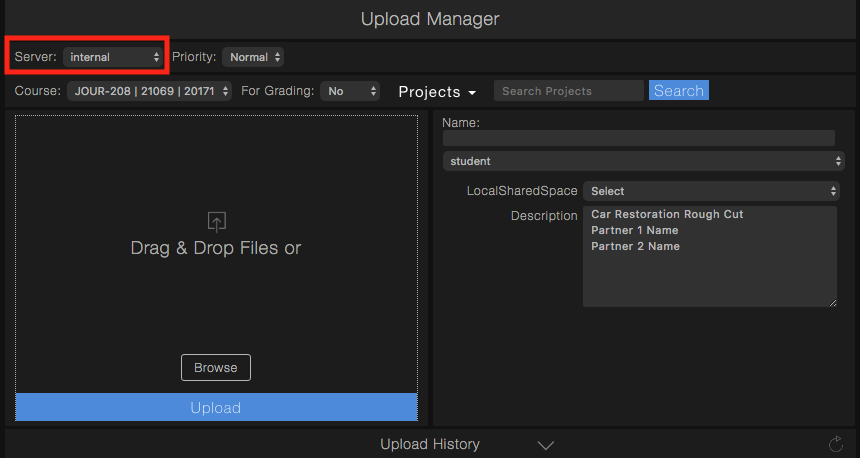
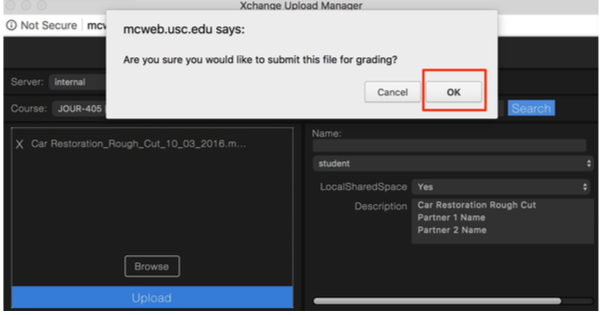
1) Click on Xplore at the top of the window and choose “Upload Manager.”
2) The Upload Manager will open a new dialog box. The Select Destination field defaults to internal, which allows you to upload to one of your courses.
3) Select the Course your file belongs to. You will see a list of Annenberg courses that you’re registered for. You will see the course number followed by the section number.
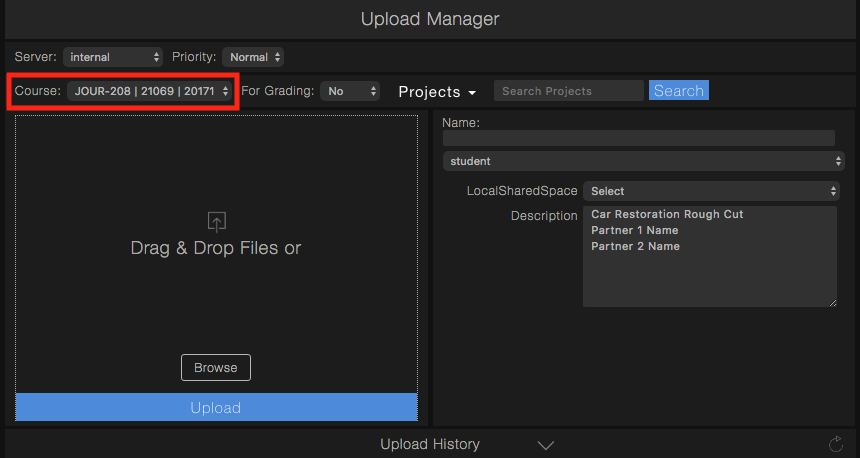
4) Under For Grading, select Yes.

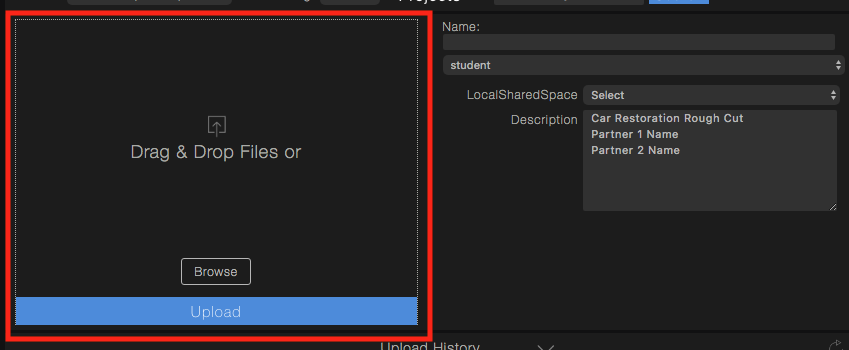
5) Next, you will either Drag and Drop a file or Browse for your file(s).
Then type in a filename in the Name field and fill out the Description. Proper naming allows you to better find/organize media. Please see recommended naming conventions below.
Name field: The default name for your project will be the uploaded filename. When you insert a filename, it will add-on to the name of the file you are uploading. You DO NOT need to include your name or course number in the file name, because when you upload, the file will be linked to your account and the chosen course bin. Avoid using any special characters (i.e. !?#$%^*&)
Description: Add in as many details as possible in the description. This will come in handy if you ever need to search for your file and it will also help you organize your files. In addition, you can leave your professor a description of your assignment or leave any important notes. You can also write in names of partners who worked with you on the project.
6) To start uploading your file, click “Upload.”
You will be prompted with a dialog box (if it is a submission) that asks if you are sure if you want to submit this file for grading. Click OK.
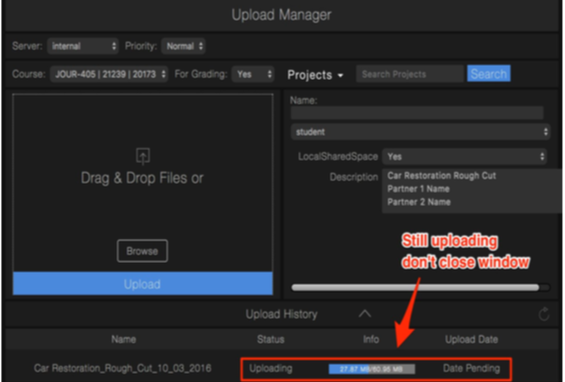
9) Under Upload History, you will see your file progress as it uploads to Xchange. Do not close the window while it says Uploading. Wait until it says Processing.
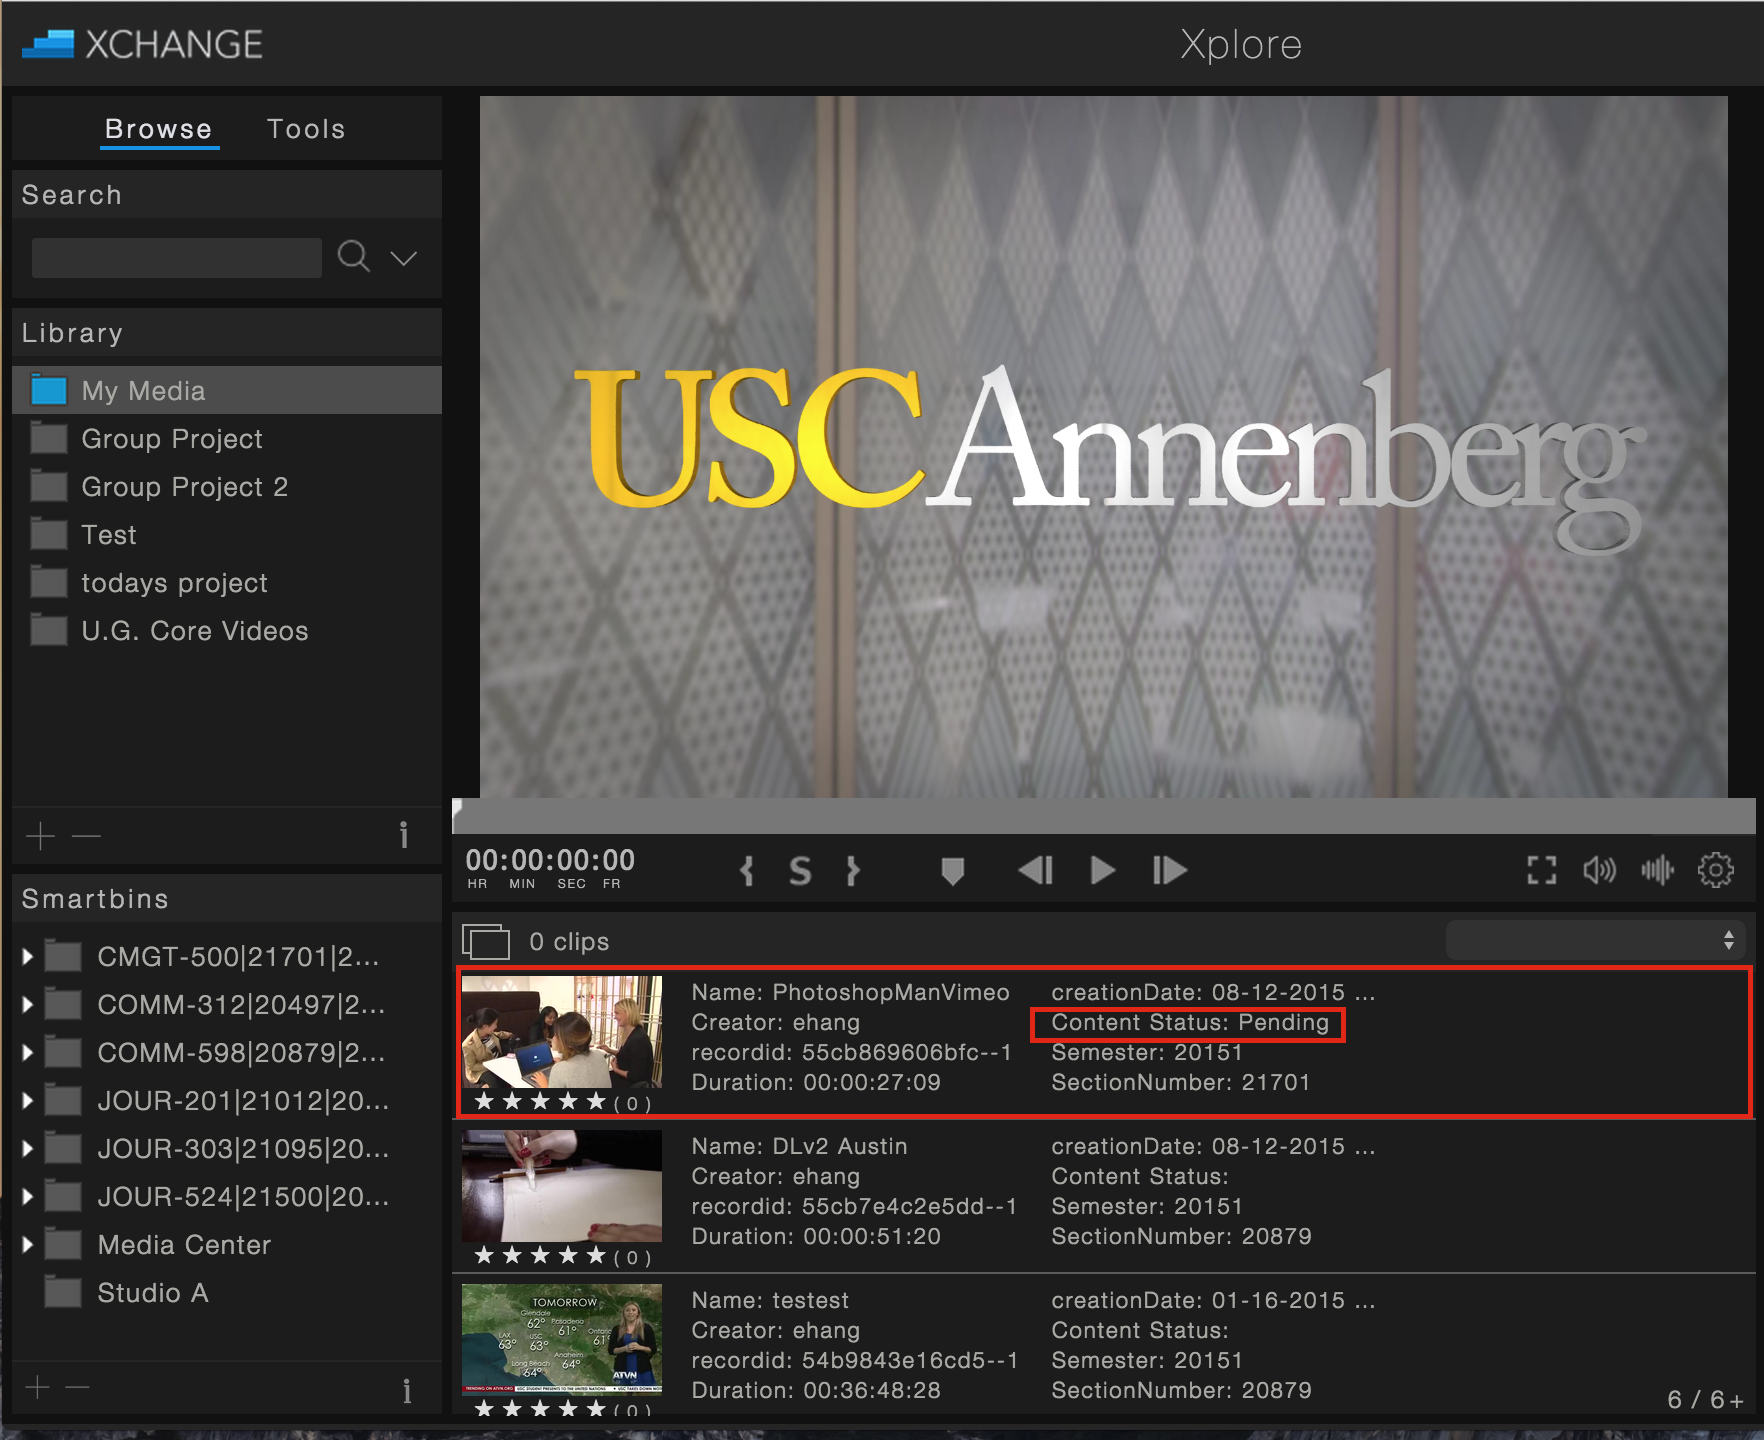
10) To verify that your clip was submitted to your faculty member’s grading space, go to your My Media folder and check that under the Content Status for the clip, it says Pending. The status will change once your professor has either marked it for Re-Edit or Approved.
Viewing Your Audio & Video Content
Xchange offers an easy interface to browse and view your video and audio content. Select a clip in any bin or space. Whenever you select a video or audio file, you’ll see a typical media player interface.
Time: This will show the current time of clip that you’re on. Simply drag the ticker to a different point of the clip to get to a certain timeframe. Note: If your file has a designated timecode, it will display here. If not, this will display media duration.
![]()
Playing/Scrubbing Through Your Clip: You can use these buttons to rewind, fast forward, and start playing/stopping your clip. Shortcuts: You can also use the space bar to play and pause and the left and right arrow keys on the keyboard to scrub through. You can also use j, k, and l to rewind, fast forward, and play just like in Premiere.
![]()
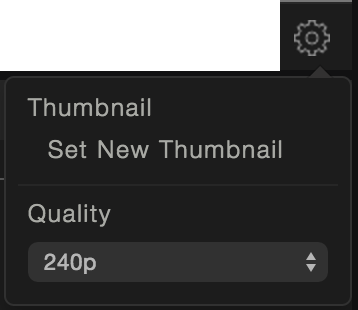
Quality: Clicking on the Gear symbol allows you to change the quality of the video streaming.
Set a New Thumbnail: Scrub through a clip and find a new thumbnail. Once you are on the part of the clip you like, click on the Gear and click on Set New Thumbnail.
Fullscreen: Clicking on this button will make the video fullscreen.
![]()
Volume: Clicking on this button will bring up a volume controller. Click on the symbol again to make the volume controller disappear.
![]()
Creating Subclips
A Subclip allows you to make new clips from existing media.
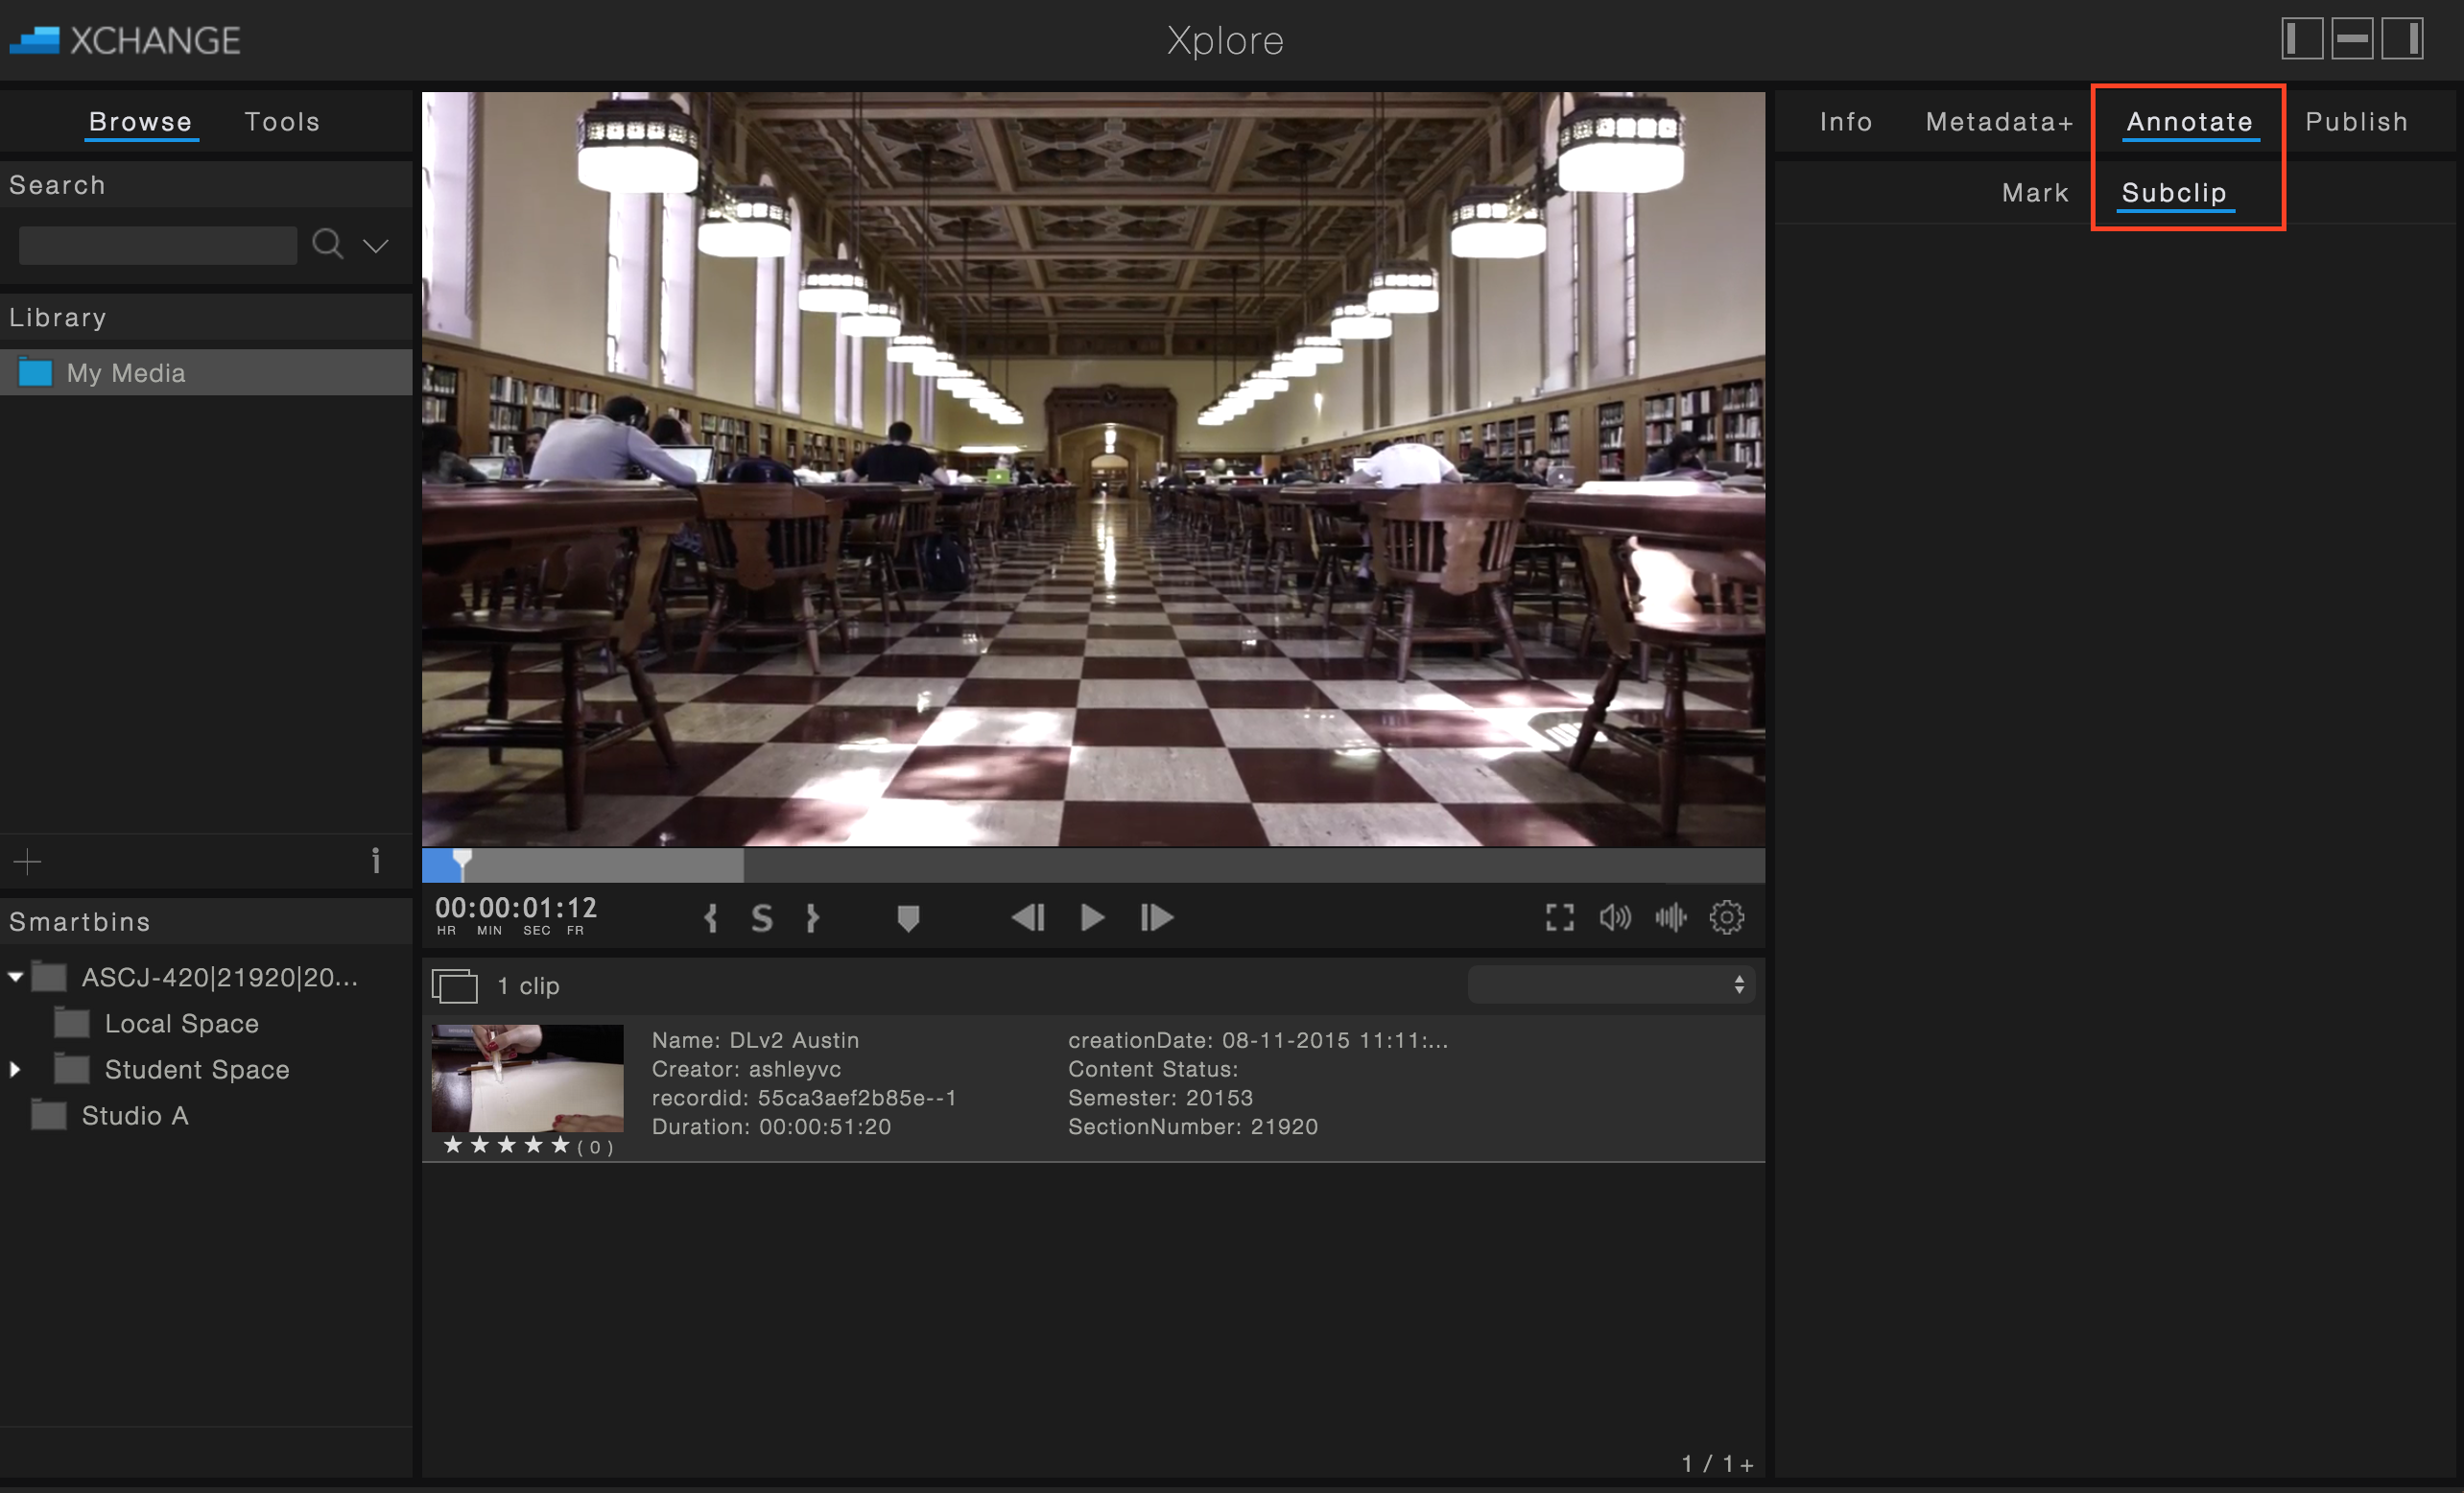
1) Choose an uploaded video or audio clip you want to create a subclip for. In the Media Information sidebar, click on Annotate and then choose Subclip.
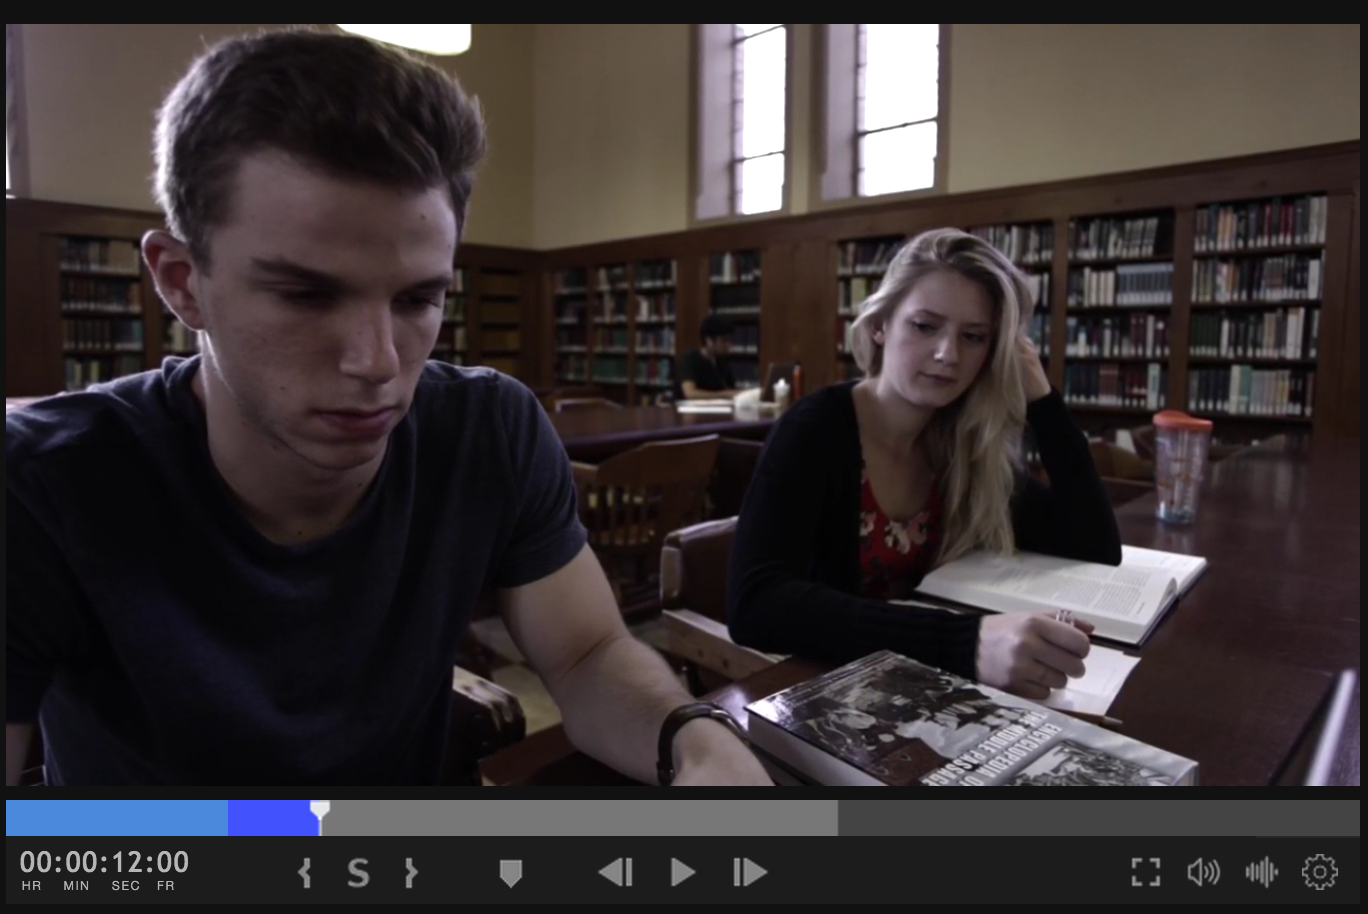
2) Using the buttons below the media player or the keyboard shortcuts, you can mark the ins and outs for your subclip.
![]()
[ marks the “beginning” of your subclip or press “i” on your keyboard
] marks the “end” of your subclip or press “o” on your keyboard
Your subclip will appear in a different shape of blue on the timeline as shown below.
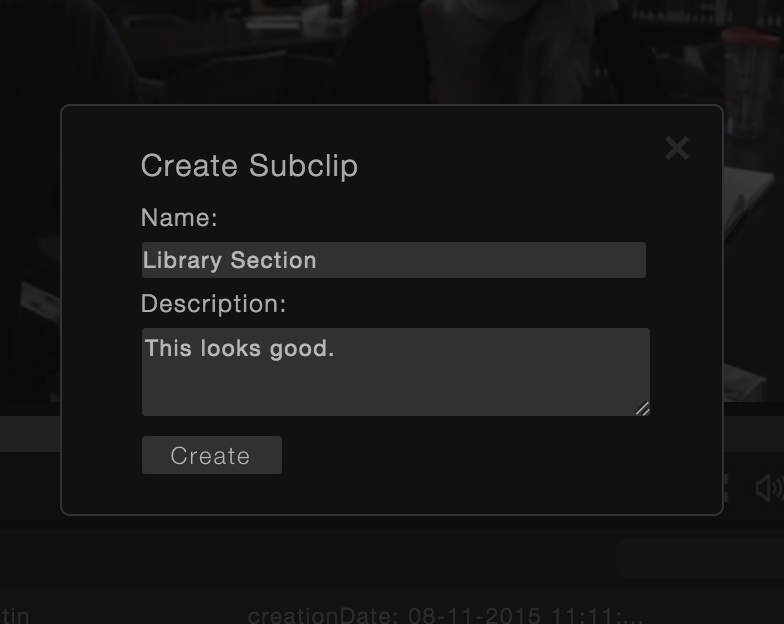
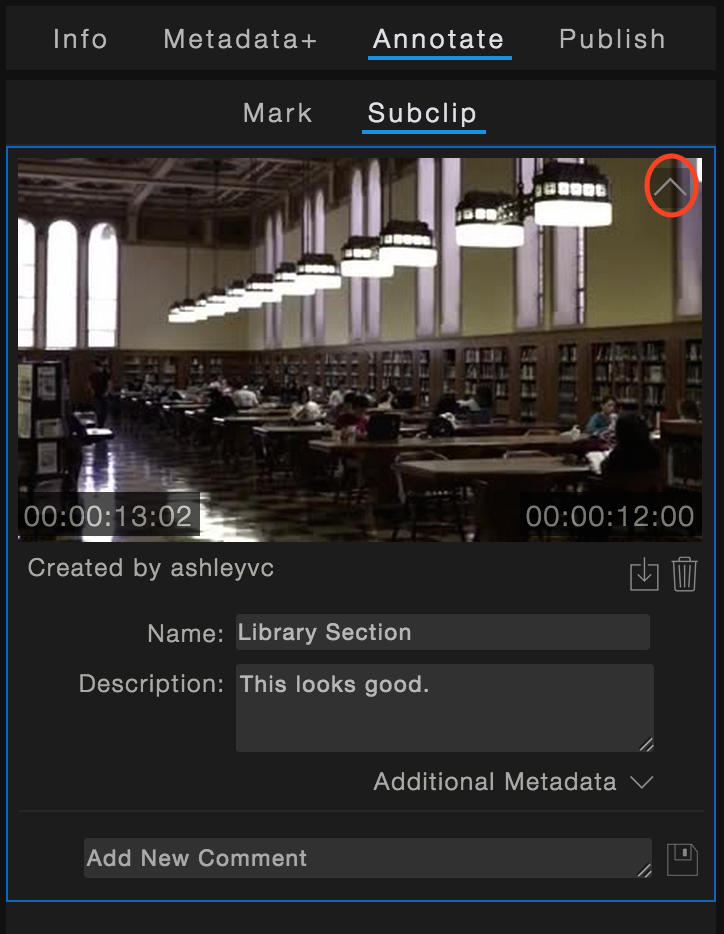
3) Once you’ve marked the in and out of your clip, then click the “S” button or press the “s” on your keyboard to create your subclip. A new dialog box will prompt you to give the Subclip a name. Once you’ve typed in a name, click on Create.
4) You will now see this clip appear under the Subclips tab next to the media player, which also notes the in and out time of the subclip.
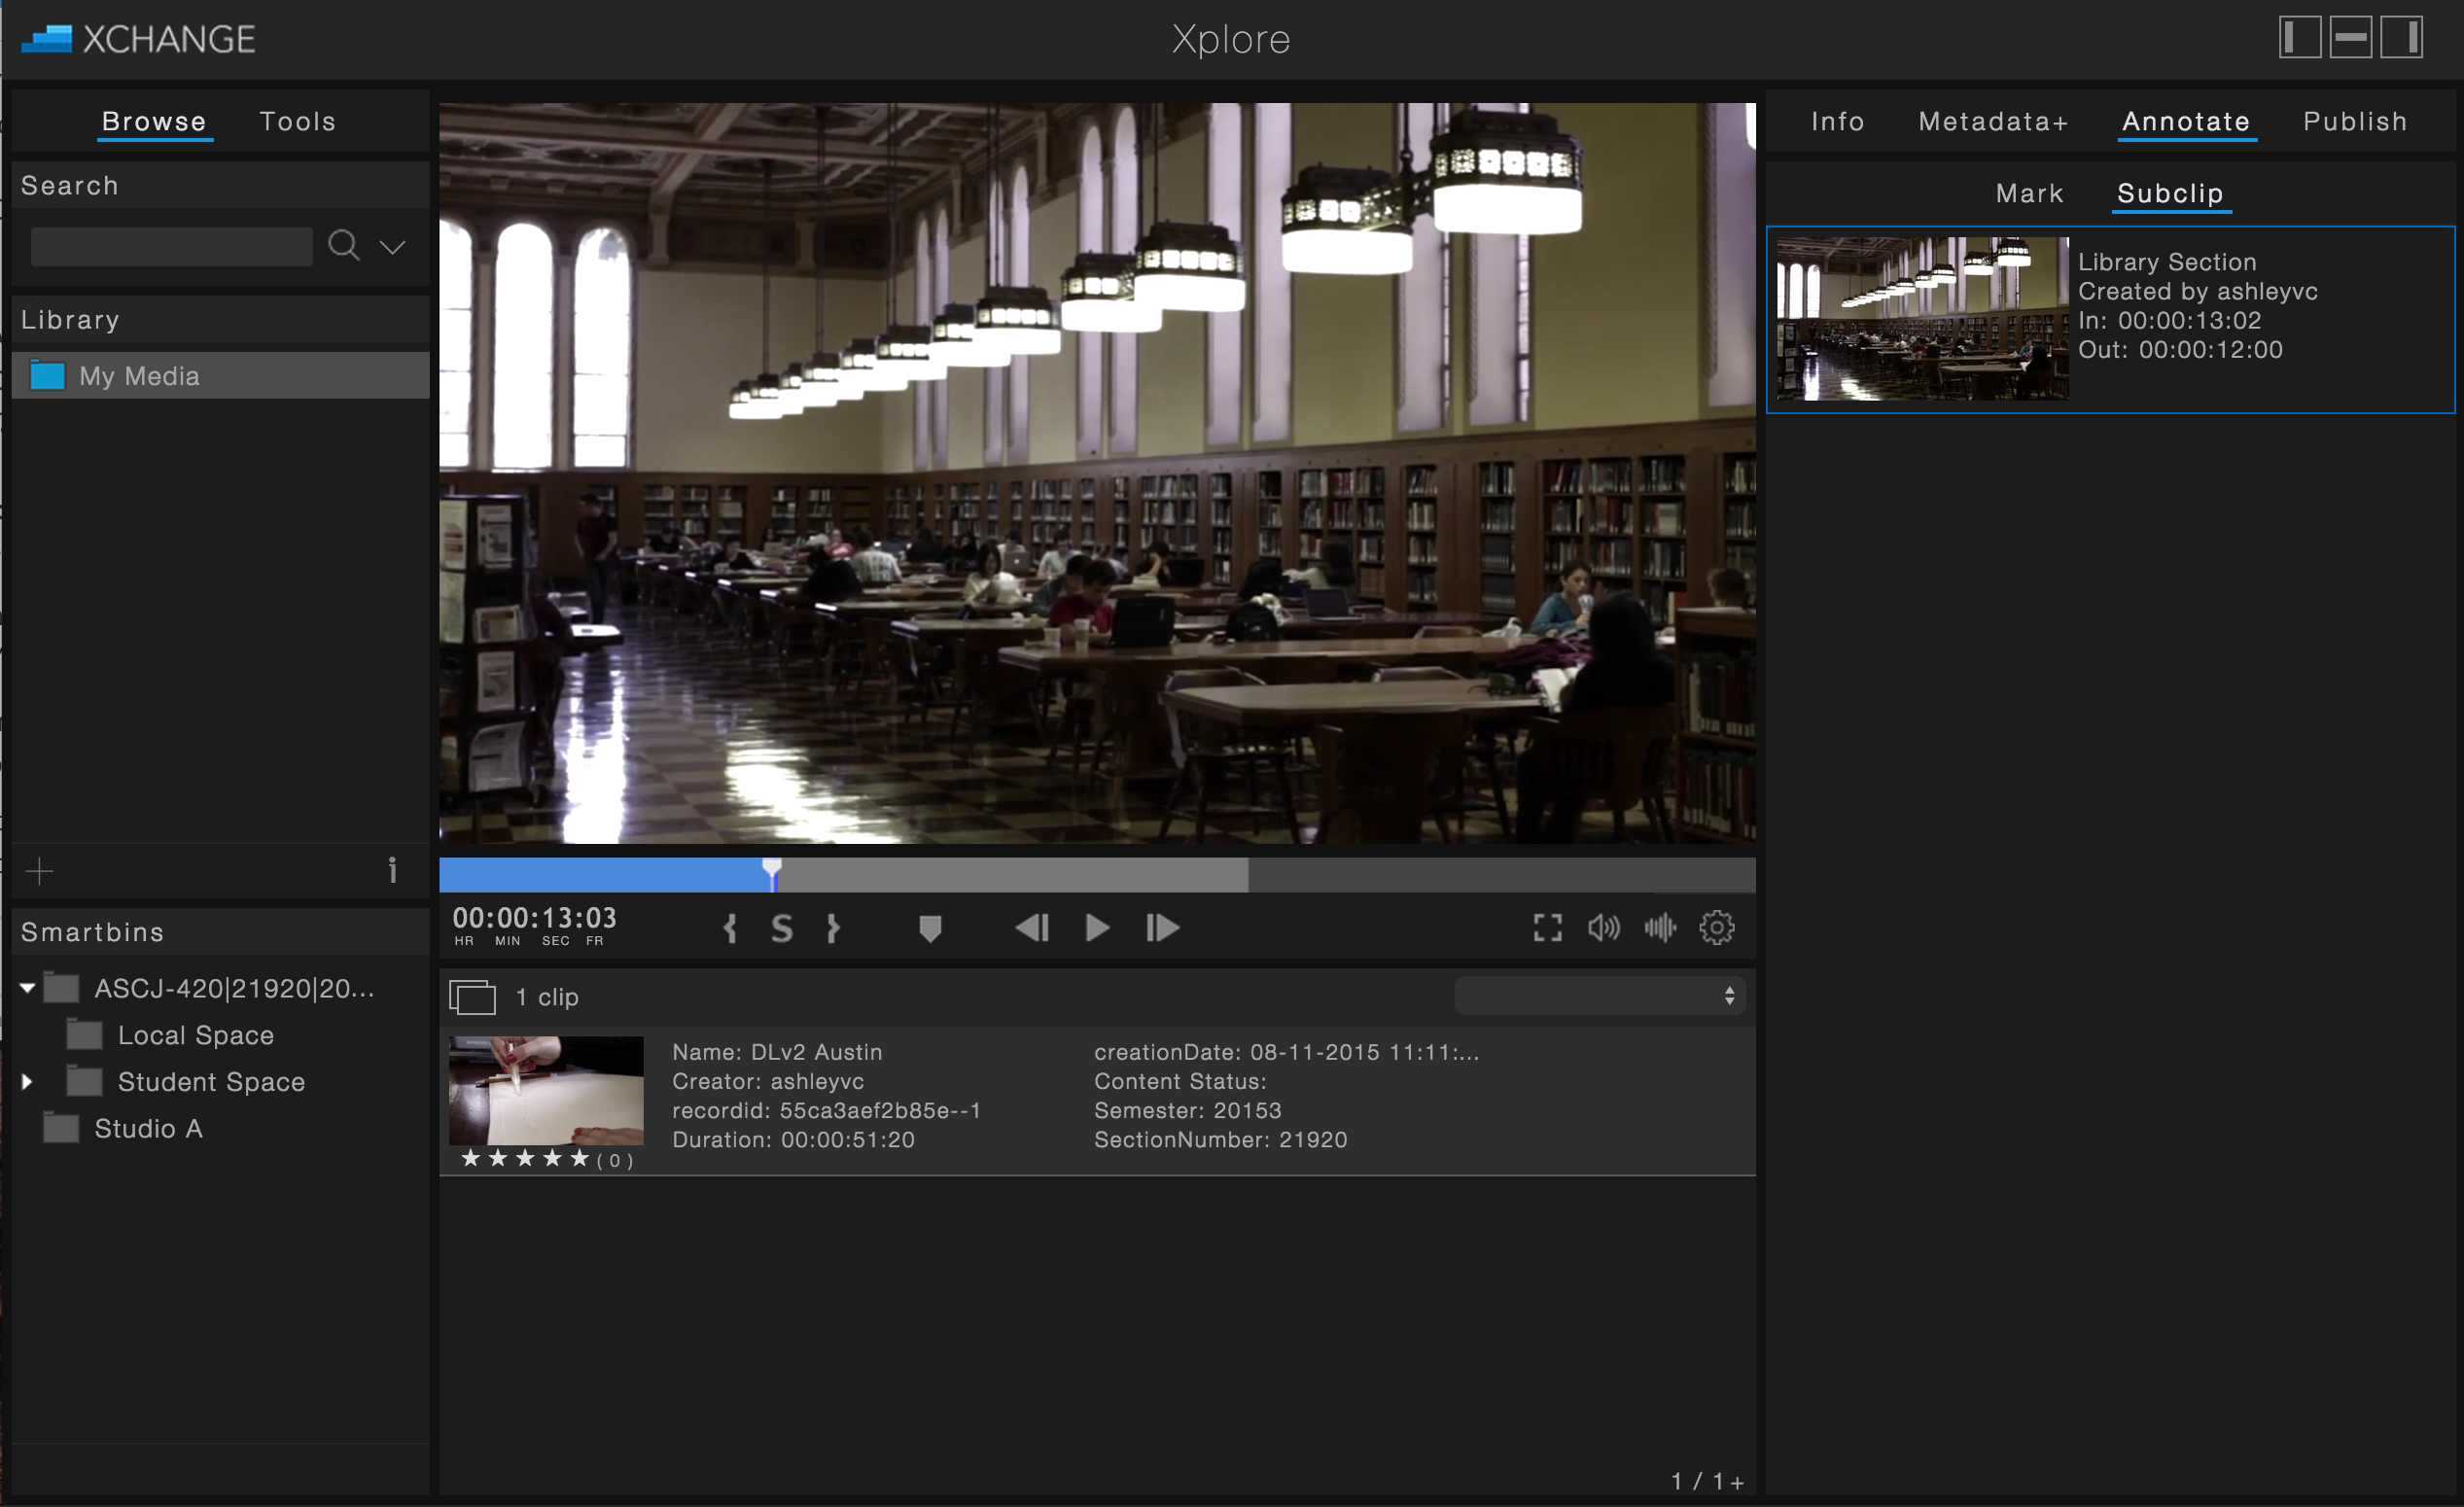
5) When you hover over the Subclip, you will see a drop-down arrow. Click on this to see the description. You’ll also be able to start a comment thread on the clip to create a discussion with other classmates or your professor.
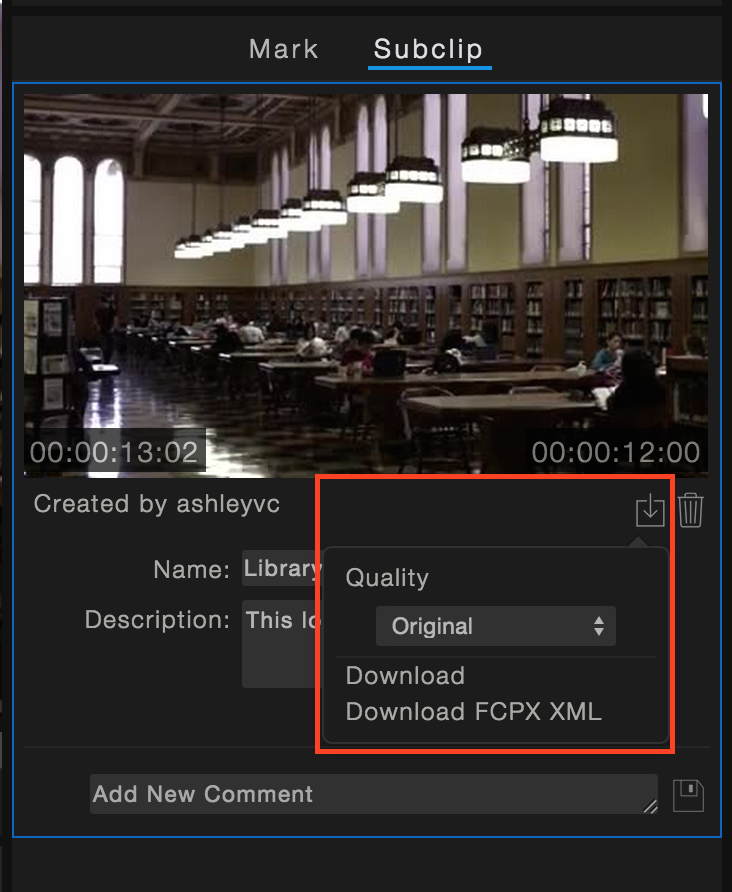
6) To download a subclip that you’ve created, click on the download icon, choose a quality and then click Download.
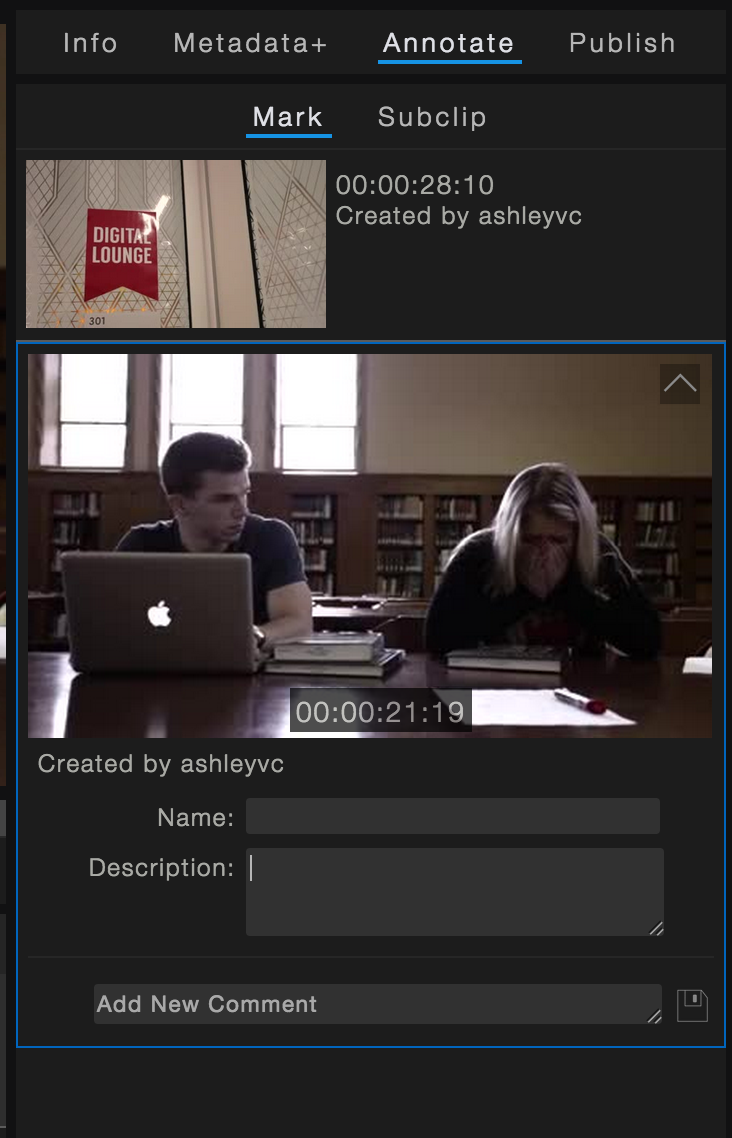
Creating Markers
Markers allow you to designate certain points on the timeline. Each marker can be given a name and notes, which gives you the ability to organize points in your media file for later edits.
1) Choose an uploaded media file that you want to add markers on. In the Media Information sidebar, select Annotate and then Mark.

2) Advance your playhead to the point that you want to make a marker. Click the marker icon ![]() or press “m” on the keyboard. You will see an overlay over your screen that the marker is being created. The marker will now appear on the side under the Markers tab.
or press “m” on the keyboard. You will see an overlay over your screen that the marker is being created. The marker will now appear on the side under the Markers tab.
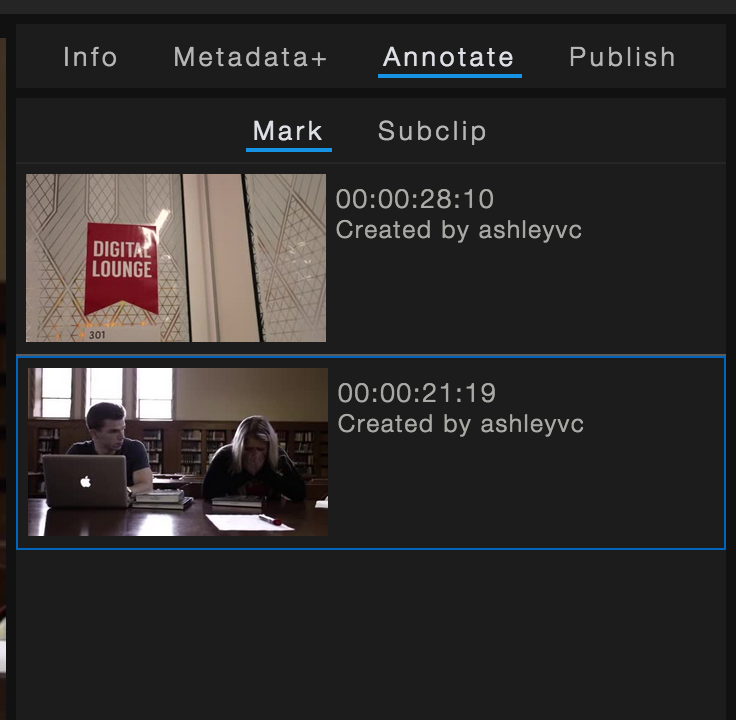
3)When you hover over a Marker, you will see a drop-down arrow. Click on this to add a Name and description. Just like Subclips, you can start a conversation about the marker with your classmates or professor.
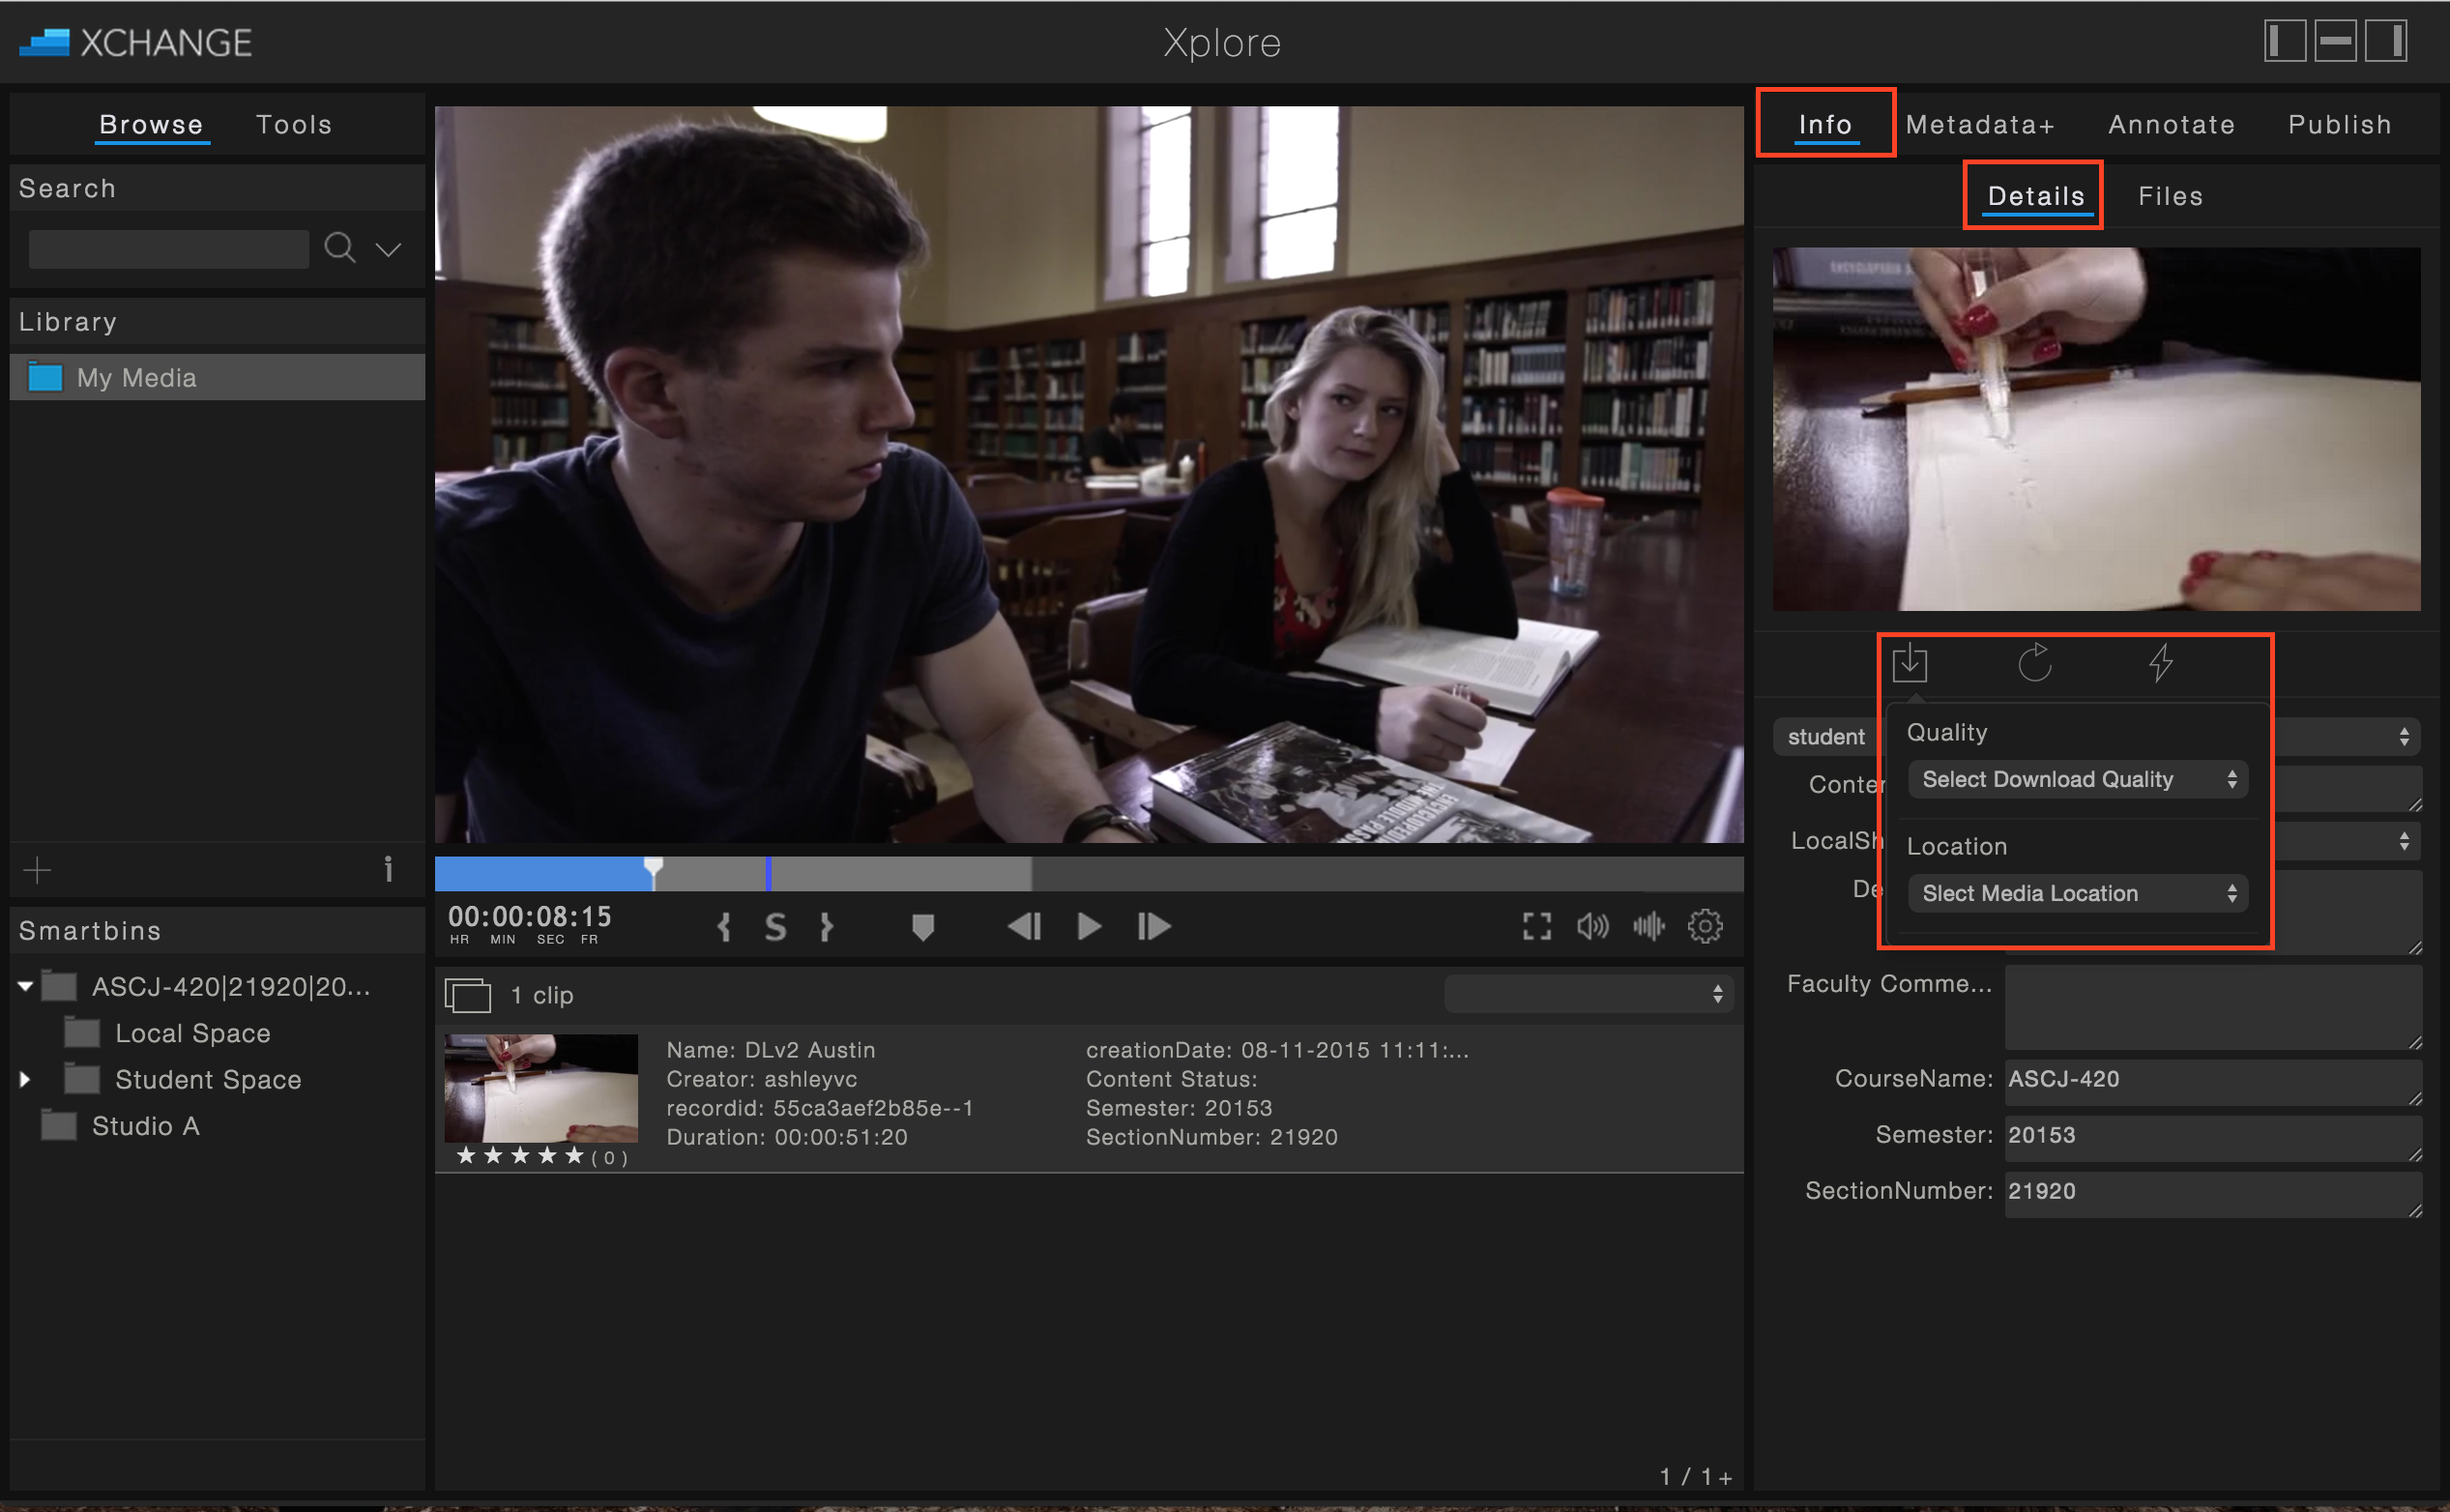
Downloading a Clip
You will be able to download files uploaded to Xchange. If you are downloading a video, Xchange allows you to download different video qualities of the clip: Low (240p), Medium (360p), High (720p), and Original (The original quality of the file).
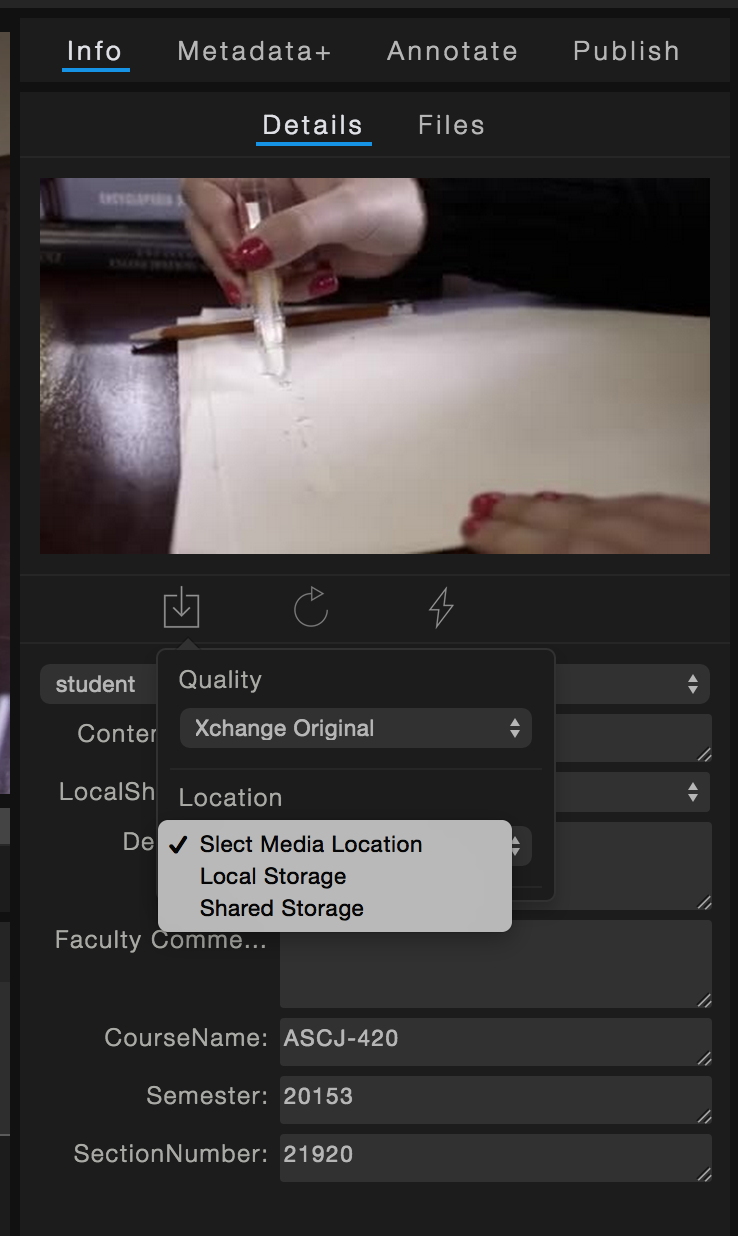
1) Select the file you’d like to download. Click the Info tab and then Details. Under Details, you will see the Download Icon. When you select it, you will be able to choose the Quality.
3) Then Local Storage to save it to your computer.
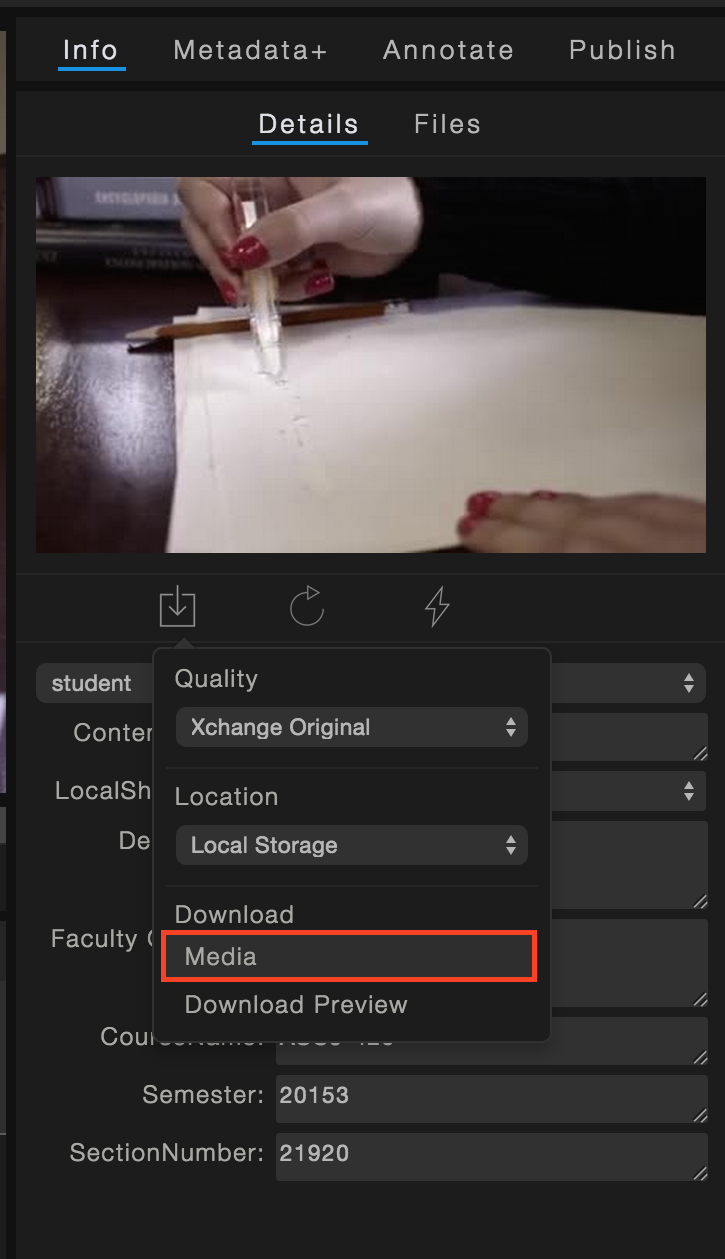
4) Then under Download, choose Media and your clip will start downloading onto your computer.
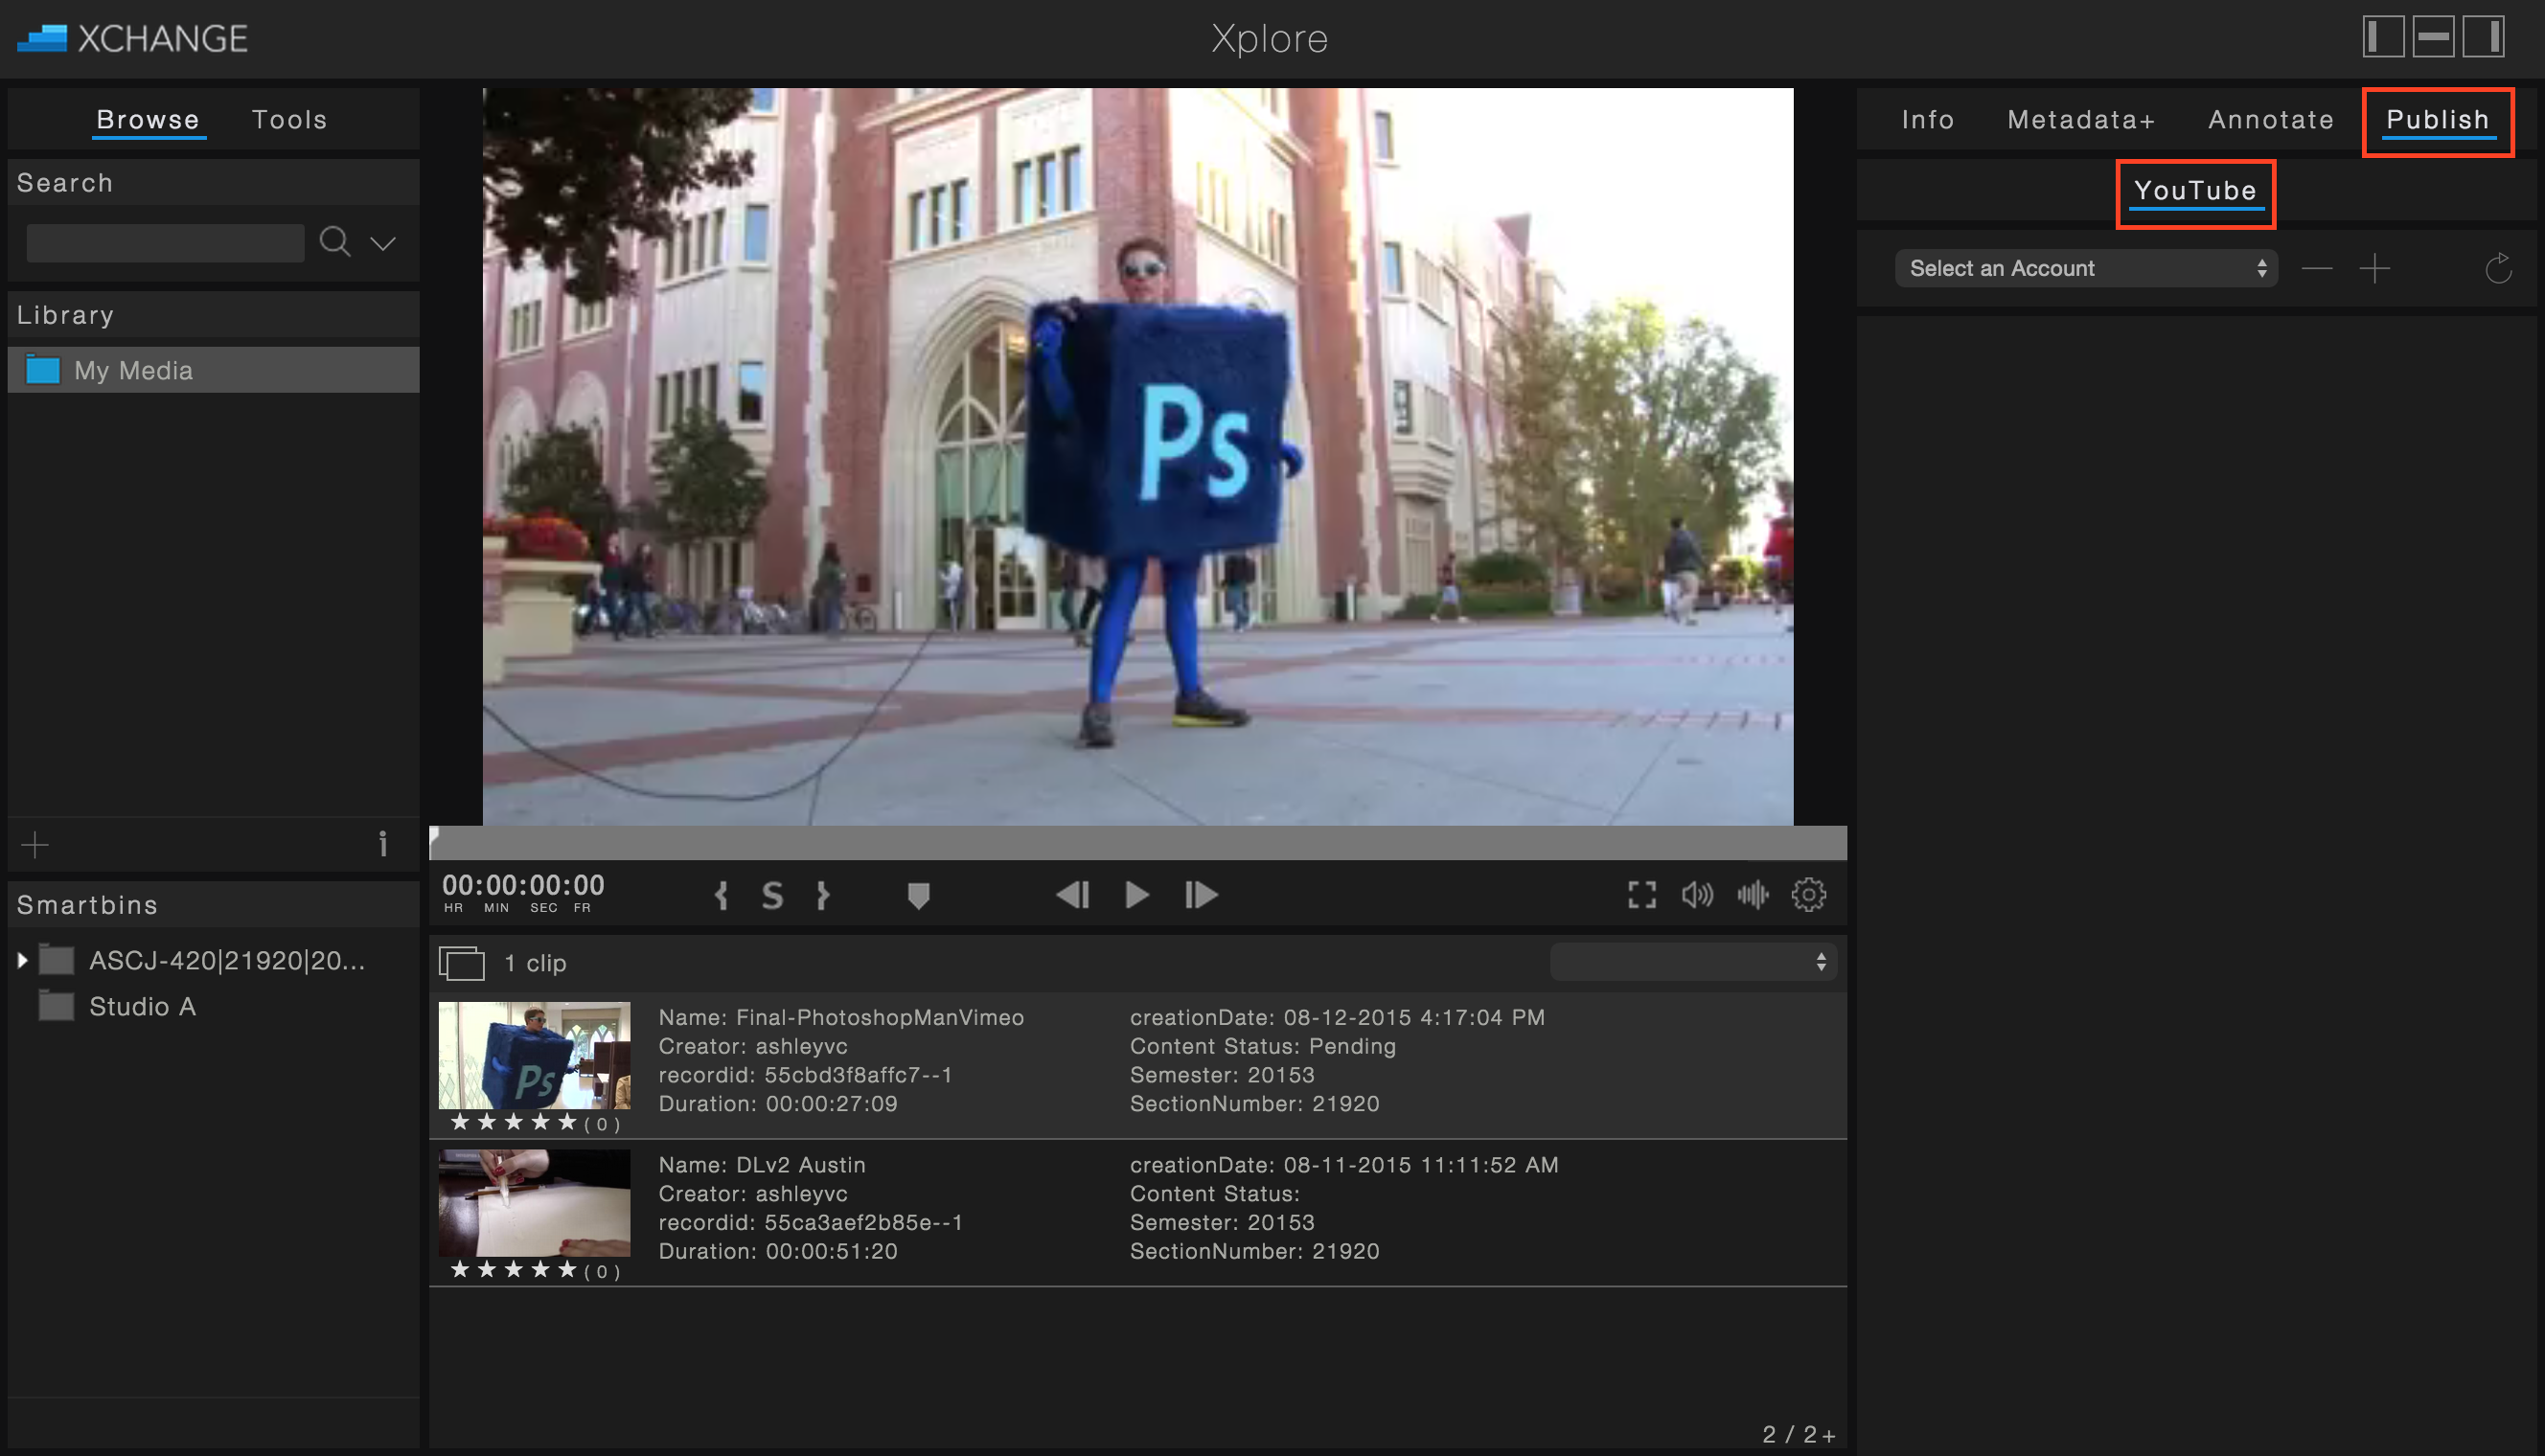
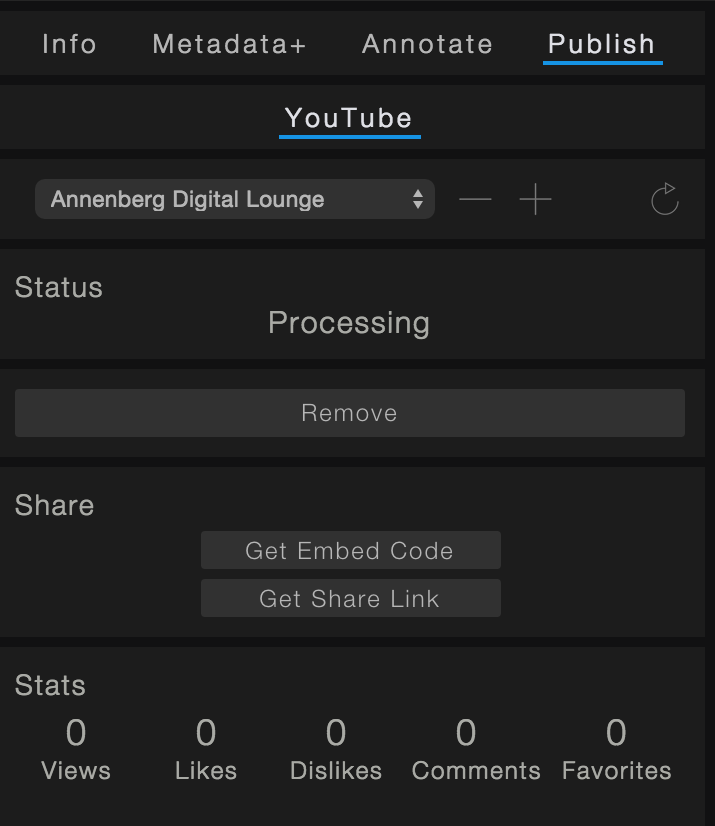
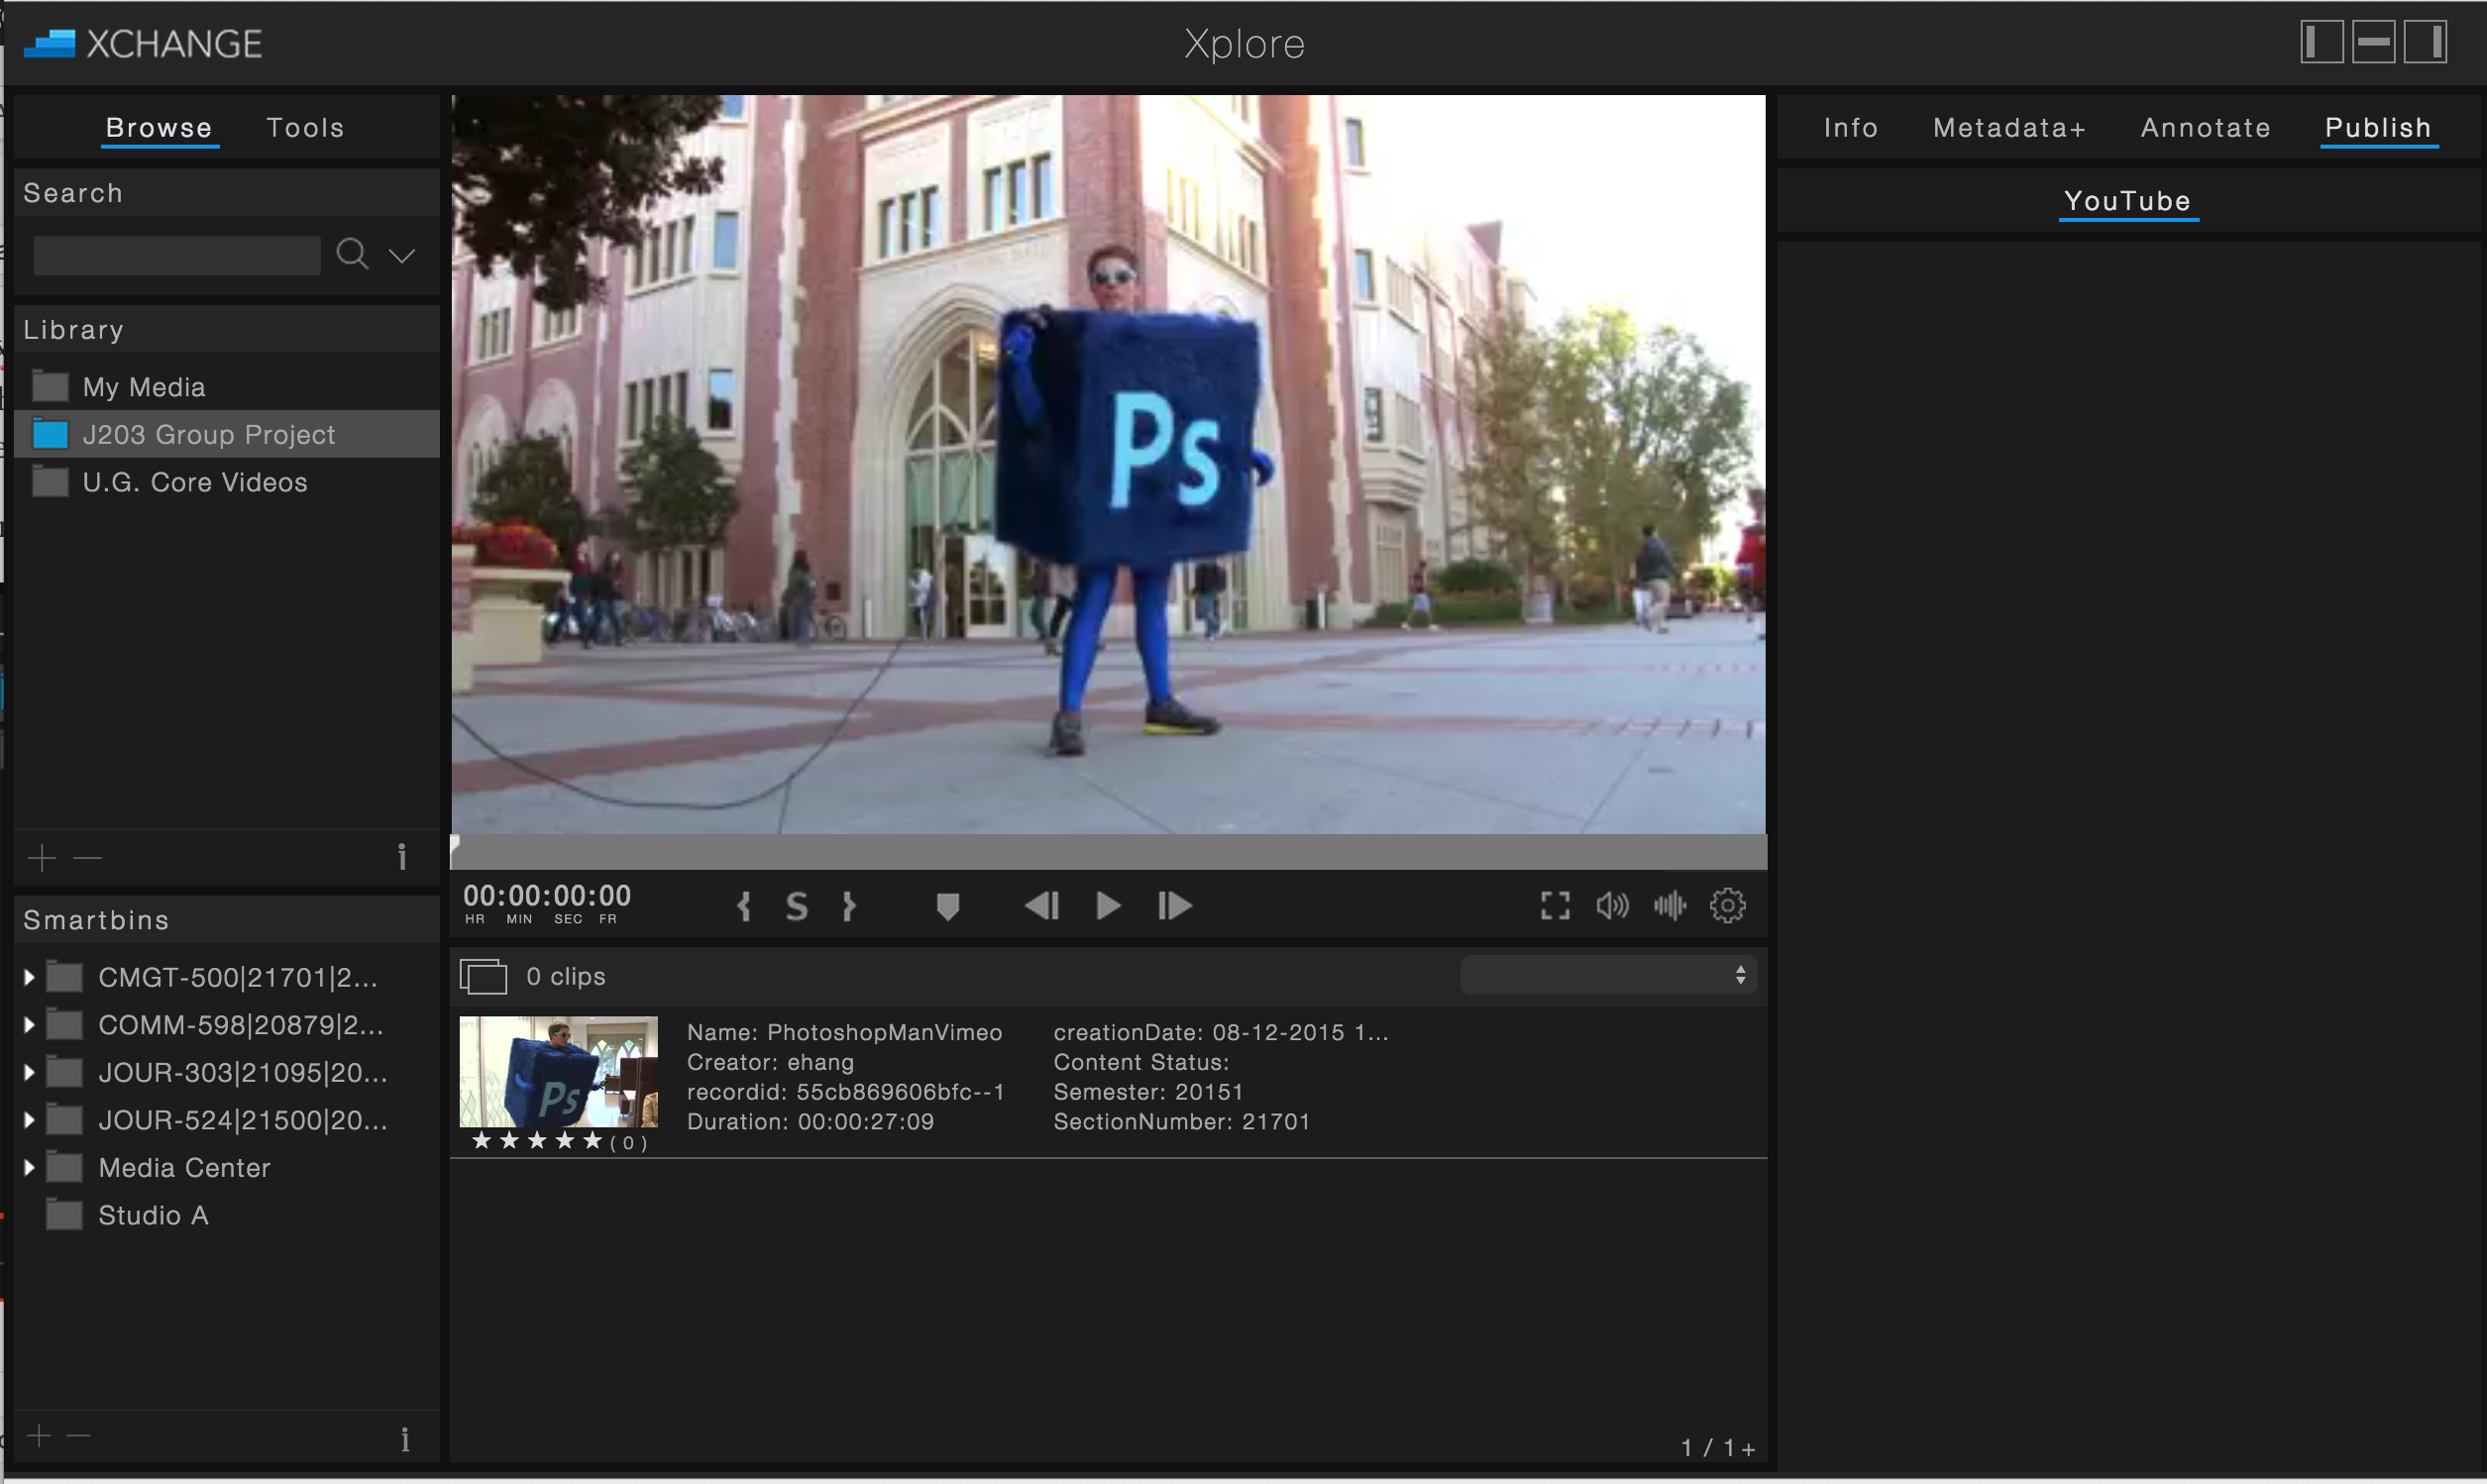
Publishing to Youtube
Any video can be published to Youtube through Xchange easily. Xchange even gives you the link and embed codes and stores statistics on likes, comments, and shares on your video.
1) Find the video you want to publish and click on Publish then YouTube.
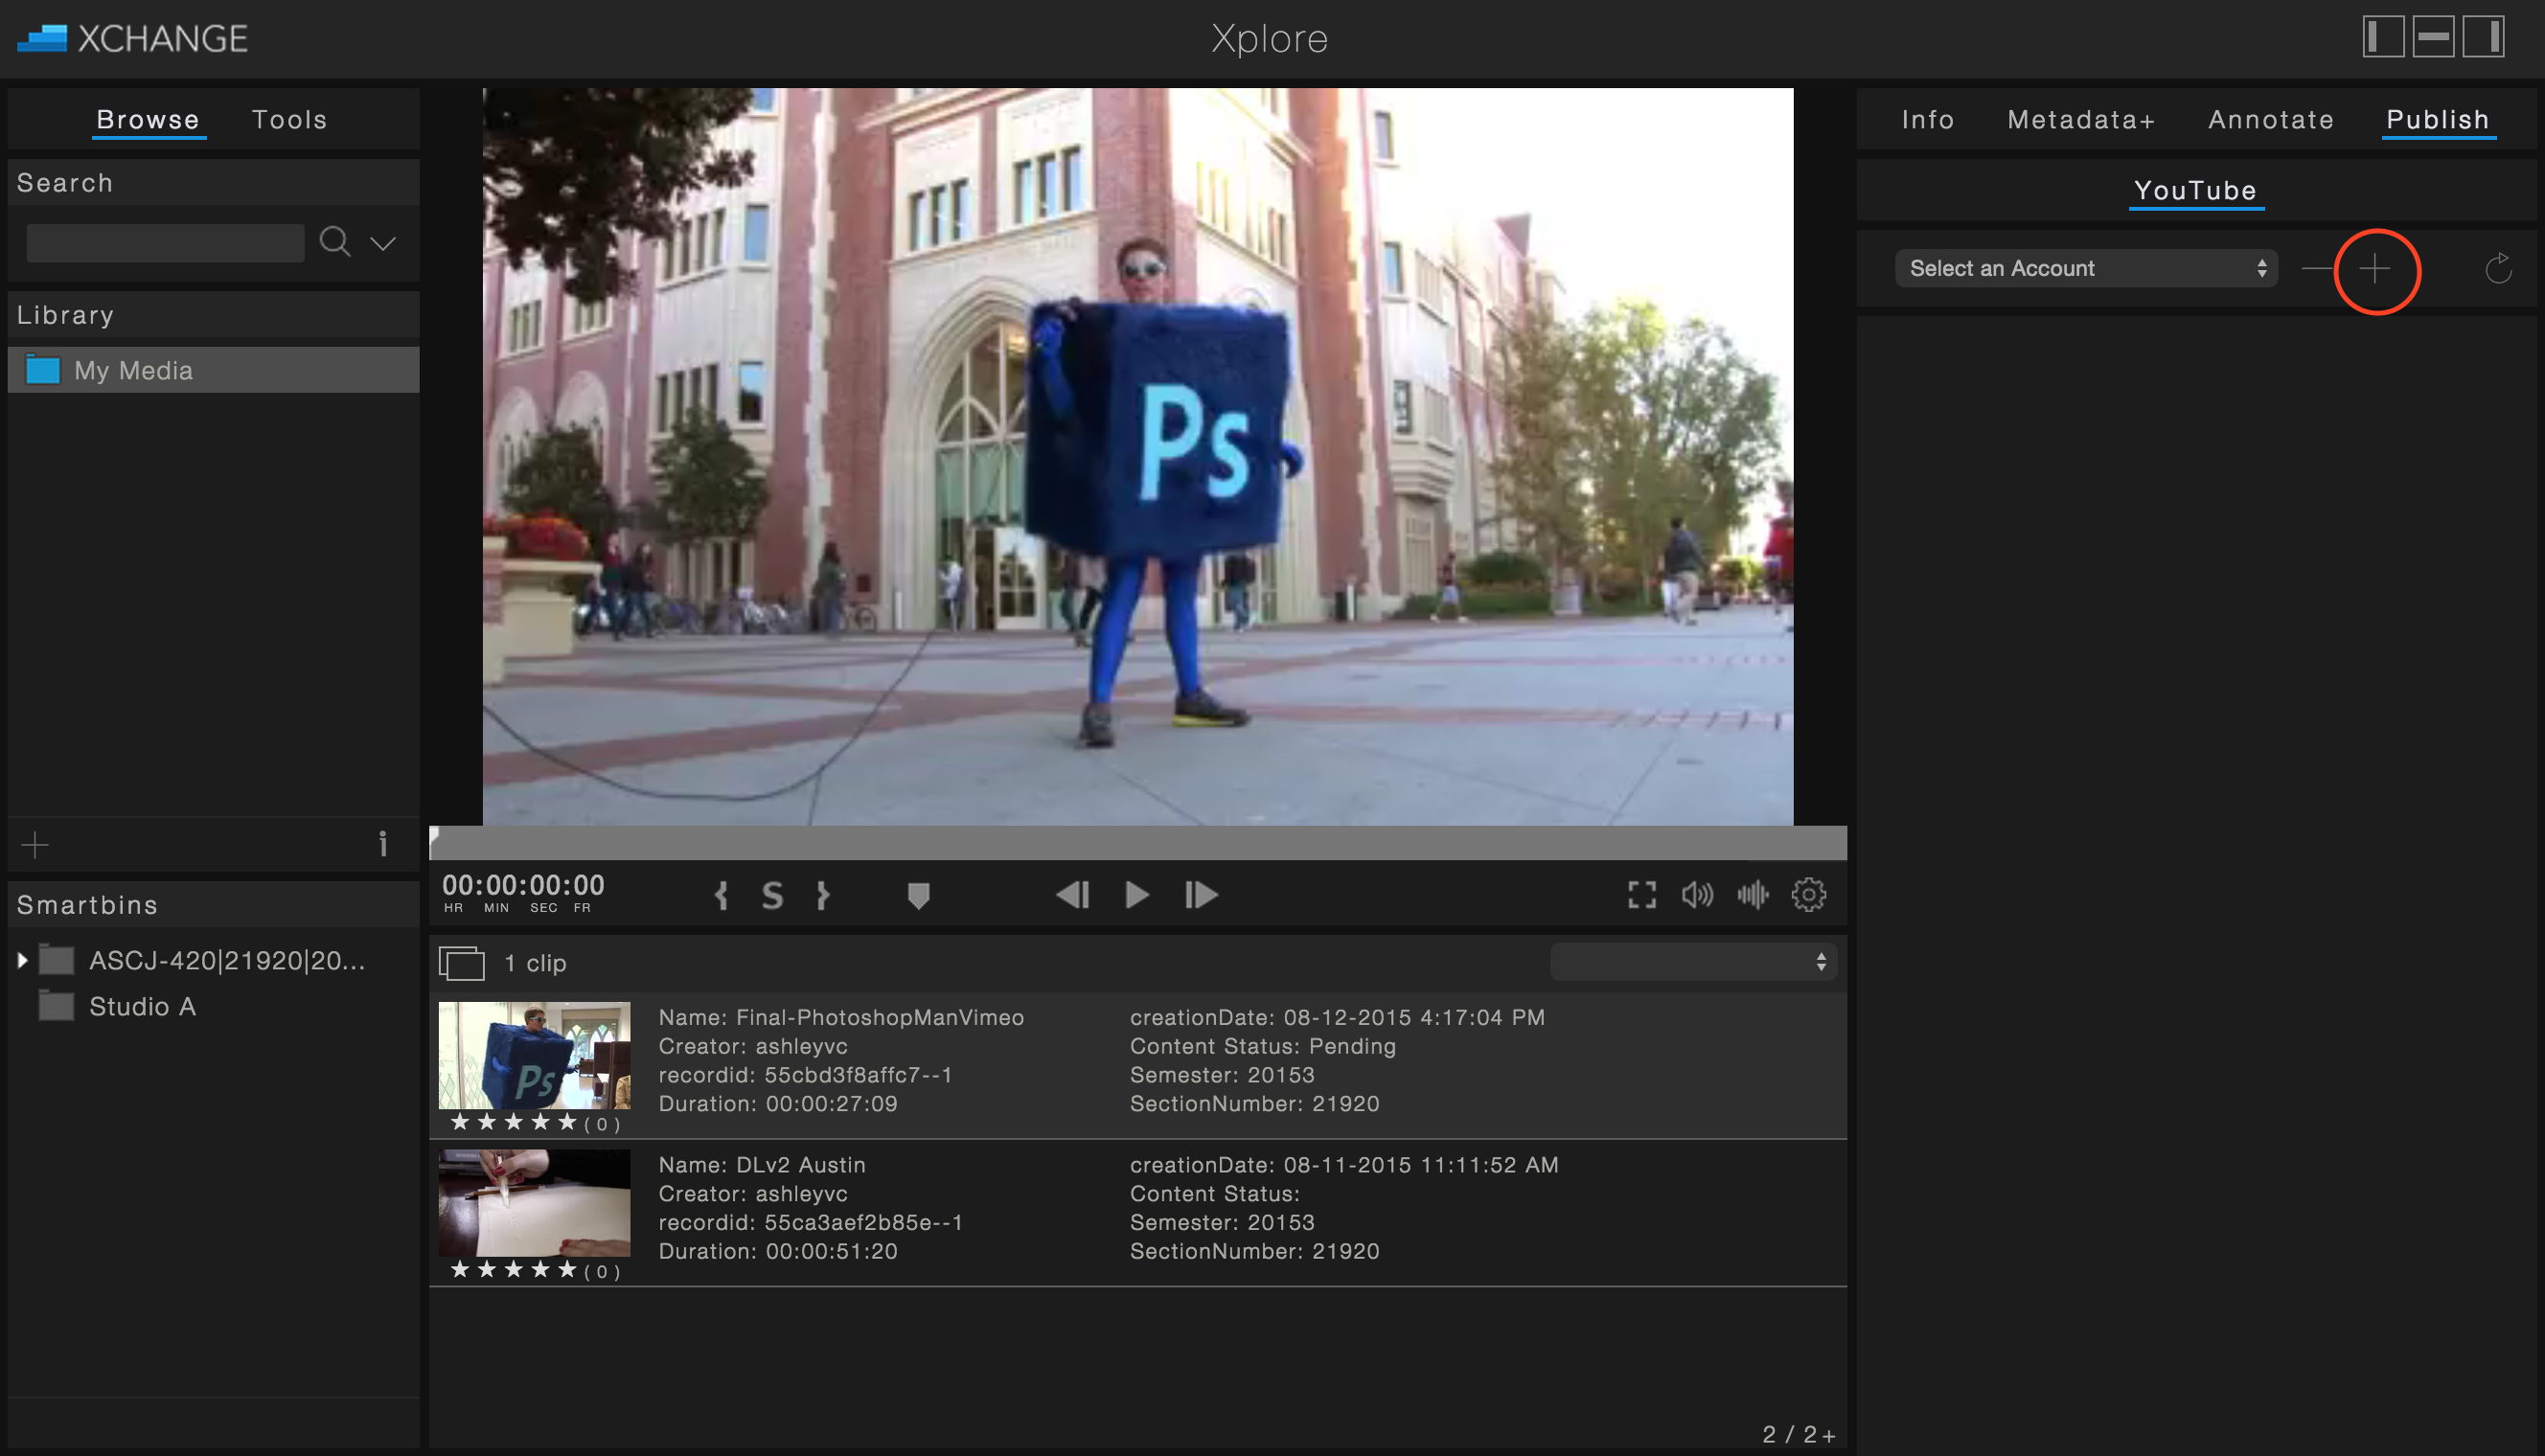
2) Click on the + symbol to add an account.
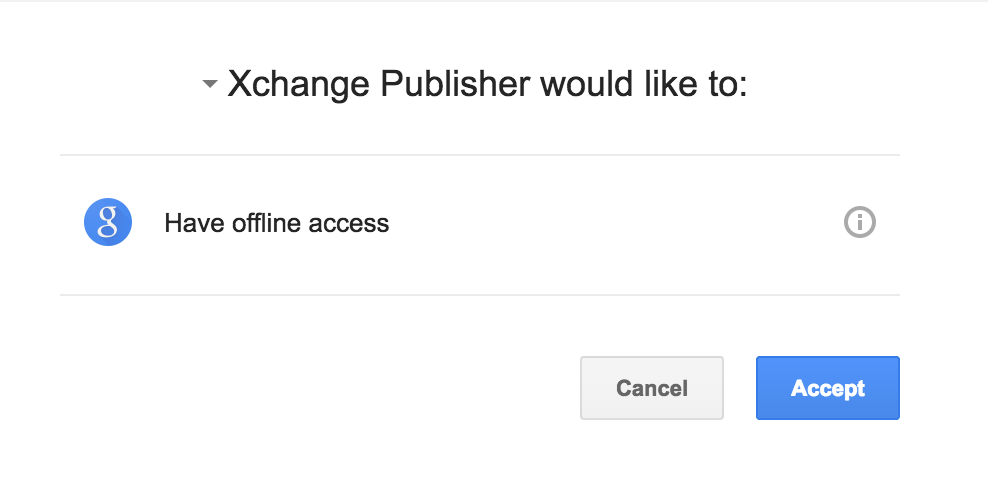
3) If you are already signed into your YouTube account, it will pop up and ask if you’d like the Xchange publisher to have access. If you are not signed in, you will be prompted with the Google Sign-in. Click Accept. You should then see a message that says “Succesfully registered Youtube account!”
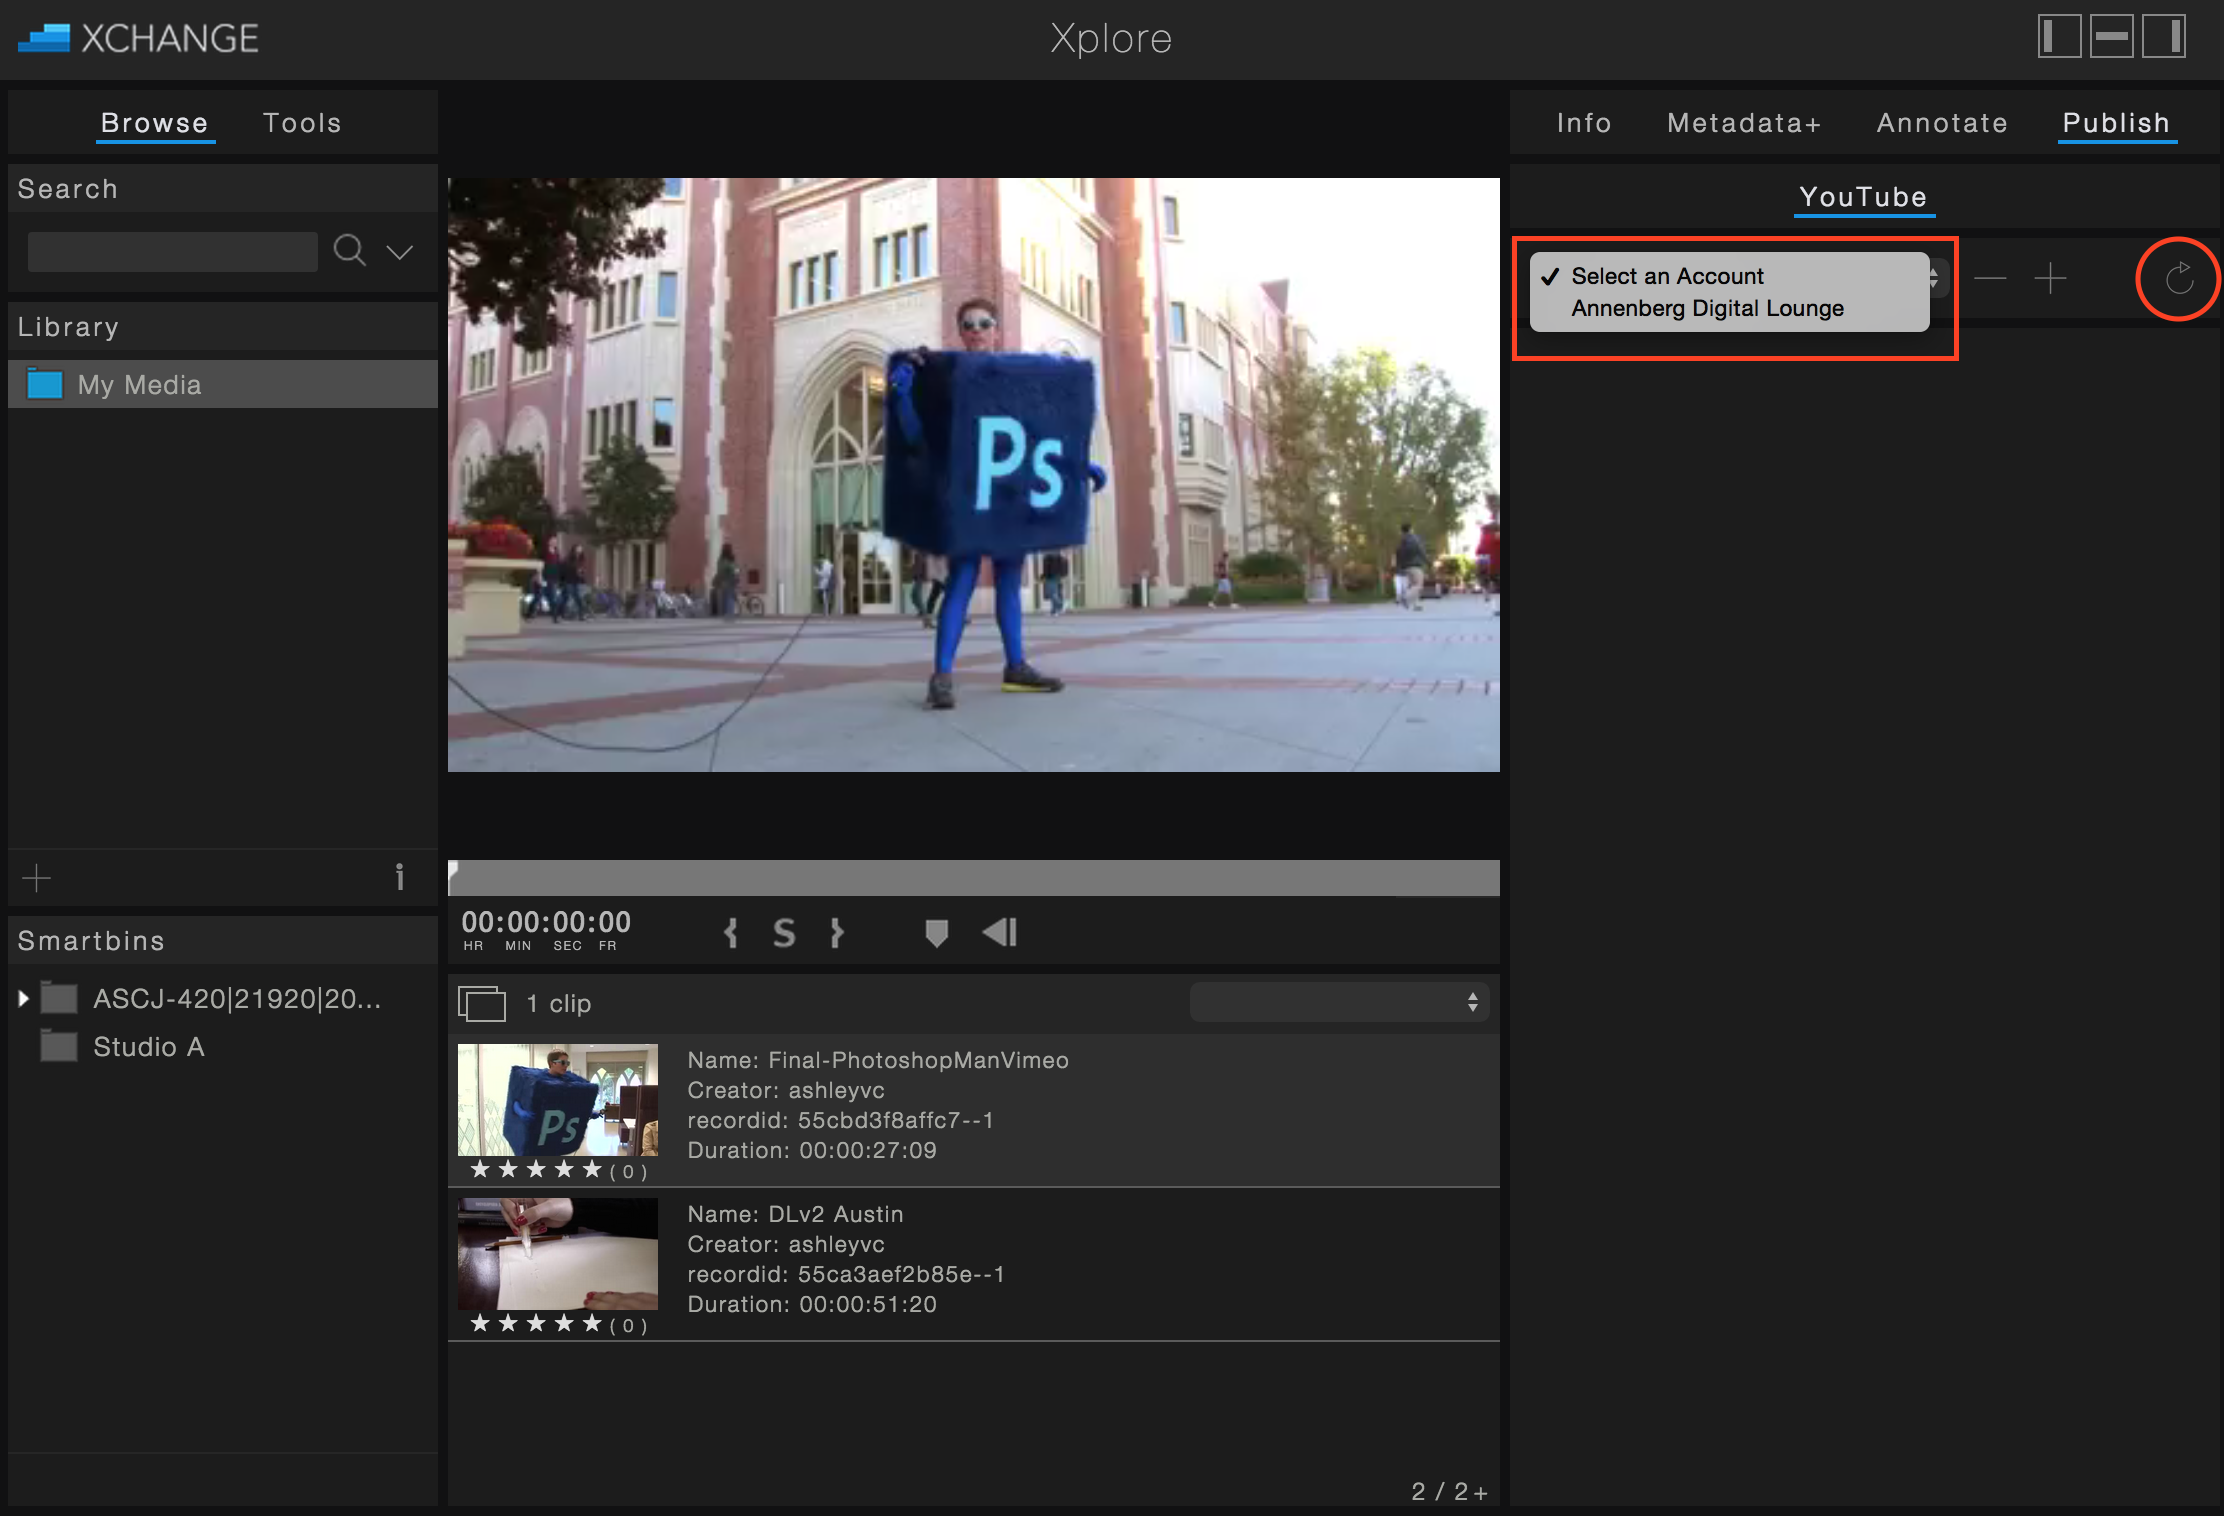
4) Go back to Xchange and click on the Refresh button to see your YouTube account on the list now. Select your YouTube account.
5) Now, you’ll see options to give your video a name, description, and other metadata. Once you’ve filled out everything, click Submit.

6) Now, the sidebar will show you stats for the video as well as give you a link to the video and embed codes.
Attaching Files to Media
In this new version of Xchange, you can now attach related files to your video or audio clip. For example, if you have a PDF of a script that goes along with your video footage, you can now attach that script to your video file in Xchange.
1) Go to the the media file you want to attach a file to and click on Info and then Files.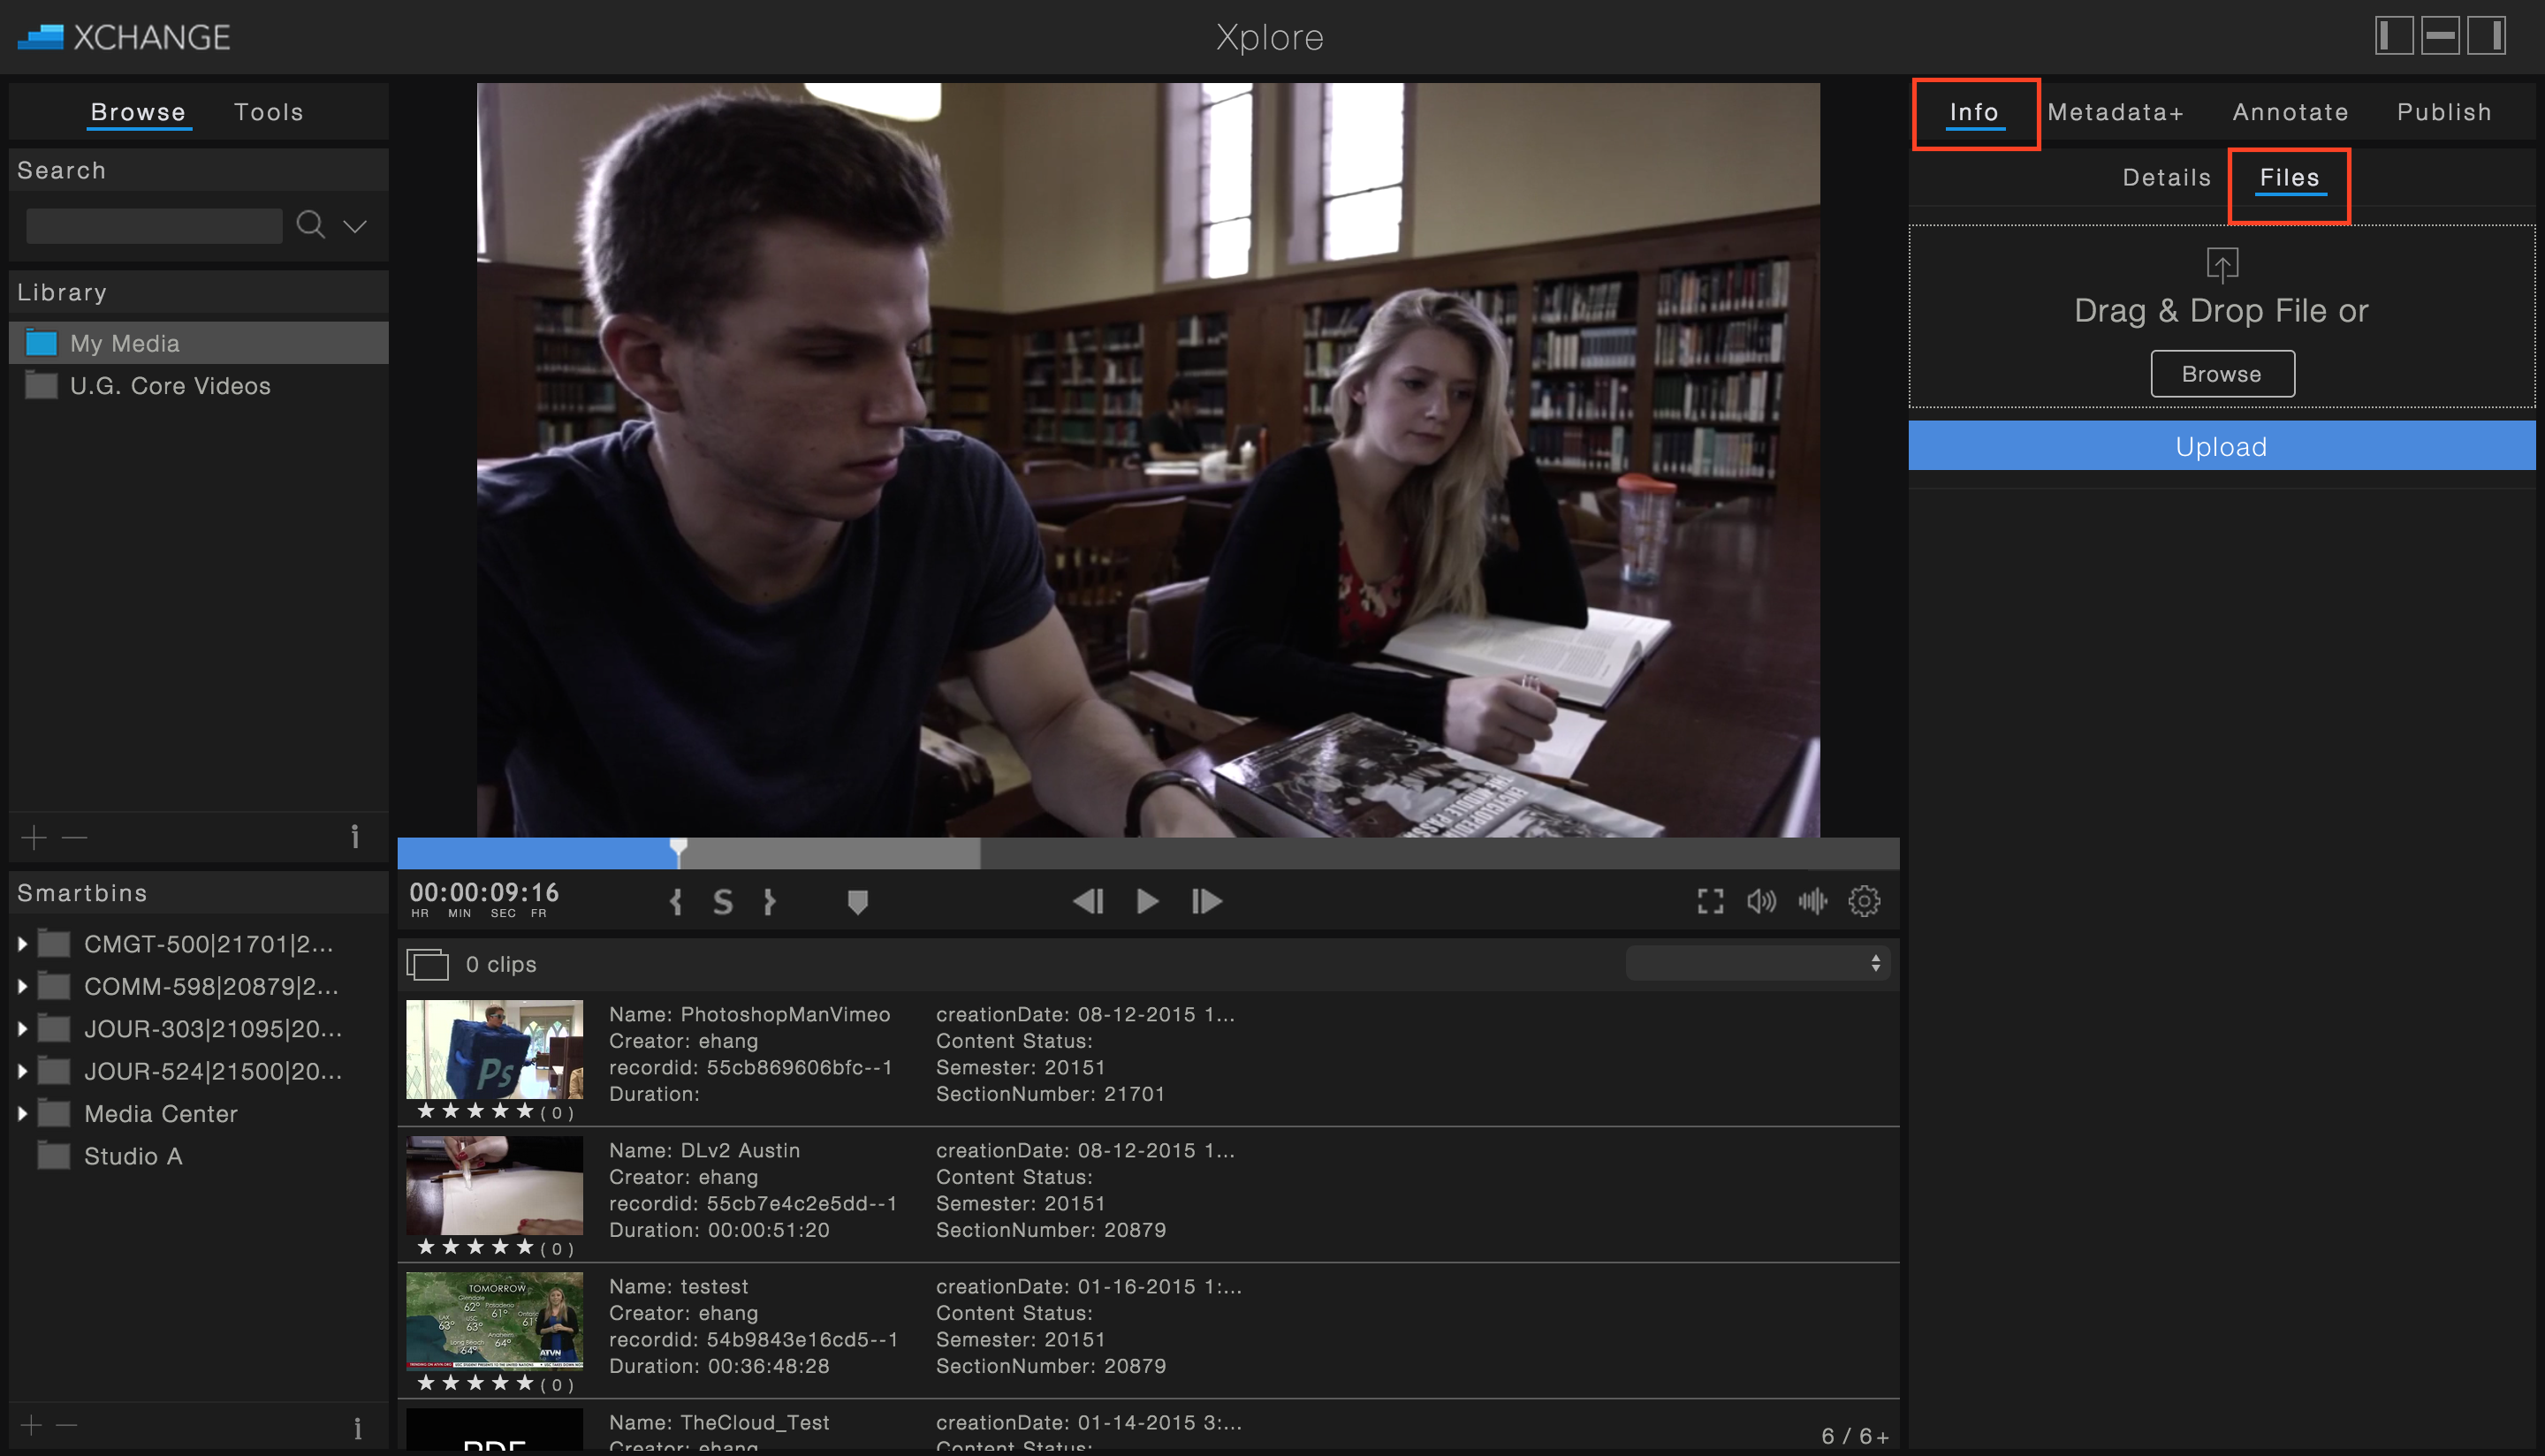
2) Click Browse to find a file on your computer or Drag & Drop a file.
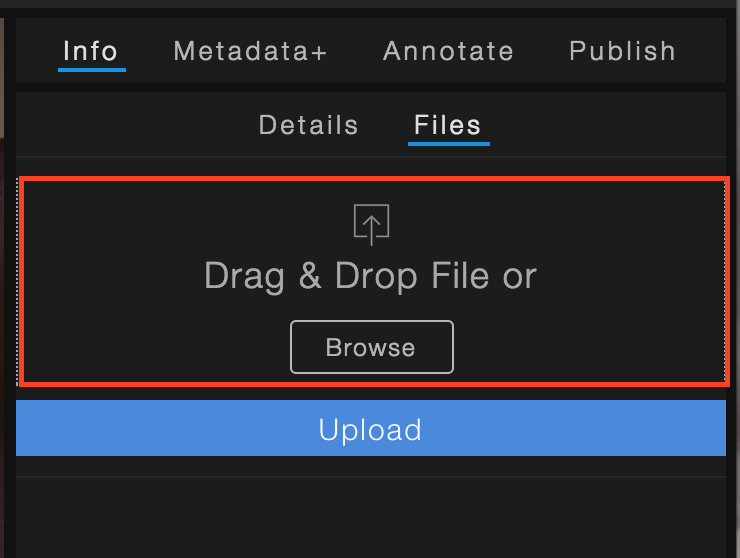
3) Once you’ve found a file, click Upload.
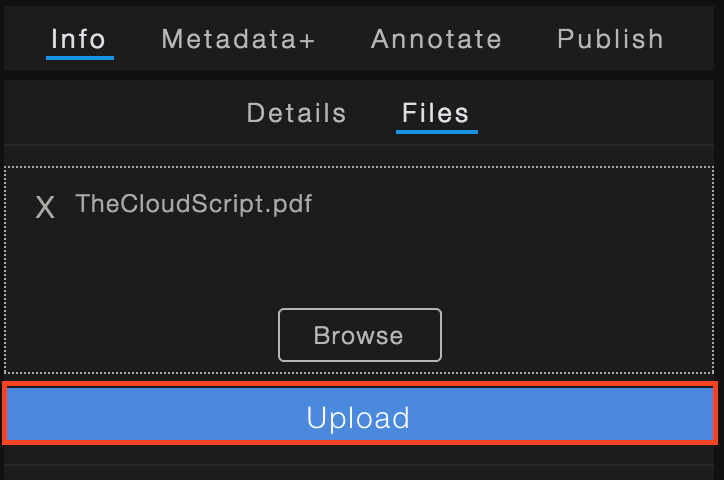
4) Now, you will see the file listed. Now, your professor can download the linked script to view alongside your video.

Creating a Shared Folder
In Xchange 4.0, it’s now possible to create folders in your Library to organize your files or to share specific content with selected classmates or faculty. For instance, if you are working on a group video project, you can create a folder titled “Group Project” and share it with only your 4 teammates.
1) In the Library section of the Xchange dashboard, click on the + symbol.
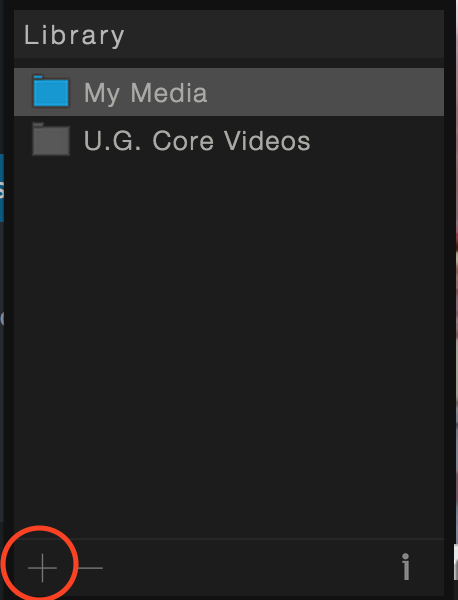
2) A pop-up window will show up. Give your folder a name.
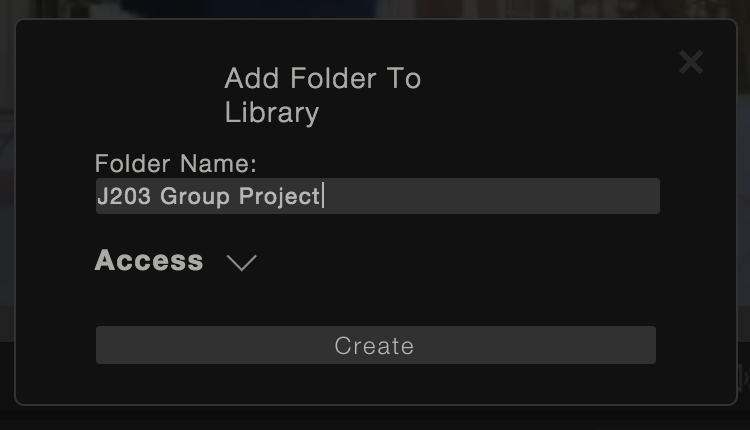
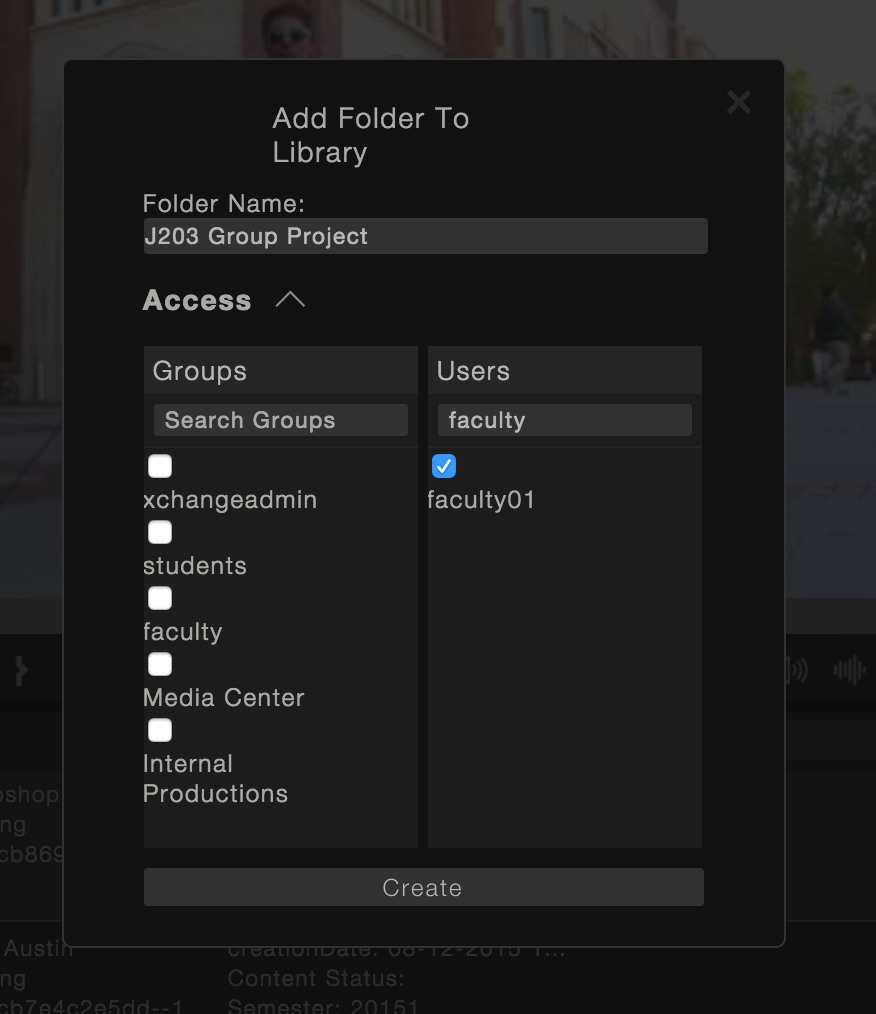
3) Click on the arrow next to Access to select which users you’d like to give access to this folder. Under Users, you can search for users. Then, you can check mark their name to add them. Continue doing this until you have check marked all the users you want! Then click Create.
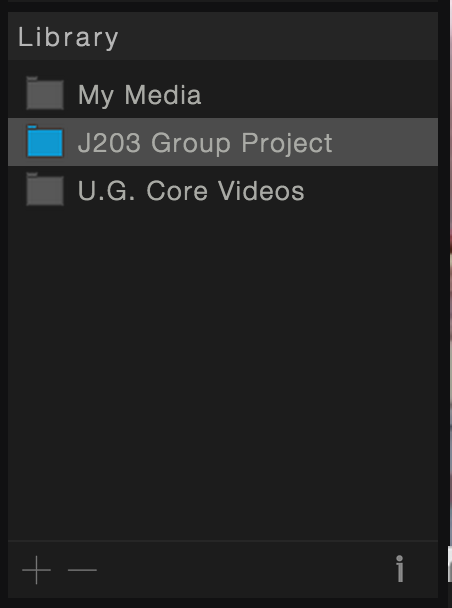
4) The folder now appears in your Library.
5) You can add any media from your My Media folder to your newly created folder by dragging it. This will not remove your file from My Media, but create a link to that file.
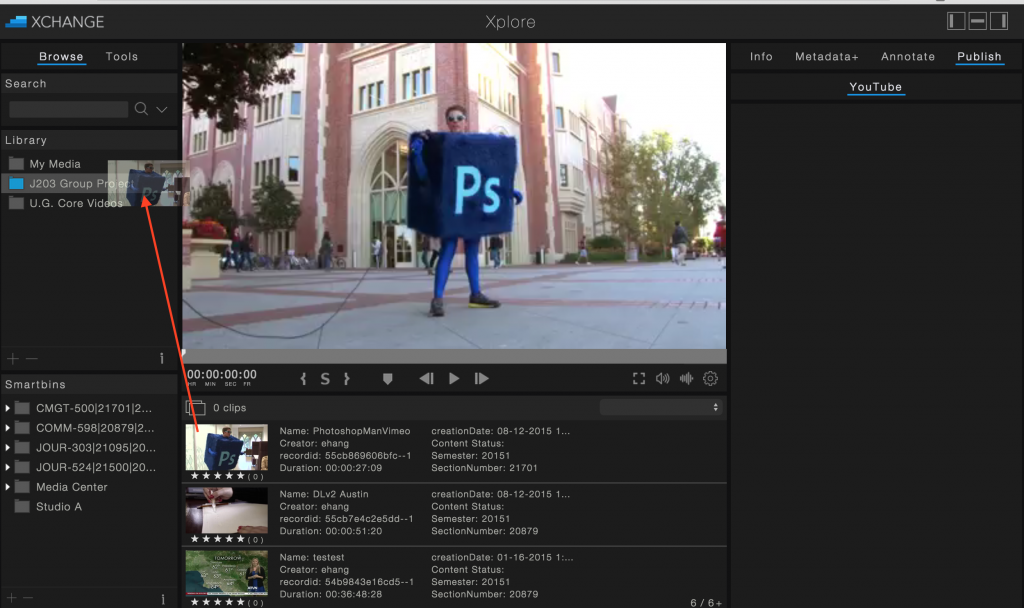
6) Notice, the PhotoshopManVimeo File is now in the J203 Group Project and all your selected users can now see this folder.
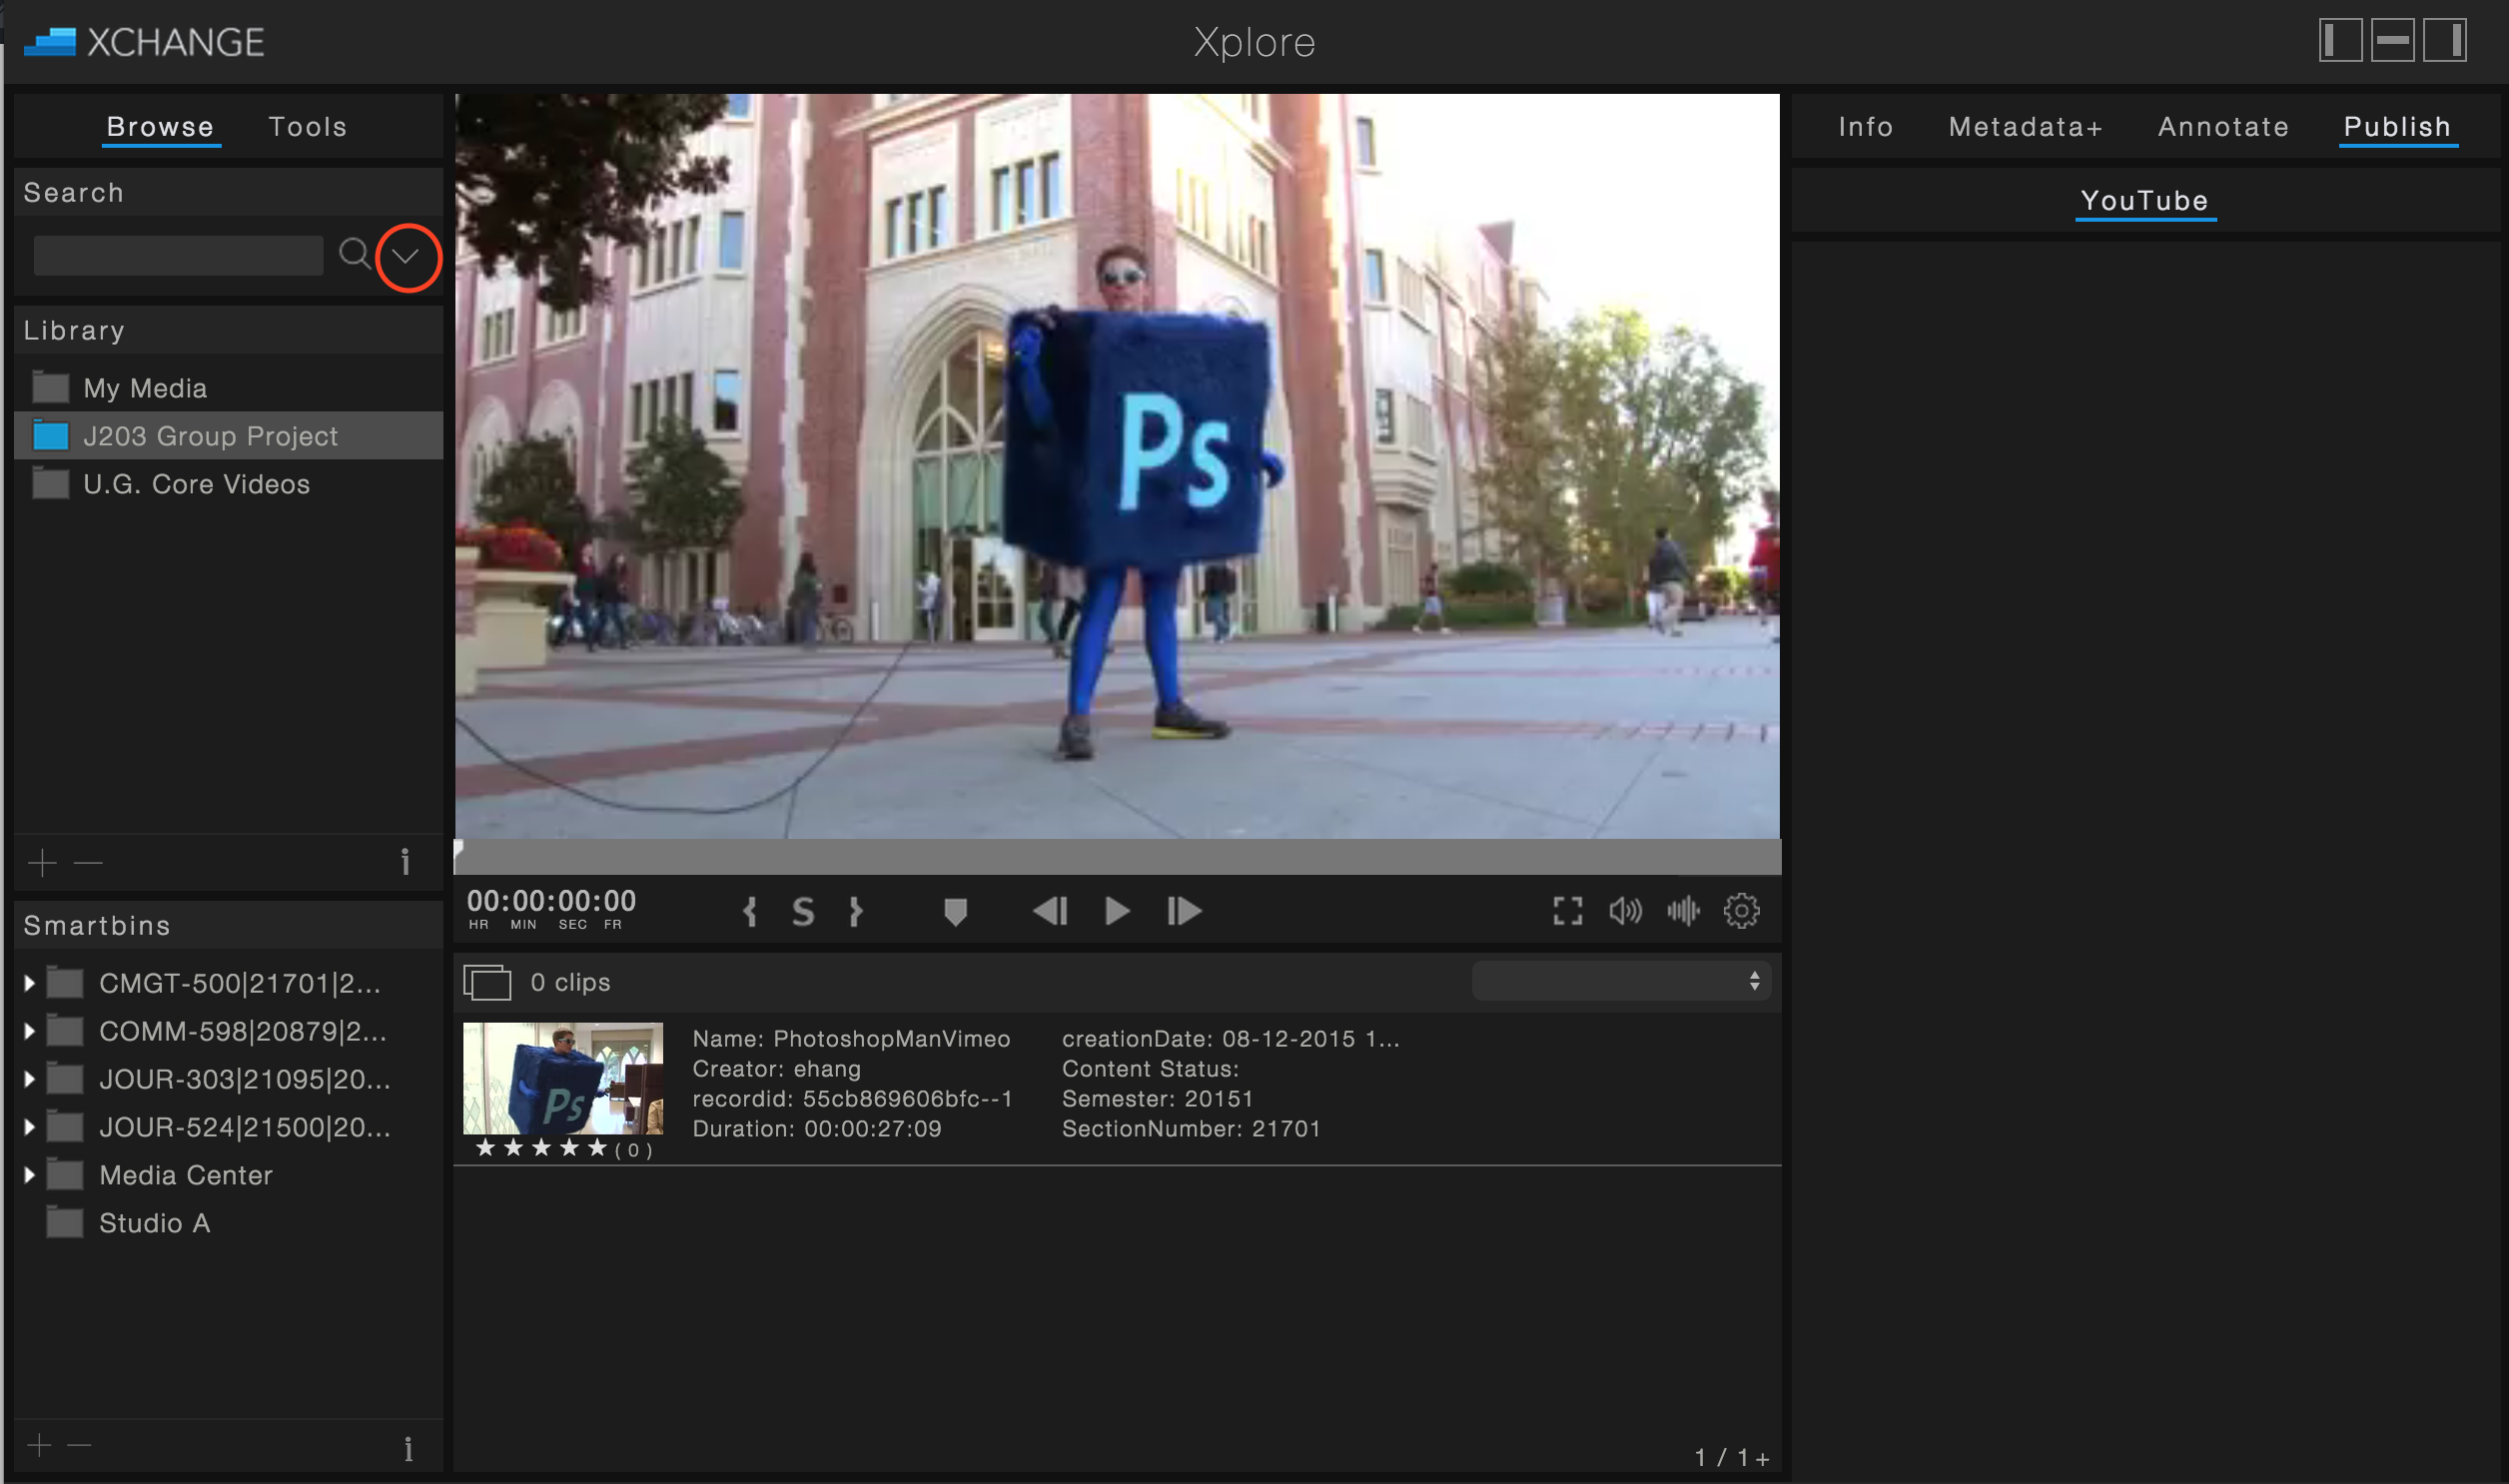
Searching Through Xchange
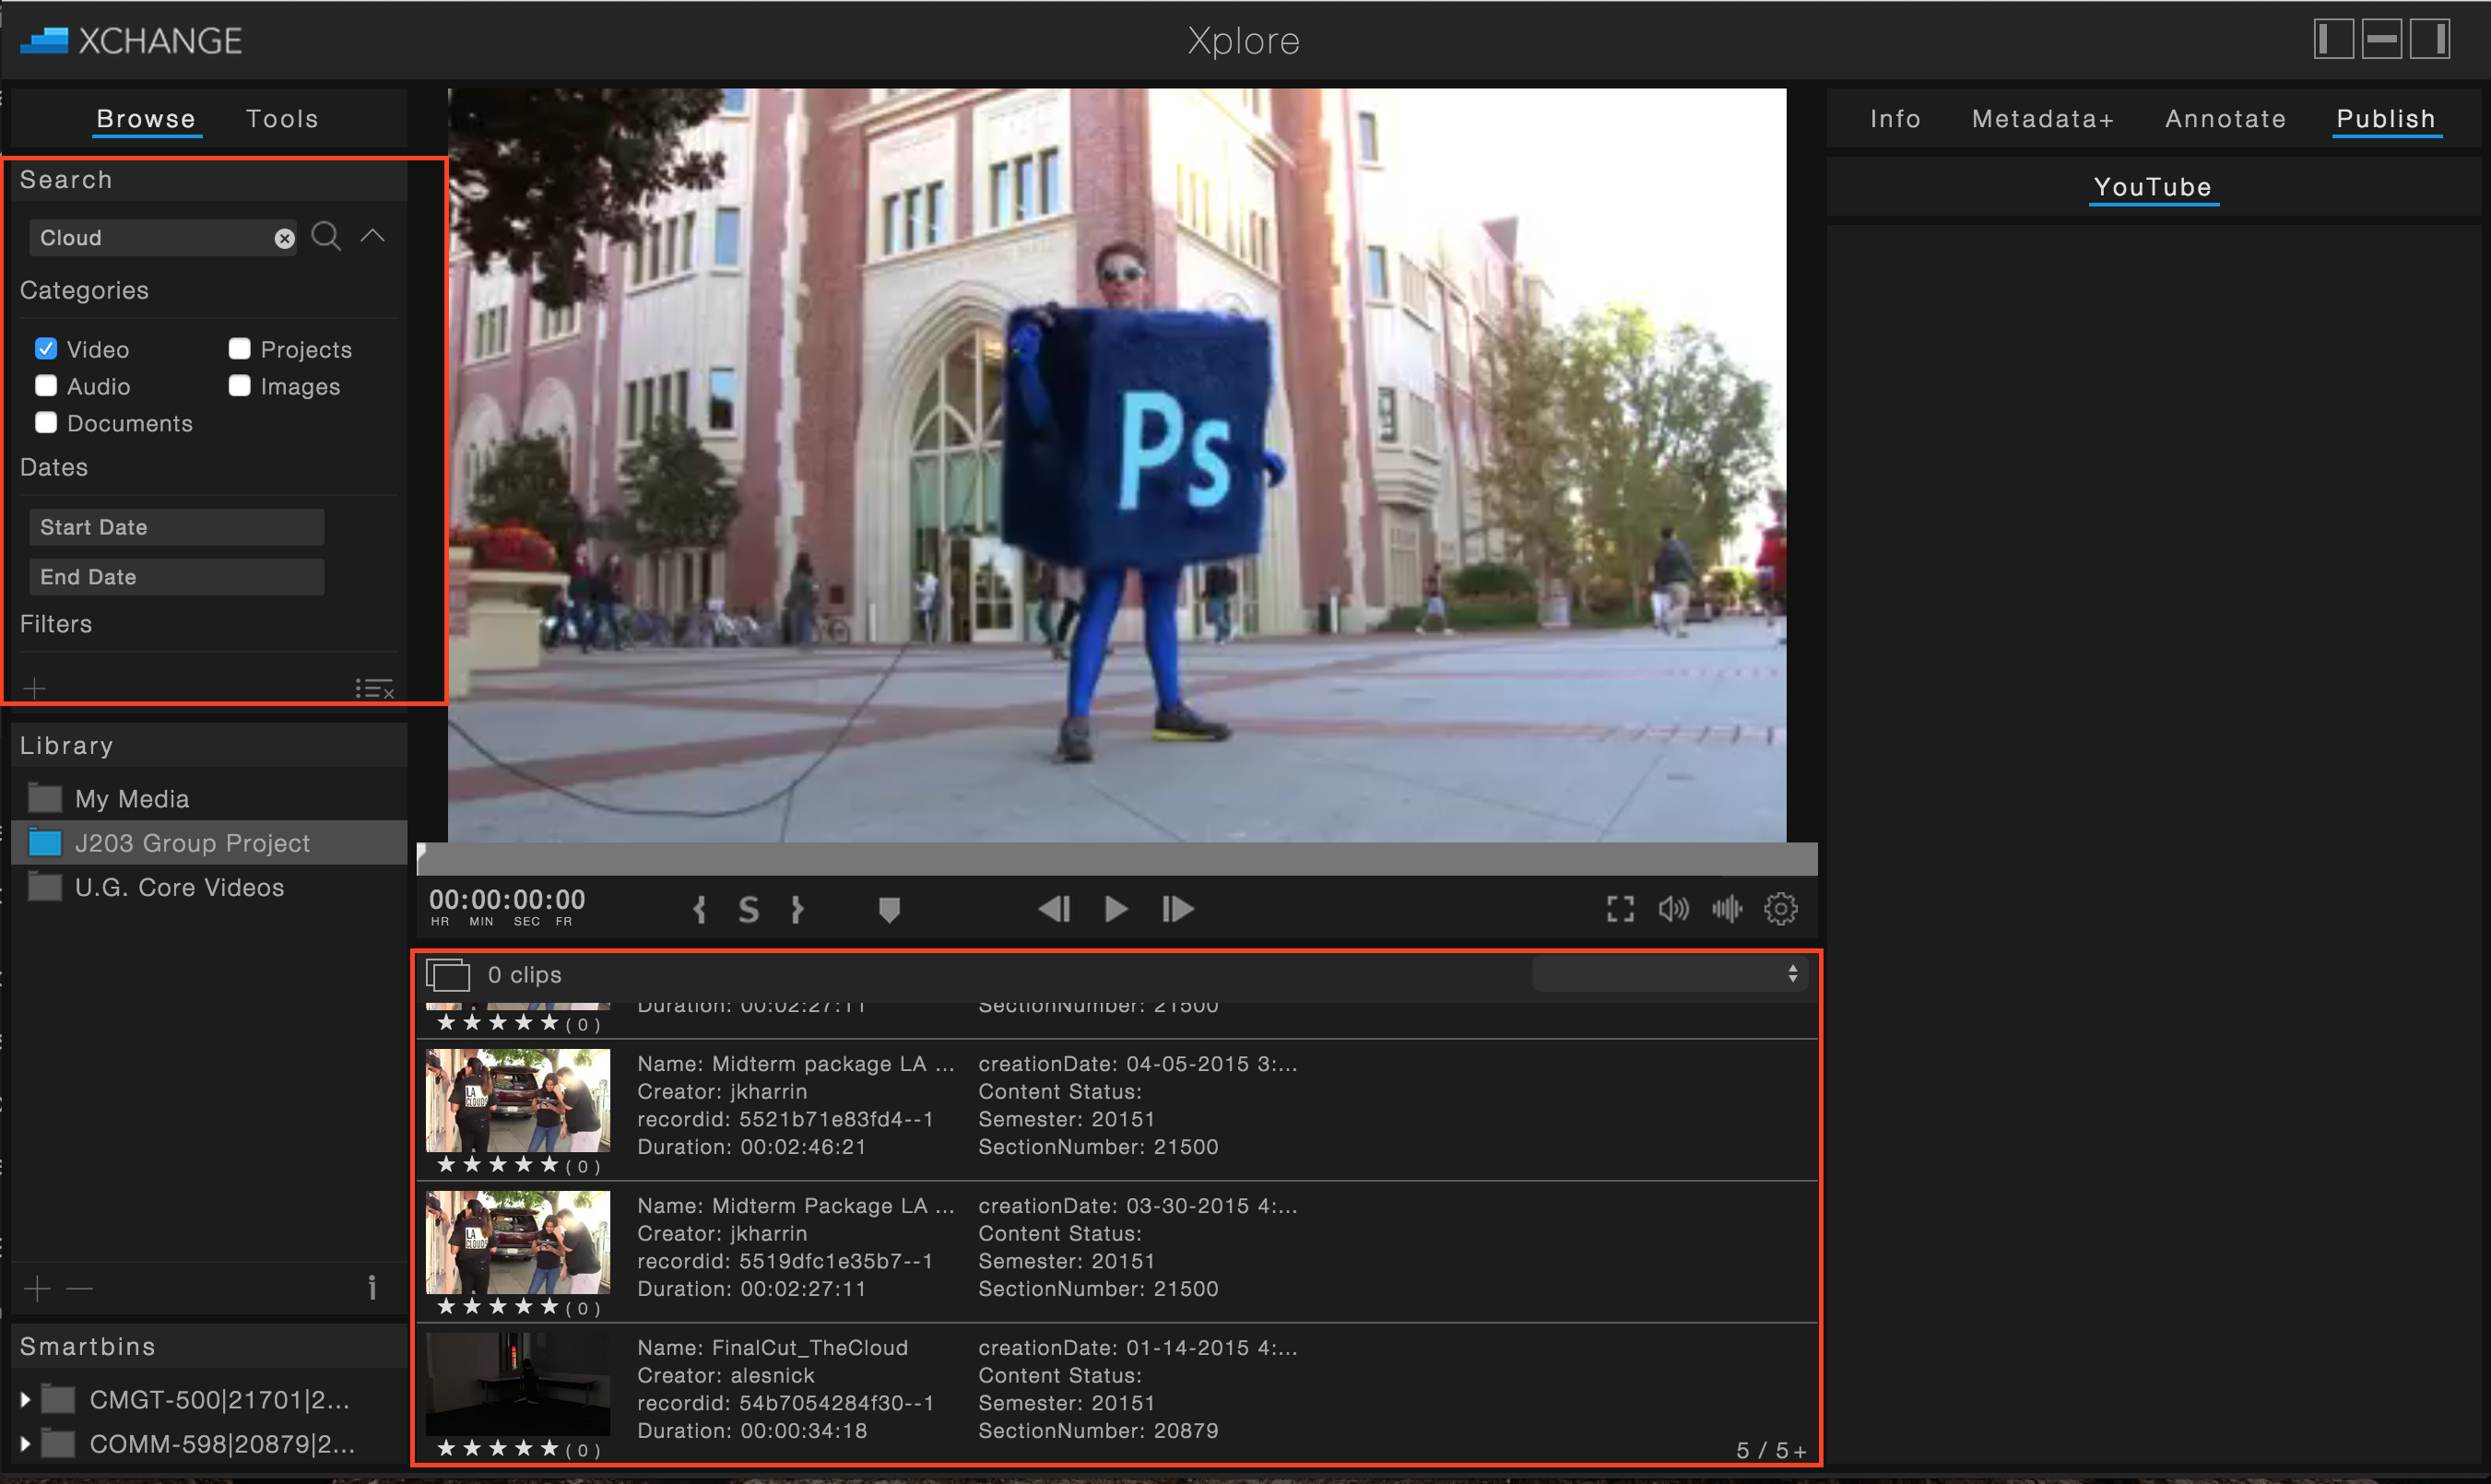
In addition, you can search the entire Xchange server to find the file you need.
1) Click on the drop down menu over by the Search bar.
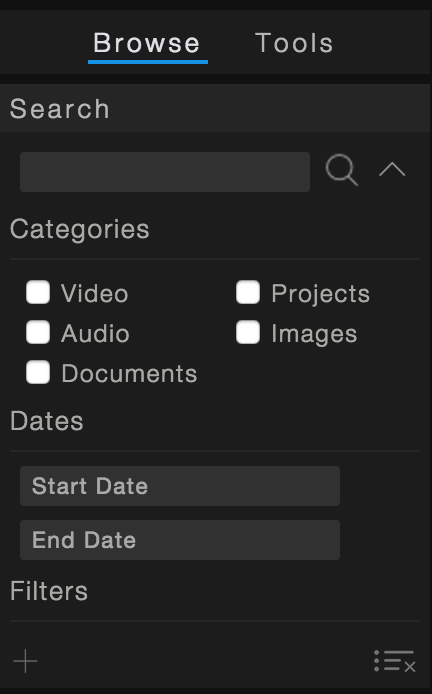
2) Use Categories to narrow down your search to specific files types. Type in the Search bar and hit Enter or click on the magnifying glass to begin the search. A list of clips will show up below with the results.
3) See an example below. We searched for all “Cloud” videos. Note: You can also use Dates and Other Filters to narrow your search further.