Topics
Introduction
This tutorial is for students who have received a fully-hosted FTP site for their course. If you received a WordPress site, please visit our ASCJCapstone WordPress tutorial here.
The FTP site you received is hosted on USC Annenberg’s subdomain, ASCJCapstone.com. Students’ final projects will be created on these websites. While a template is pre-loaded onto the server to provide a baseline for all ASCJCapstone FTP sites, some experience hand coding HTML and CSS will be necessary to customize and add content to your site. The .css and .html files you’ll be editing are well commented and should help you navigate to relevant sections on your own, but we’ll cover a few main ideas in this tutorial.
Since your site is managed and owned by USC Annenberg, no additional security is necessary and the server is backed up weekly. Please ensure that your images and videos are compressed to an appropriate size before uploading them to the site.
This tutorial will guide you through accessing and setting up your website.
Accessing Your Site (For the First Time)
Depending on the timing of your course, you will receive an email from support@ascjcapstone.com sometime during the semester with your account credentials to access your site.
If you did not receive an email, please contact us at support@ascjcapstone.com (using your USC email address) with the course you’re enrolled in and your professor’s name.
You will need an FTP client to connect to your site. In this tutorial we’ll use Cyberduck, a free FTP client available for both Windows and Mac
Add a Connection Point
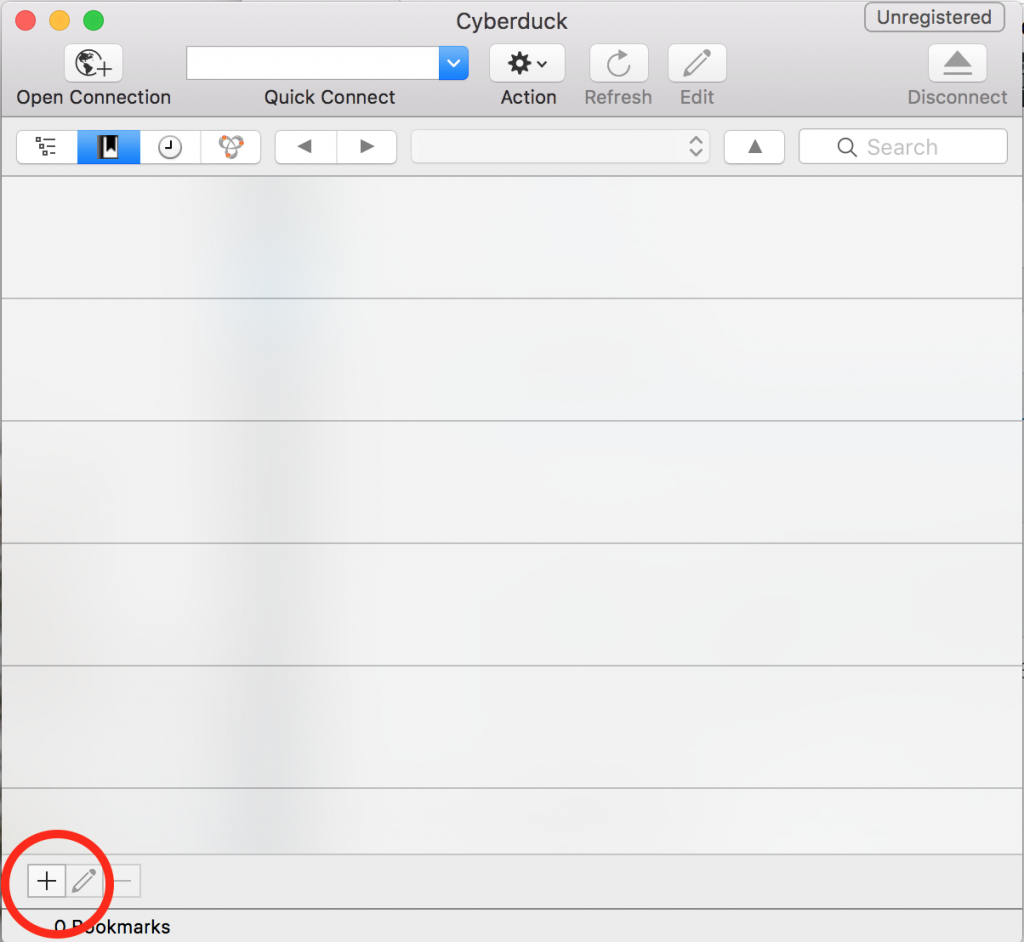
After launching Cyberduck, click on the + sign (circled in red) in the bottom left hand corner.
Make sure to use FTP (File Transfer Protocol)
Make sure the dropdown menu at the top shows you’re using FTP.
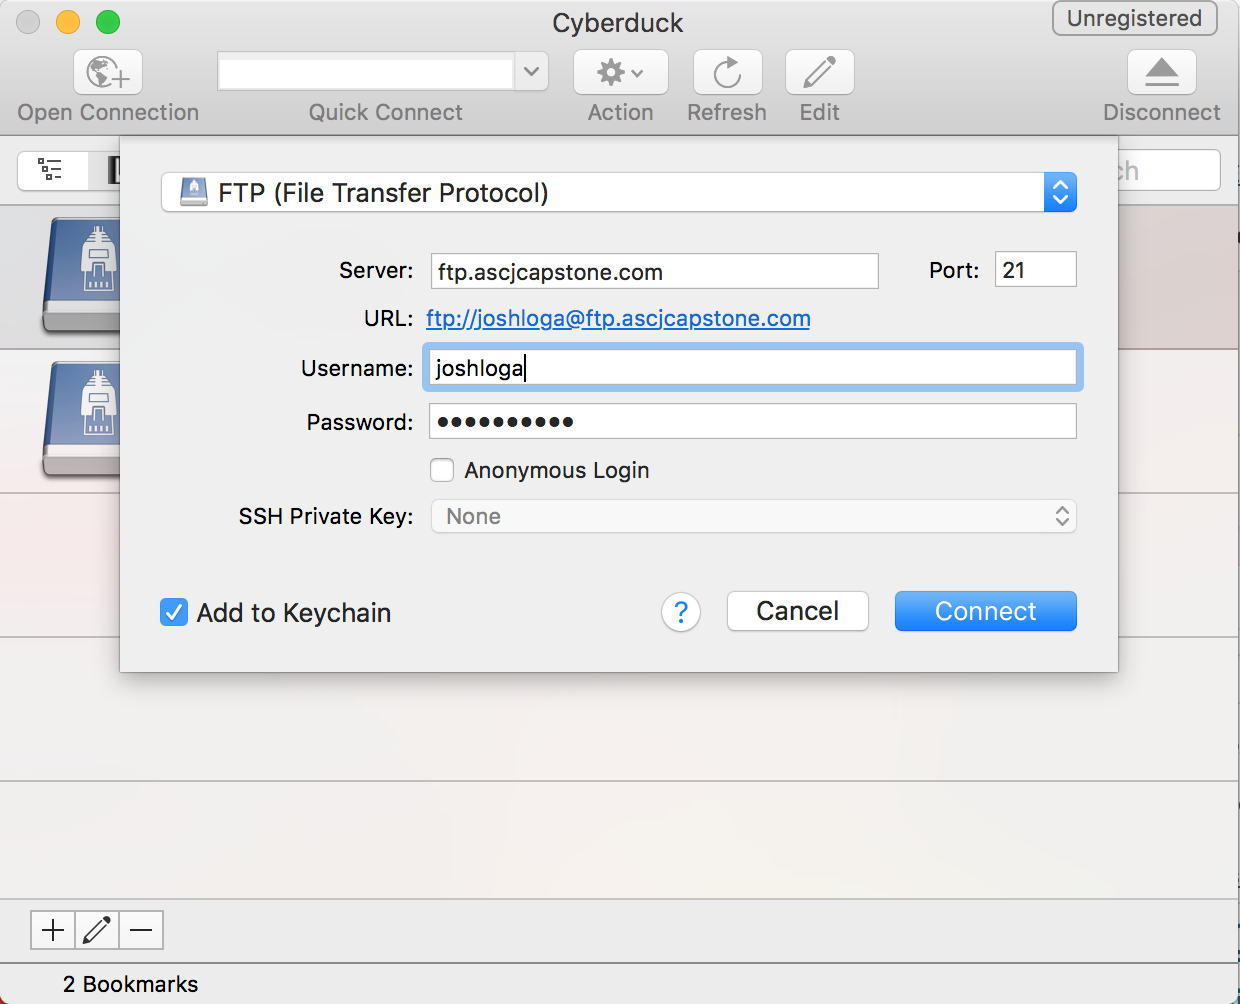 Enter your FTP Server and Username
For FTP Server, it is often ftp.yourwebsite.com. To access your ASCJCapstone FTP server, we’ll use: ftp.ascjcapstone.com.
The email you received from support@ascjcapstone.com with your account credentials will have listed your Username and Password. Your FTP username will be the prefix of your USC Email (i.e., if your email is ttrojan@usc.edu, your username is ttrojan).
Click Connect to open a connection with the ASCJCapstone server.
Note: You may get a dialog box that says “Unsecured FTP Connection” and ask you to switch to FTP-SSL, click on Continue.
Editing Your Site Template
Once you establish an FTP connection, you’ll see several files already in your folder. This is your site’s template, providing the framework for the content of your final project. Since this template is pre-loaded, you won’t need to hand code every element of your site and instead can focus on customizing it’s design and content.

To begin editing your site, it’s recommended to download these template files and edit a version on your local machine, rather than edit your site live on the server. Once you’ve tested your changes locally you can re-upload the files via your FTP client so that your hosted FTP site is up to date.
To download your site files and begin editing, select all the template files and click Action > Download

Note: You’ll also need to download a free text editor like TextWrangler (Mac only), Sublime(Mac & PC), or Brackets (Mac only).
Previewing Your Site Changes
While editing the site files you just downloaded you may want to preview your changes and test whether or not your additions were made successfully. To do this you can simply navigate to the index.html file found in your site template files and open it in your web browser. Your browser will display a locally hosted version of your site, loading data from the local site files and folders you downloaded instead of from your ASCJCapstone FTP site. You can use this to test and preview your site changes before uploading them via FTP to your ASCJCastone FTP site.
Customizing the Look of your Site
The majority of the changes you make to your site’s look and feel will be done by editing the student.css file, located within the css folder of the site template files you just downloaded. This student.css file has been custom created for this template, allowing you to change the styling of your site while keeping the main styles.css file that governs the rest of your site unedited.
Changing Colors and Fonts
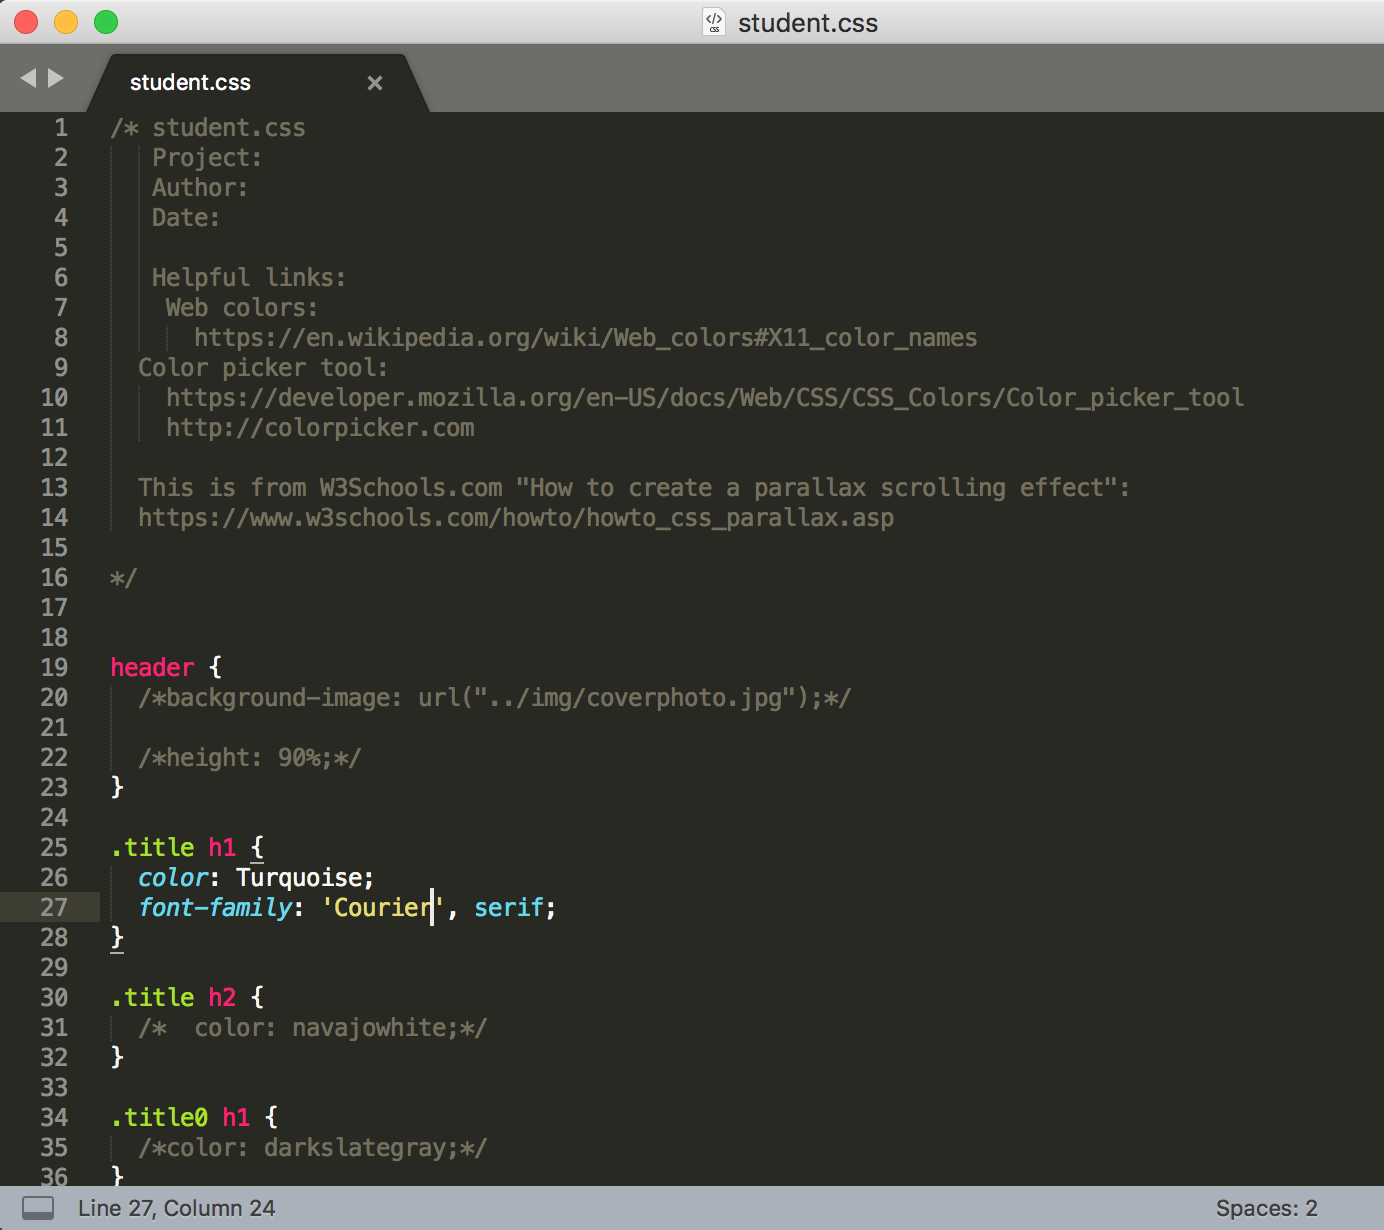
For this tutorial, let’s change the font and color of our site’s title by opening the student.css file in our text editor and navigating to .title h1 element. The current values and properties, as written in the main styles.css file, are shown commented (/* example comment;*/), in this case showing the h1 header color as “blanchedalmond”.
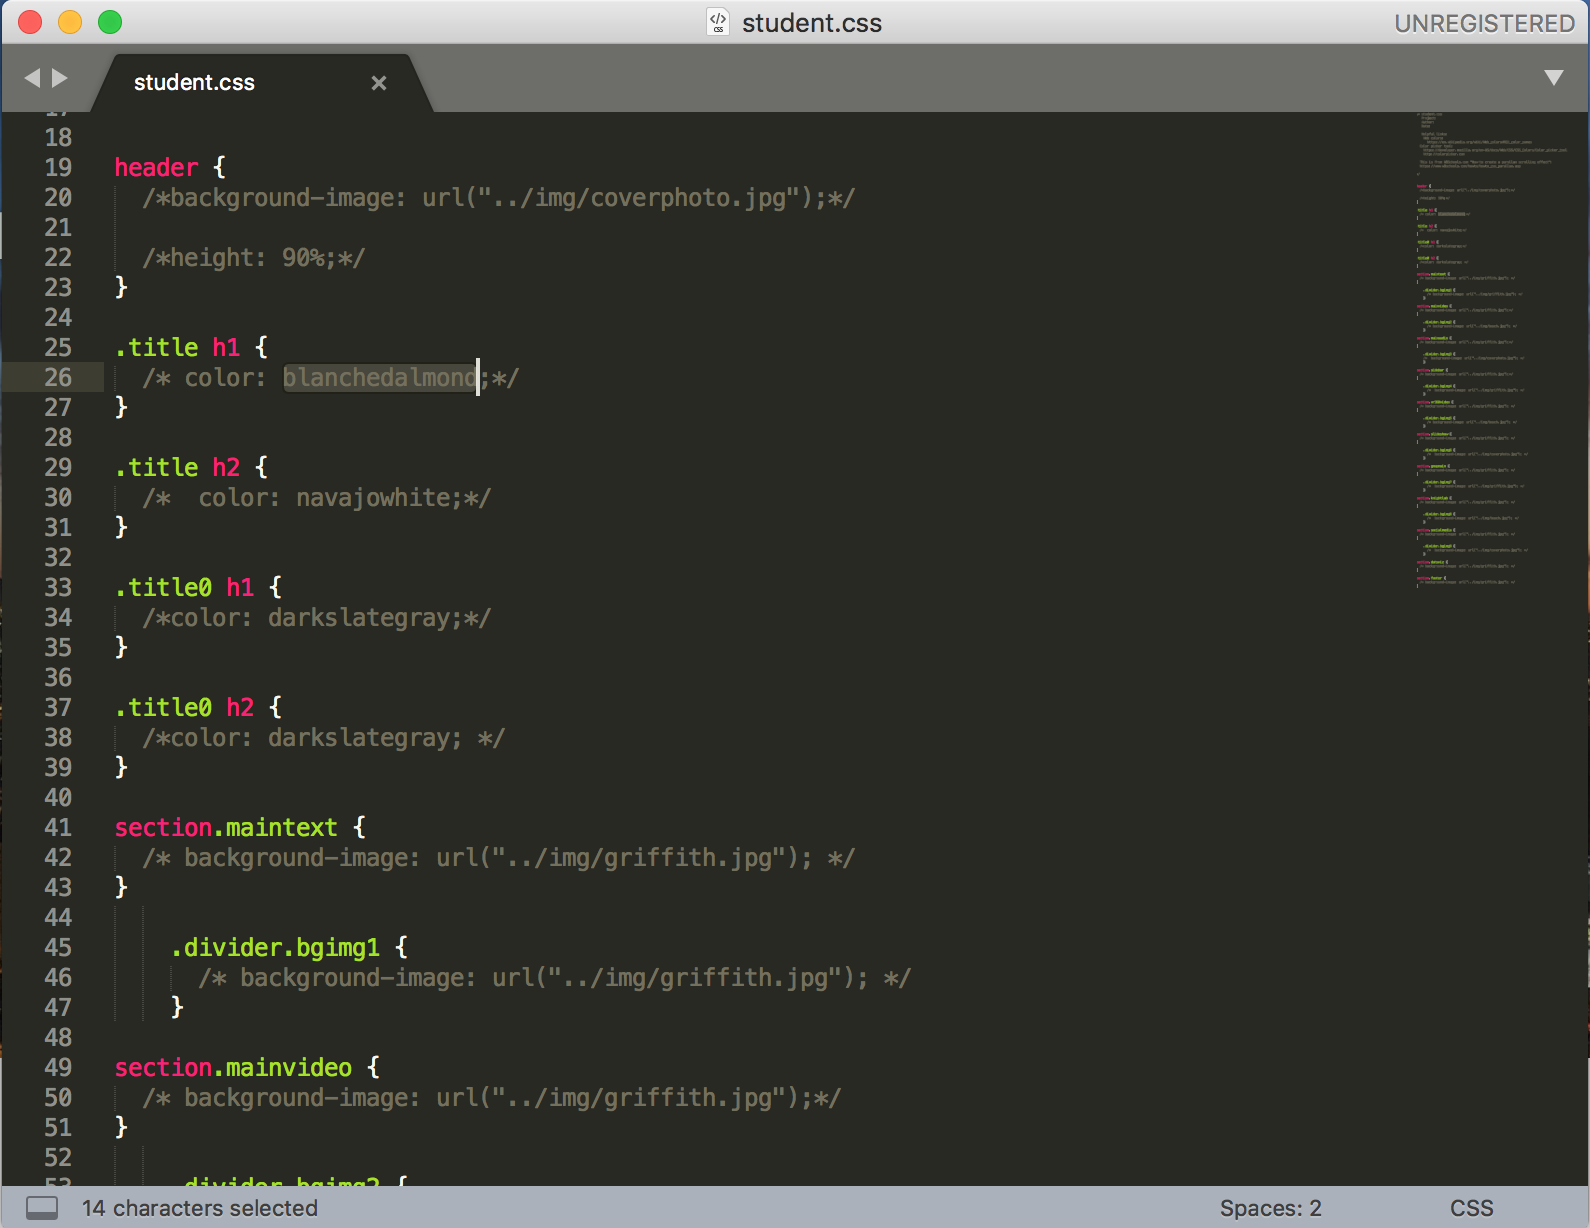
Remove this comment and add in the font family and color properties to change the font and color for our page title to a font and color of your choice.
Save the student.css file to preserve your changes, and then find the index.html file in your downloaded site template files. Open index.html in your web browser to preview the changes you just made to the color and font of your site headline.

Change and Add Media
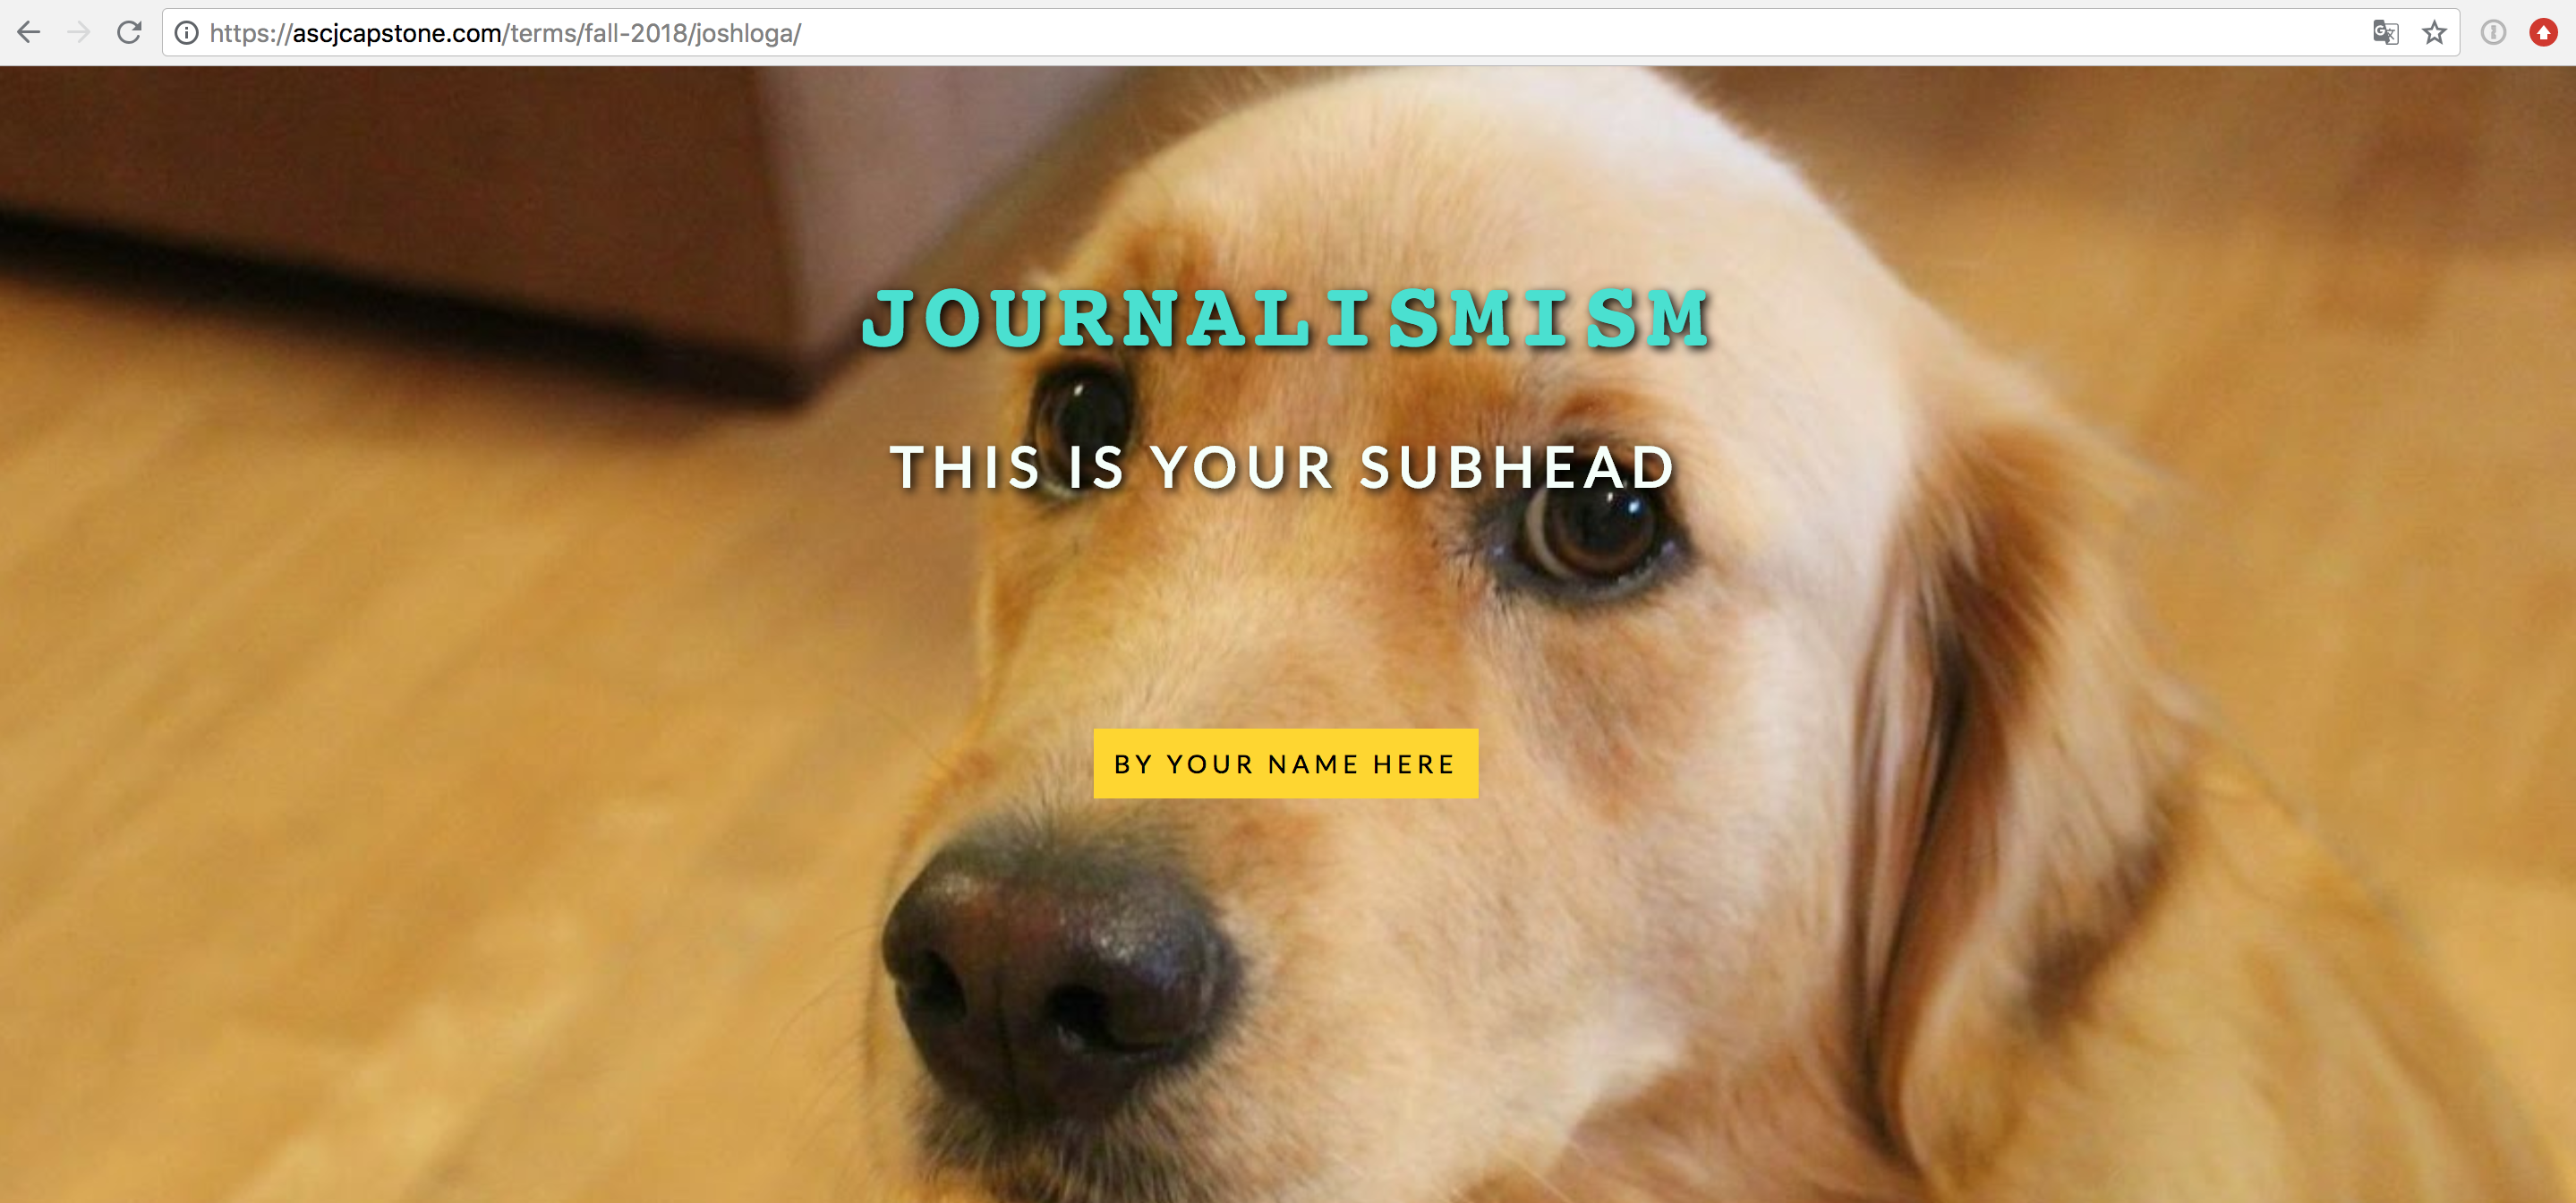
The FTP site template comes with several example images, videos, and audio clips arranged throughout the site. You can add more media like this and change existing elements using the same process we just used to change our h1 header properties. To do this we’ll first need to add a new image, audio file, or video file to the appropriate folder located in our site template files – the img folder for images or the media folder for audio and video files. For our example, we’ll be adding the photo “dog.jpg” to our img folder and then displaying it as our site’s cover photo.

Now that our new photo has been added to our img folder, we can open student.css and change the image displayed on our site. Navigate to the header element and remove the comment annotations, where we can see the current cover image displayed is “coverphoto.jpg.”
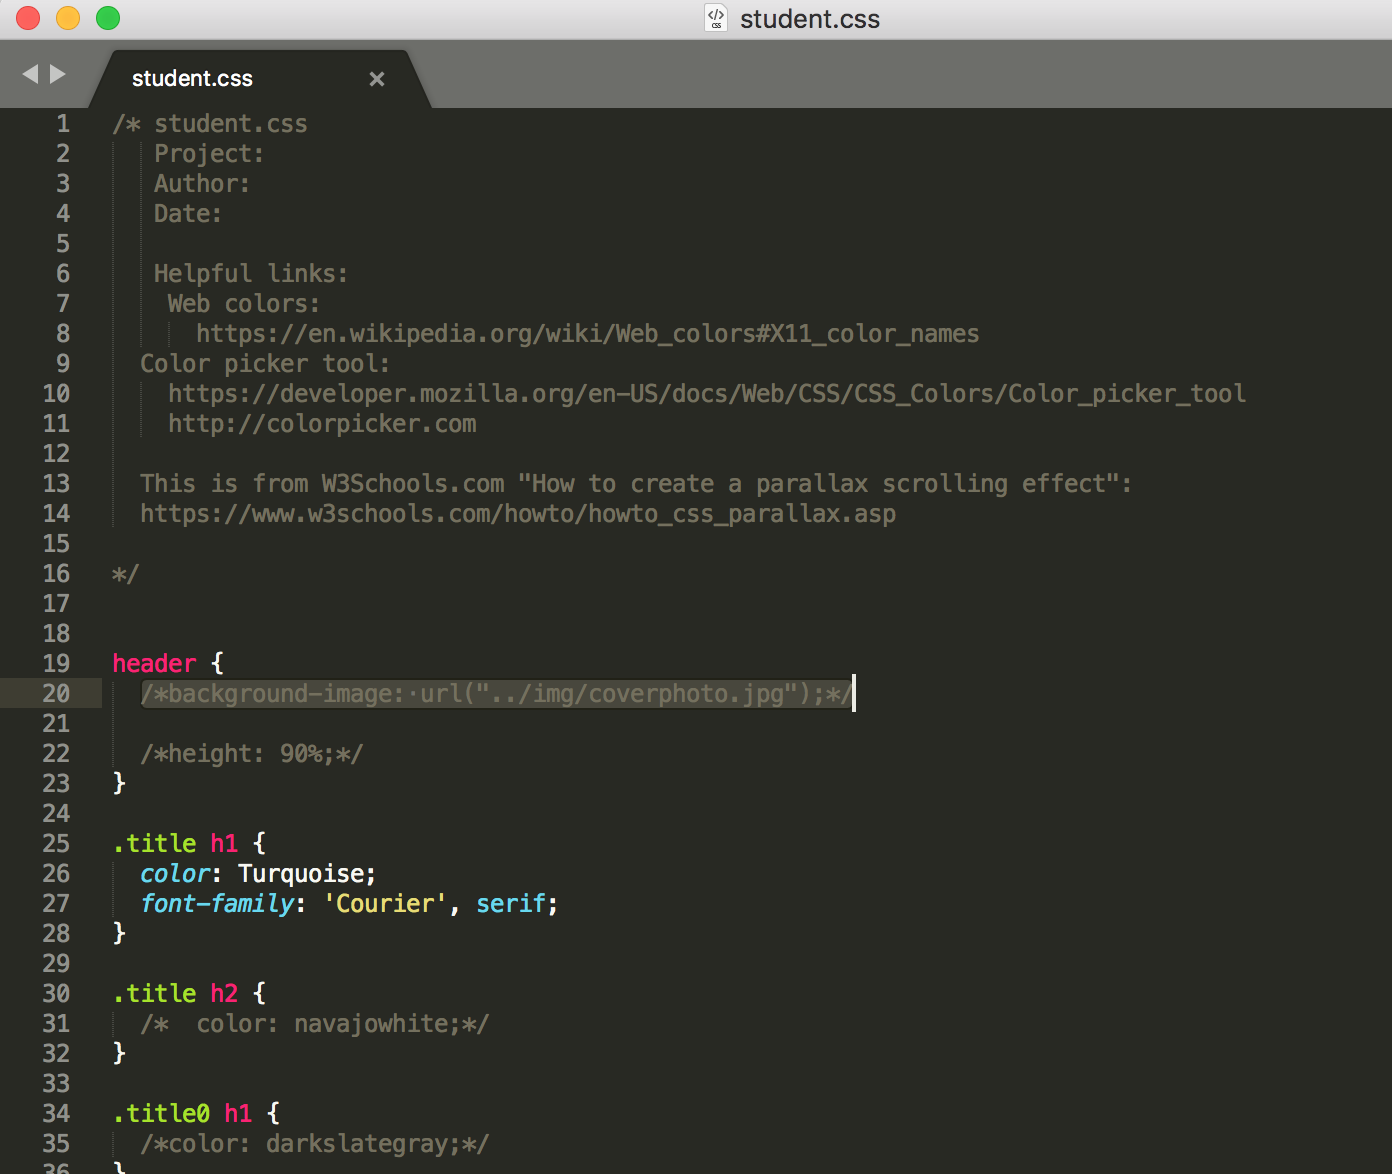
Replace coverphoto.jpg with our new background image, dog.jpg, and save your work. Open your local index.html file in your web browser as you did before to preview your changes.

The same process we used to change our header title and background image can be used to add, edit, and remove properties from other elements throughout the student.css file, allowing you to customize your site extensively.
Editing Your Site Text
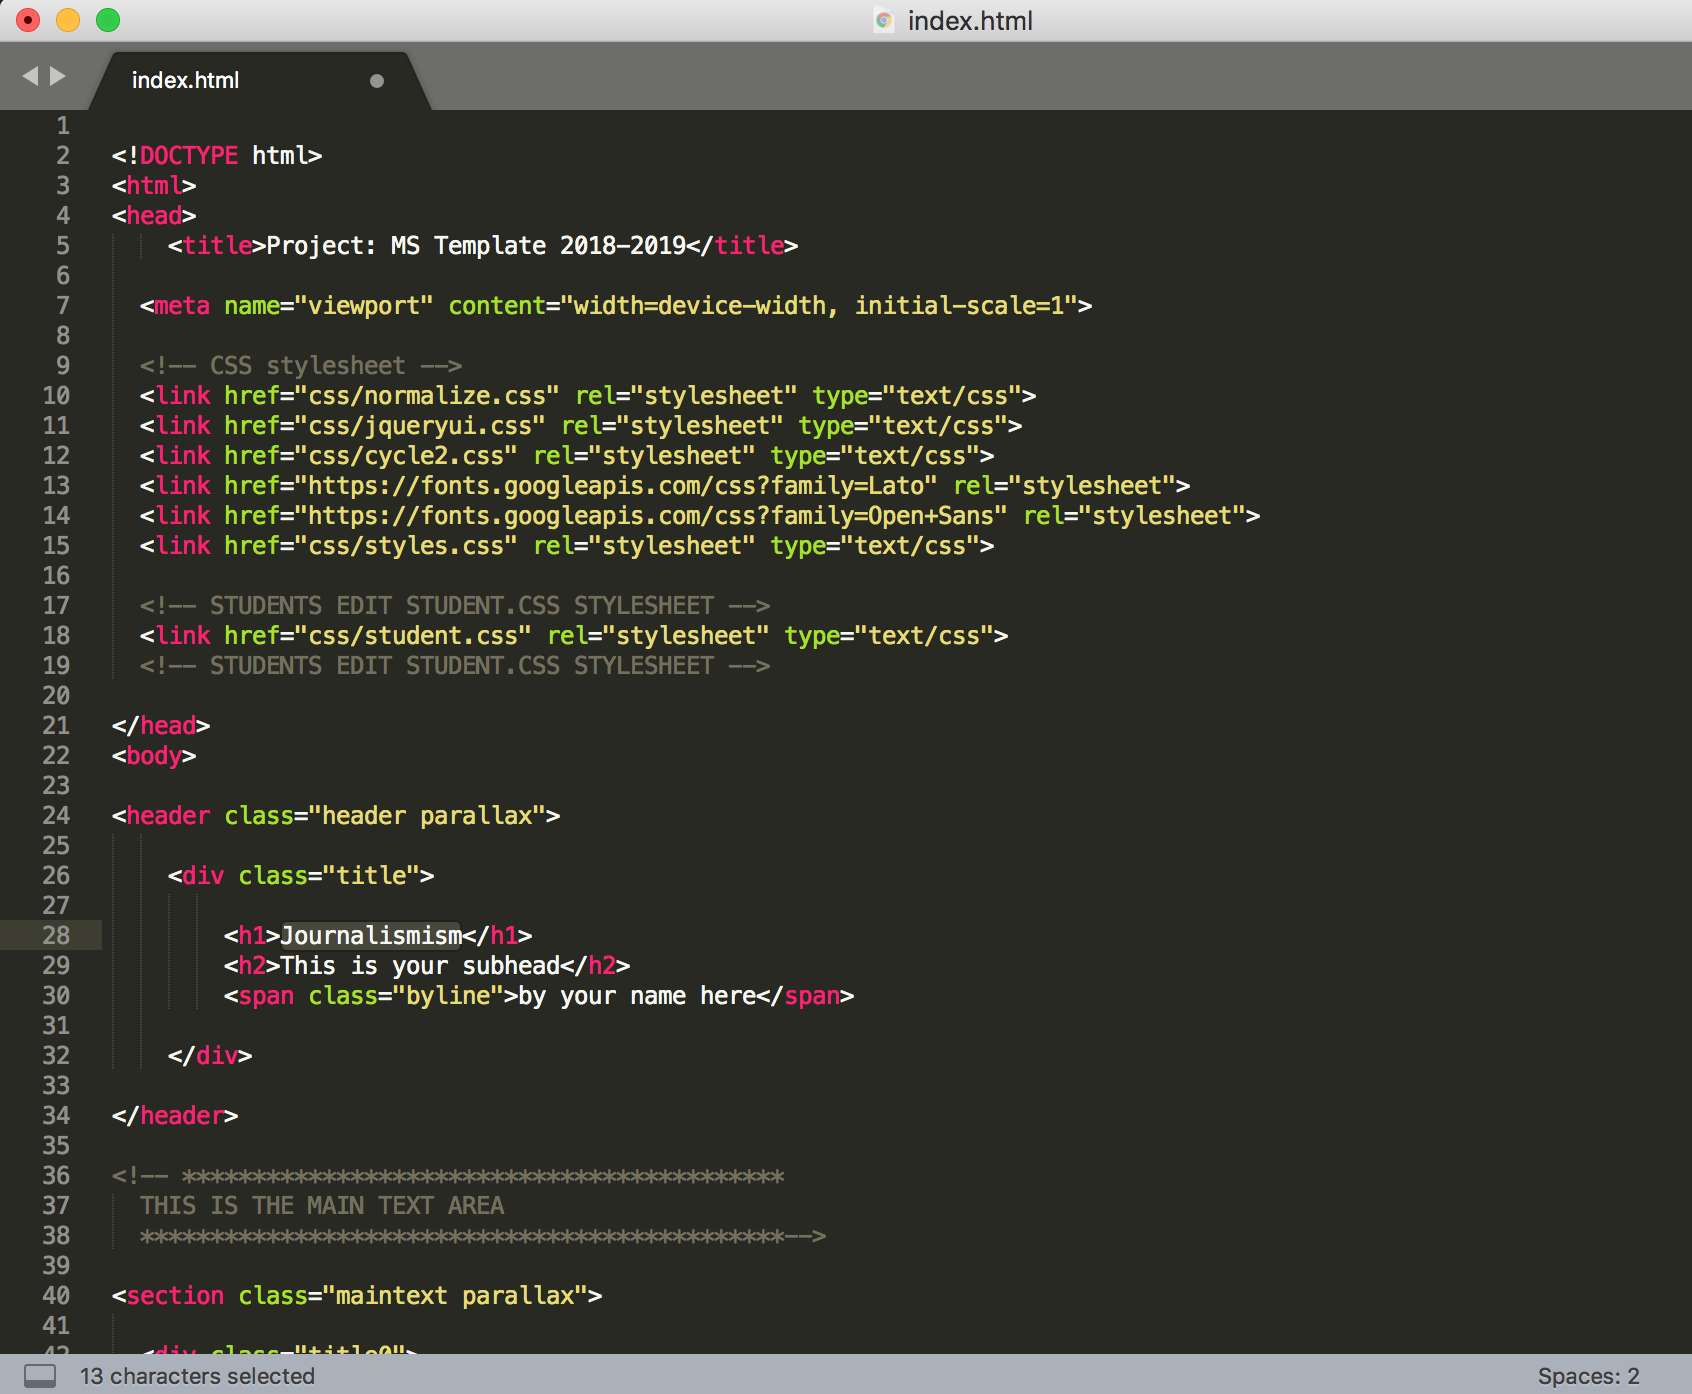
To change the text content on your site you’ll be editing using the index.html file from your site template files, rather than the student.css file used for colors, fonts, and media. Open the index.html file in your text editor to begin replacing the placeholder text from your site template.

Throughout the index.html file you will find comments indicating where that specific section of text is displayed – eg “<!– teaser right with pull quote–>”. Using these comments you can navigate to the section you want to edit and replace placeholder text and some images displayed in that specific area of your site. Placeholder text in the index.html is often self-describing what and where the text is displayed on your site, further helping you edit your intended element.
For this tutorial, we’re going to edit our site’s headline by finding our header in the html and replacing the placeholder headline text, self-described as “This is your headline.”
Save your work and test that the changes you’ve made to your site are displaying correctly by opening your local copy of index.html in your browser window.

Upload Files to Your Live FTP Site
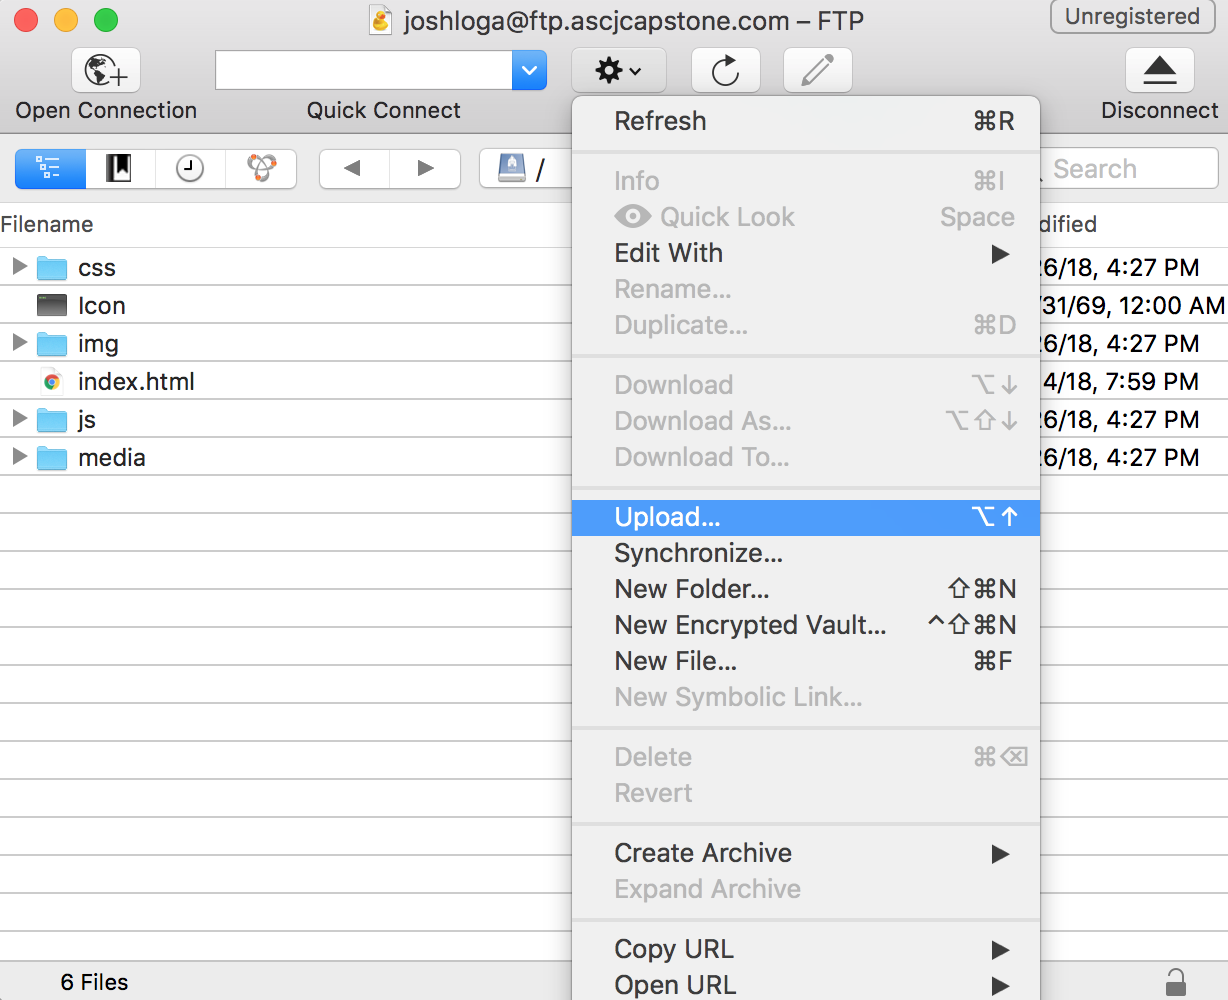
Now that we’ve made changes to our site files and tested that they’re working as intended, we’ll want to upload those changes to the ASCJCapstone FTP server. Using your FTP client (Cyberduck, in our example), connect to your ASCJCapstone FTP server like you did at the beginning of this tutorial.
Click Action > Upload, select the site template files you’ve been editing locally and click Upload.
Since you’re uploading several files that already exist on your FTP site with the same file names, after selecting Upload you’ll be asked to confirm you’d like to overwrite those existing unedited files. Click Continue to replace them with your updated versions.

If the upload was successful you’ll receive a notice like the one below:

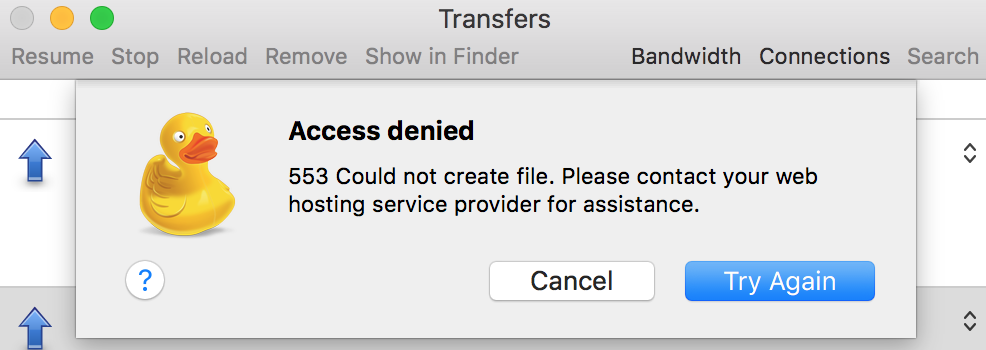
Note: if you receive an error message like the one below, please contact support@ascjcapstone.com and include a description or screenshot of your issue.
Verifying Your Changes were Successful
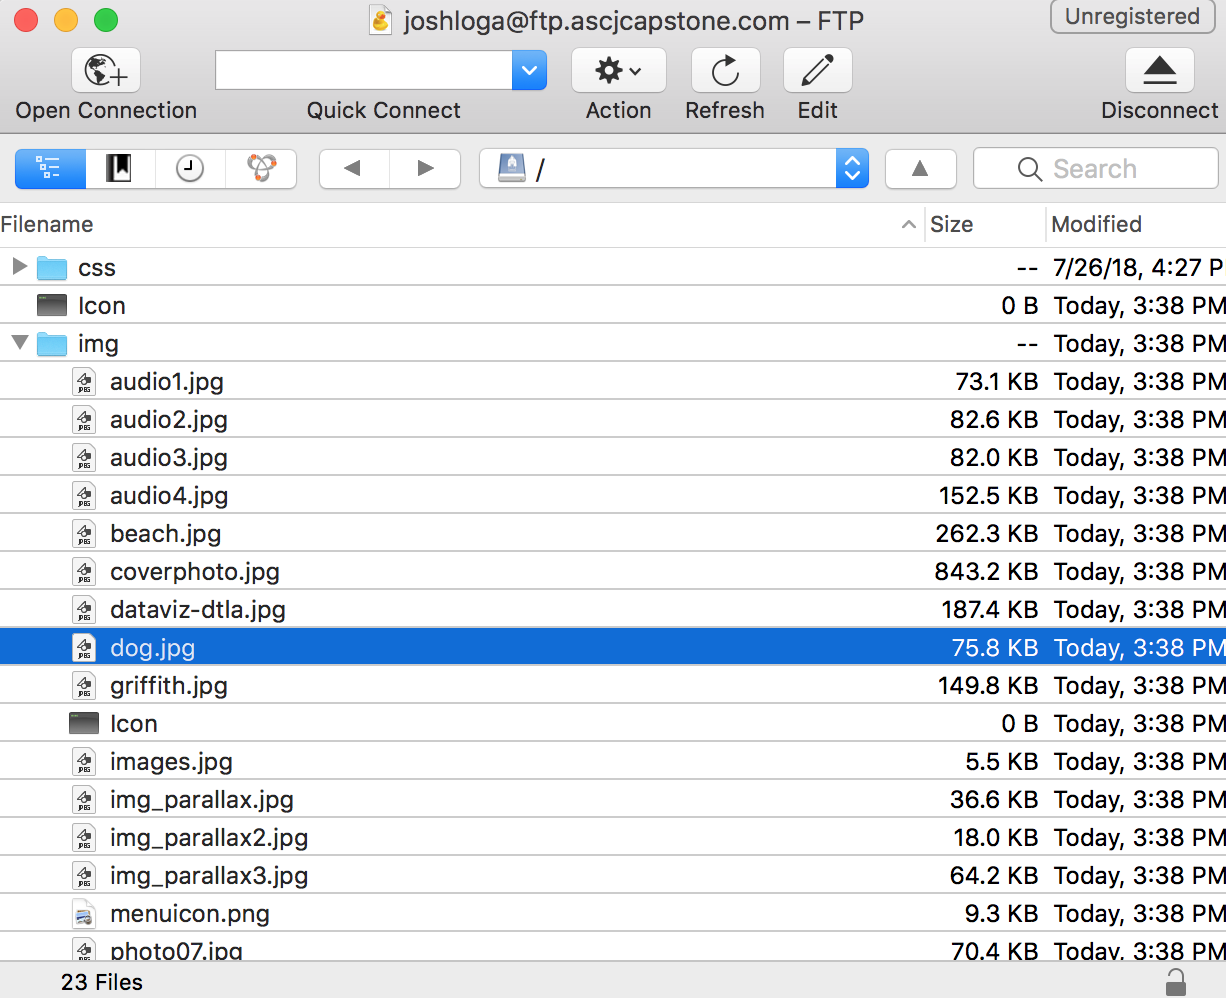
After uploading your edited site files successfully to your FTP folder you should be able to see any new files directly in your FTP client, like the dog.jpg image we added to the img folder below.
Congrats! You’ve now edited your ASCJCapstone FTP site. Visit your site URL to see for yourself.