Topics
Let’s continue our Audition tutorial* by learning about three handy effects that can sweeten your audio and get your mix sounding professional and polished – EQ, Compressor, and Limiter.
* – If you missed our Audition basics tutorial, you can find it here: http://www.annenbergdl.org/tutorials/podcasting-with-adobe-audition/
Download Tutorial Sample Files
For this tutorial I am going to be working with the same sample files from our first lesson. Links to these files are here:
Pocasting – Justin Audio file.aif
Podcasting – Mike Audio file.aif
Podcasting – Theme Song file.aif
Download these and import them into Audition using FILE > IMPORT > FILE or the shortcut Command-I if you want to follow along.
The Effects Rack
Adding effects to tracks in Audition takes place in the Effects Rack. To assign effects to a particular track, make sure you have the track selected by clicking on it in the timeline. You should see which track you are affecting in the Effects Rack named after Track: (below Presets)
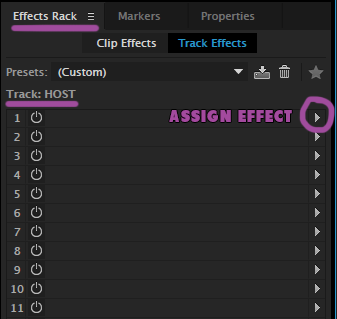
There are a list of numbers on the left which you can use to assign effects, keeping in mind that effects work in a hierarchical manner, a.k.a.: the effect on #1 will be applied to the track first, and an effect on #2 will be applied to the track after #1 has been applied, and so on.
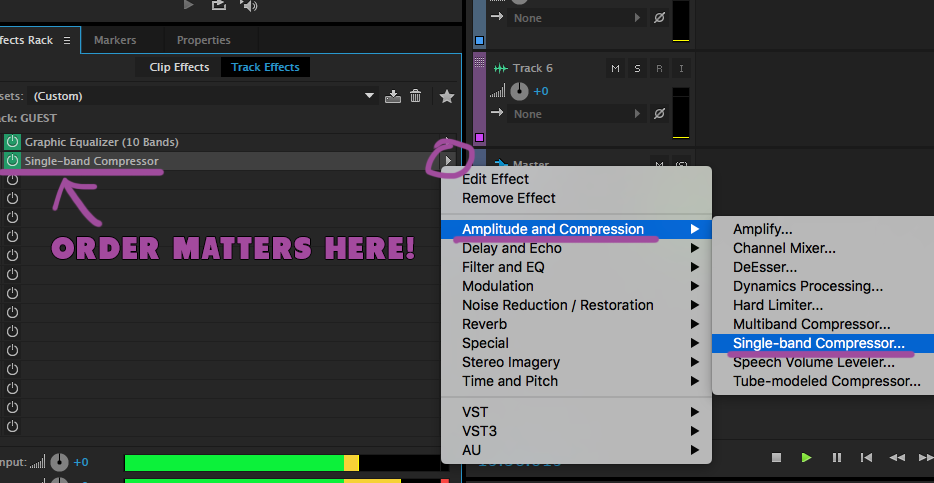
This comes into play for instance when you consider: Do I want to compress my EQ’d track, or EQ my compressed track? For podcasting it may not make a major difference, but keep it in mind if you start piling on effects: ORDER MATTERS.
To choose an effect, use the triangles to open a dropdown menu.
Adding a Graphic EQ
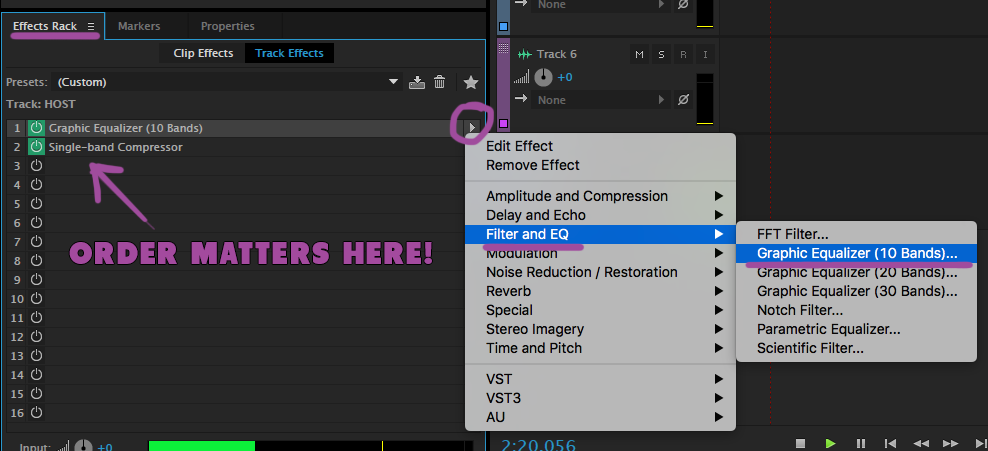
Let’s start with Justin track (Track 1, which I’ve renamed HOST in my project). Click the triangle for the dropdown, and go through FILTER AND EQ and add the 10 Bands Graphic Equalizer. This will bring up the following window:
If you want some tips on how to EQ voices, go ahead and listen to Mike share his effects process in the sample files, around the 20-minute mark, or on the MP3 of the episode here: Podcasting with Justin Edwards. I’ll mirror his suggestions here.
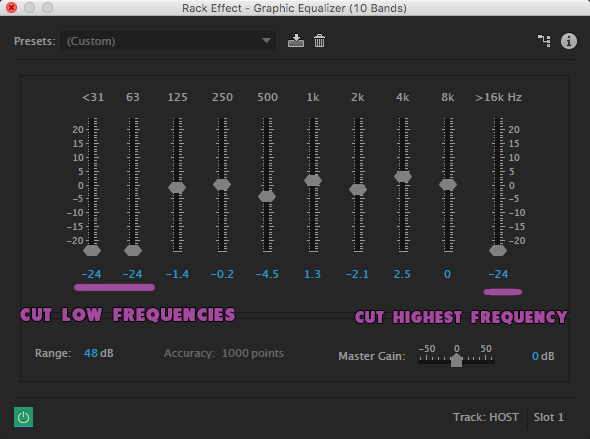
To start, let’s cut the low frequencies. Anything below 80 hertz can die. This will knock out any low rumbling noise that might have crept in the recording. I also like to kill the highest frequency here, as human voices don’t tend to live up here, but high-pitched noise might have snuck in, so let’s take that down too.
As for the rest – these depend on the speaker and the recording, and can be subjective. Fiddle around with each band and find what helps and what hurts. The goal here is “to make them sound like themselves” as Mike puts it. For Justin, I ended up with something like you see in the above image.
Now add the same 10 Band EQ to Mike and repeat.
Add a Compressor to Each Track
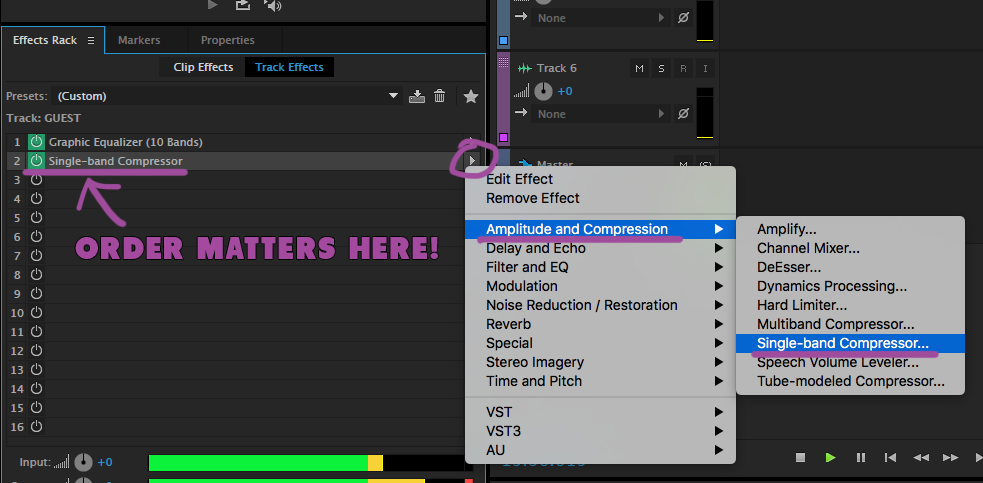
A compressor is a way to adjust the dynamic between the quietest someone speaks compared to the loudest they speak. Naturally we start sentences louder than we end them, for example. Let’s add a Single–Band Compressor to Justin’s track under AMPLITUDE AND COMPRESSION.
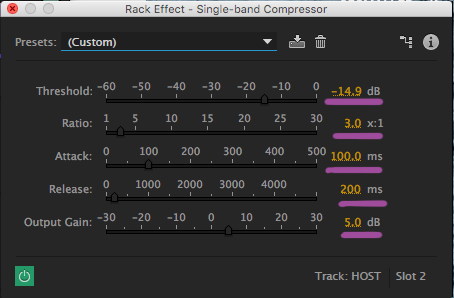
The options here are as follows:
- Threshold: at what volume will the compressor engage? This is a line in the sand. Anything quieter than this dB will be unaffected, anything louder than it will have the compressor applied. Think of it like a cowboy lassoing back anything louder than the threshold, “Hey you, Loud Noise/Word/Sound! Get back down here!”
- Ratio: The higher the ratio the more severe the compression, or in the cowboy example, how strong the cowboy will lasso that sound back down to the threshold. Mike mentions using a 3×1 ratio for his podcasts. This means for every 3dB louder a signal comes in above the threshold, it would be reduced to 1dB. 6dB louder would be pushed down to 2dB, and so on. Play with this to see the effects of higher compression ratios.
- Attack and Release are ways to smooth this compression’s affect, to make it not seem so sudden. These settings will adjust how gradually a compressor works leading up to the loud signal (attack) and how it gradually turns the compressor off afterwards (release).
- Output Gain: this will boost the overall signal of the track. Since a compressor pulls down the loudest parts of the signal (the start of a sentence for example), you’re able to boost the quieter end of a sentence (when we trail off) and not worry about the louder start of the sentence going past 0dB. In these tutorial files, Mike’s audio came in quieter than Justin’s, so he should probably get more Output Gain here to make up that difference. Get them both living in the yellow-red as you read your audio meters.
Like EQ, compressors can be subjective, too, but the goal here is to make it not noticeable. Play with the settings and see what works for each track.
Add a Limiter to the Master Track
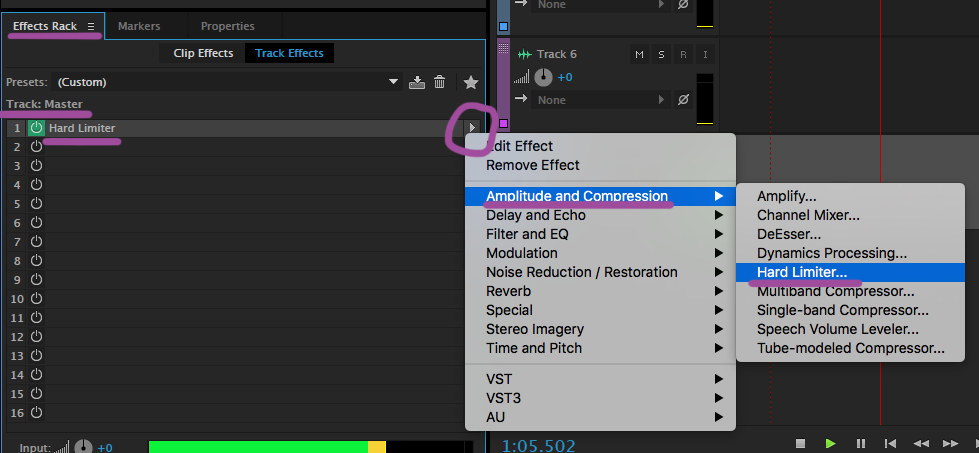
The Limiter is another form of compression, but is very severe. It’s a rude cut off point, not permitting anything to go past a certain point.

Add a Hard Limiter to the Master track by clicking the Master track in the timeline and using the triangle dropdown menu as seen above, also under AMPLITUDE AND COMPRESSION.
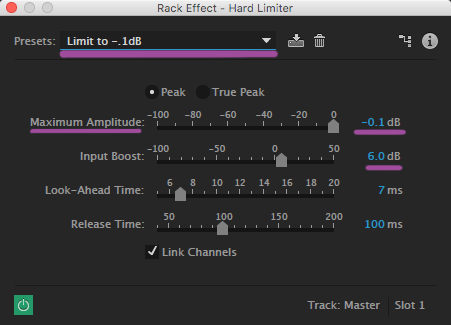
The reason to add a limiter to the master track is that you want to be able to affect the entire show now that you’ve EQ’d and compressed each track accordingly. It’s the last stop to make your signal loud and healthy but ensures it will not peak.
Set the Maximum Amplitude to -0.1dB. Your show will peak (and probably distort) if it hits 0dB or goes over. Setting the limiter at -0.1dB will keep all signals below the danger zone where distortion occurs. Watch your meters now with the limiter applied:

You should never see the red rectangle past 0 light up, because you should never be peaking.
The Input Boost is also one last effort to boost the signal of your entire show. If you’ve EQ’d and compressed, you may find your signal living down in the greens or yellows. Use the Input Boost to bring your show signal up to the red in a healthy way. You can flirt with the danger zone confidently, knowing you’ll never go past it.
With these 3 tools in place you should have a pretty sweet mix. Follow the “Exporting” chapter in our first tutorial to get this bad boy out into the world!
If you succeeded, it should sound something like this: Podcasting With Justin Edwards: Episode 1.mp3
Congratulations!


