


Topics
- 1 – Importing Video From A Phone
- 2 – Launch Adobe Premiere
- 3 – Start A New Project
- 4 – The Blank Project Window
- 5 – Import Your MOVs Into Premiere
- 6 – Working In The Source Window
- 7 – Working In The Timeline
- 8 – Assembling The Cut
- 9 – Adding Graphics/Images
- 10 – Adding Titles/Lower Thirds
- 11 – Adding Transitions/Fade Ins/Fade Outs
- 12 – Sound Mixing
- 13 – Exporting Your Finished Sequence
Hi friends! Let’s walk through the basics of Adobe Premiere Pro with a step-by-step guide for beginners! No worries if you’ve never touched the program before — I know it can seem daunting at first, but the basics can be learned in a few easy steps.
1 – Importing Video From A Phone
Before getting to Premiere, let’s take a quick look at an easy method for getting video off your phone and onto the computer so we have something to work with.
My favorite and easiest tool for getting video off my phone onto my computer is a program that comes built in with any Mac* computer: IMAGE CAPTURE.
Make sure your phone is connected to your computer via USB cable (the same one you use to charge the phone), and launch Image Capture from the Applications folder:
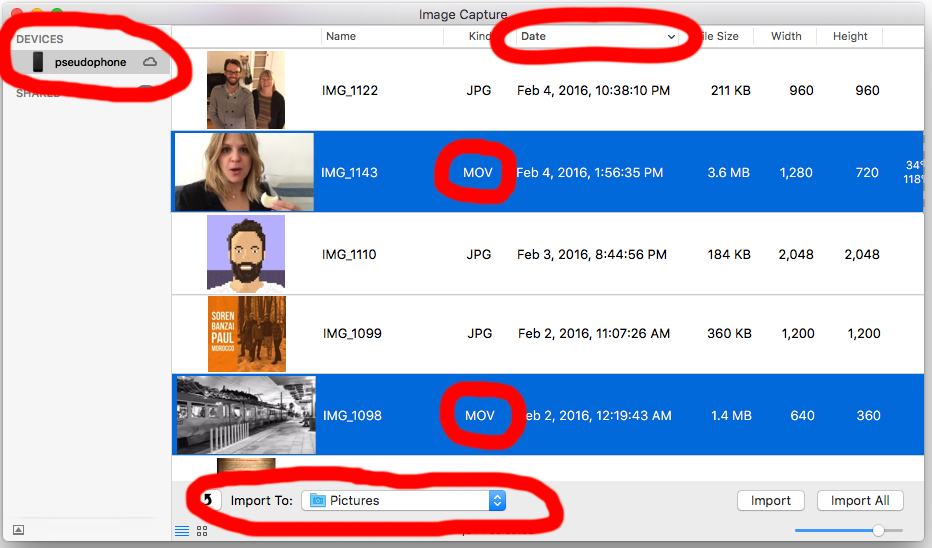
In the upper left your phone will appear in DEVICES. Click on your phone to show a list of all of your images and videos. It will default list them in reverse chronological order (latest files on top), which is good if you are grabbing something you shot recently.
My video files are recorded as MOV files. You can see file types in the Kind column. If you hold the Command key (the ⌘ next to the space bar), you can pick multiple selections. In this example I have selected two MOV files.
For now, let’s just drag these to the desktop for easy access. For more involved projects you’ll want to keep your media organized and living with your Premiere project file using the IMPORT TO: dropdown to choose that folder.
* – If you have a Windows computer, you should be able to navigate to your phone like you would any external hard drive and find your videos there.
2 – Launch Adobe Premiere
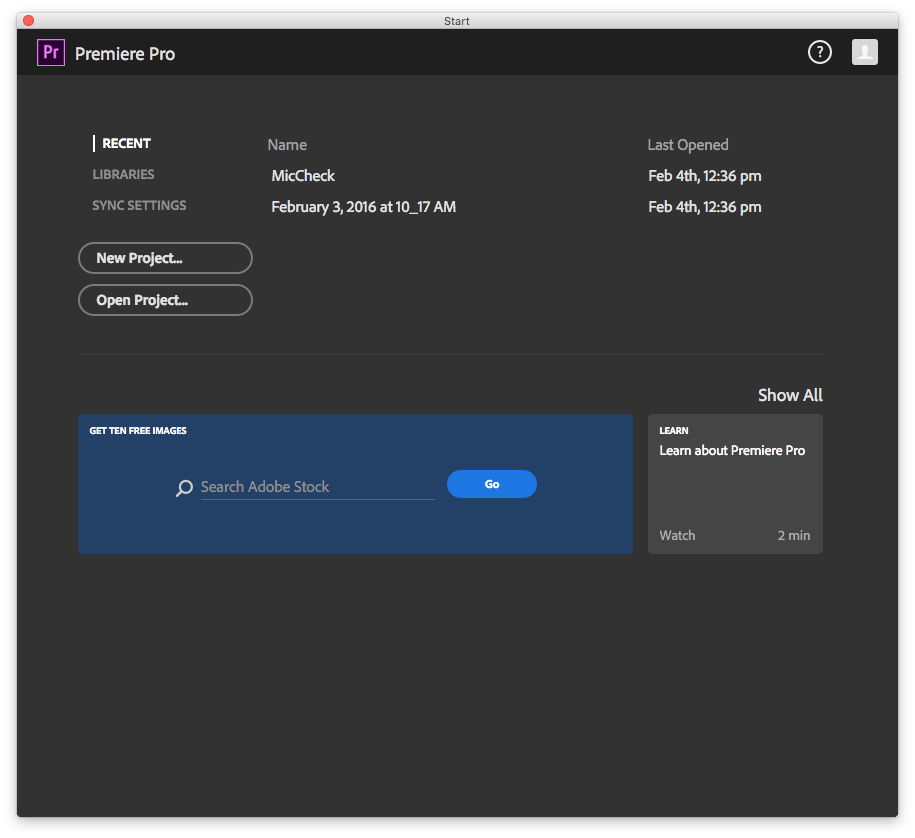
After it loads you will be taken to the splash screen for starting a new project much like this one here:
3 – Start A New Project
Let’s hit New Project, which will load a screen with a few options:
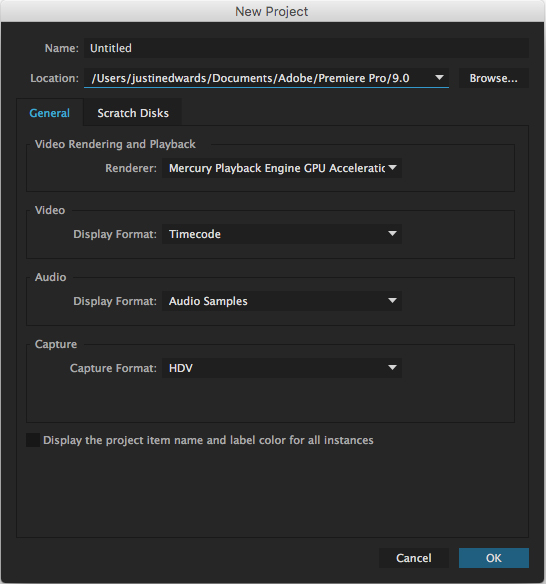
For now, let’s leave all the options alone – we don’t need to worry about these settings right now. Just give it a name by double-clicking Untitled, name it whatever you wish, and then hit OK. This will launch a Blank Project window for you:
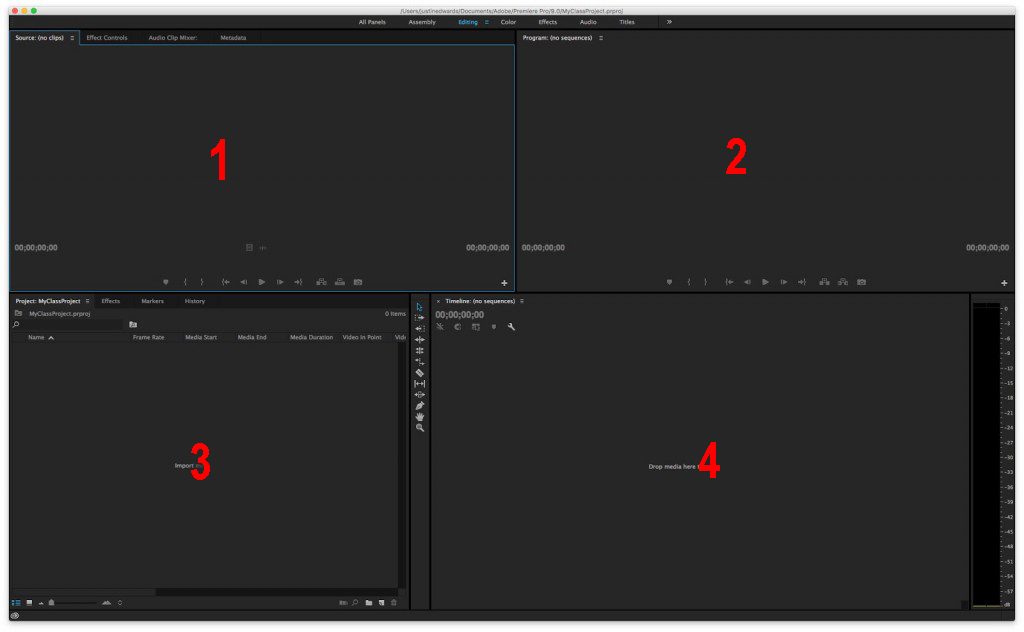
4 – The Blank Project Window
The standard project consists of the following 4 windows from which to work:
- Source Window – the window for previewing video, audio, and images before adding them to the Timeline
- Program Window – the window for previewing your project as it is edited in the Timeline
- Project Window – the window where you’ll see all of your project’s media files, bins, and sequences.
- Timeline – where most of the editing action will take place
You’ll also notice there are extra tabs within some windows, for instance, the Source Window has Effect Controls among others. Don’t worry about these just yet, we’ll stick to the basics for now.
5 – Import Your MOVs Into Premiere
Let’s import our video files into Premiere. There are a few ways to do this:
- Double click in the empty Project Window
- Go up to FILE > IMPORT
- Use they keyboard shortcut: ⌘I (that’s the letter i)
- You can even simply drag the files into the Project Window
I want to reiterate the use of the Command key (the ⌘ key next to the space bar) – it will be your best friend in speeding up your editing game. Get used to using it in combination with many commands in Premiere and you’ll be a wizard in no time!
6 – Working In The Source Window
Double-click on a video file in the Project Window to open a preview in the Source Window. You can also drag files up to the window.
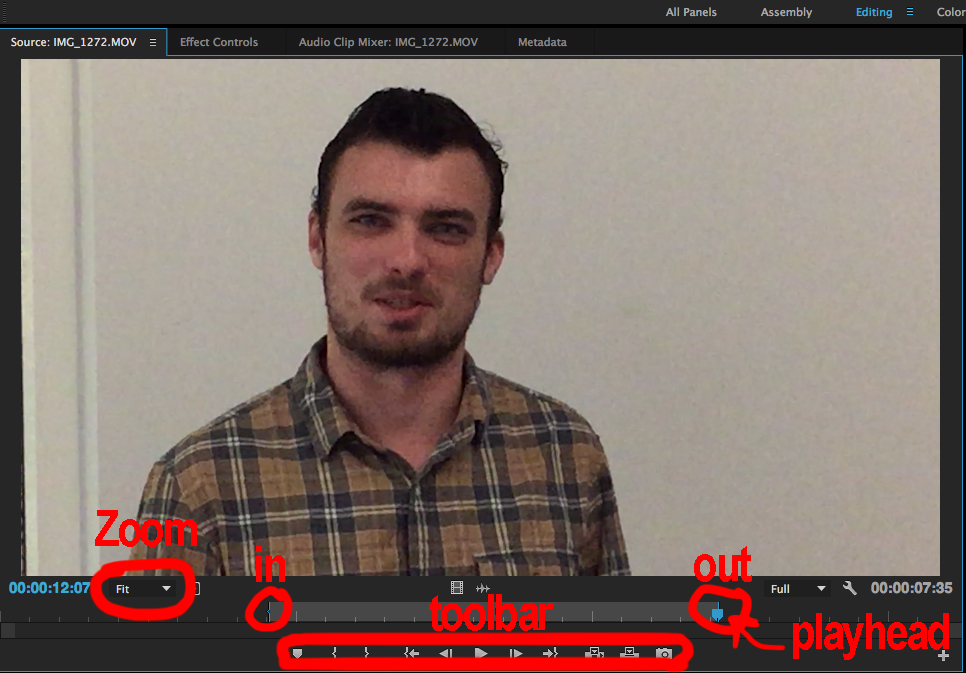
Set The Zoom
The first setting you’ll want to adjust is the Zoom – located in the lower left of the Source Window. It may default to a %, but you’ll want to set the zoom to Fit so you can be sure you’re seeing the full image of the video.
Navigating within the Source Window
- A blue PLAYHEAD will show you where in the clip you are, and can be dragged around.
- The SPACEBAR will play and stop the video.
- J K and L will REWIND, STOP, and FAST-FORWARD respectively.
- You can also use the TOOLBAR to navigate around the video — hover your mouse over these to see what they are.
Your keyboard’s ARROW KEYS are also very helpful to get around:
- Press Left/Right to move one frame at a time.
- Press Up/Down to jump between the beginning, end, and any MARKERS you place in-between.
What are markers? Let’s make our first ones now:
Selecting In and Out Markers
Your first editing decision now is to select a clip from your video, something you feel is good for your project. You’ll probably trim the beginning and end of a file because they most likely have camera adjustments or interview questions before getting to what’s actually useful.
To mark this selection you need to choose a frame as an IN point and a frame as an OUT point. Find your in frame and press the letter i to set the IN point. Find the out frame and press the letter o to set the OUT point. You can do this while the video is playing back as well.
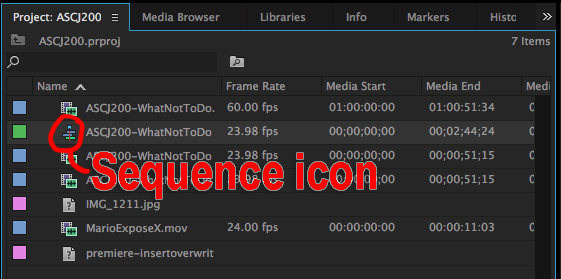
Create a Sequence
Now that we have selected a clip, let’s take it to the TIMELINE, which will also create a new SEQUENCE for us. Do this by grabbing the image of your video in the Source Window and dragging it down (and right) into the Timeline Window.
7 – Working In The Timeline

Congratulations, you have created your first SEQUENCE! You should see one in your Project Window now. Your sequence only contains one clip now, but we’ll add to it shortly.
You’ll also notice that the Program Window now has a preview for you. Go ahead and set its Zoom to FIT the same way you did in the Source Window.
Navigating within the Timeline
Timeline navigation basics are the same as in the Source Window – SPACEBAR will start and stop playback, there’s a PLAYHEAD, you can use the ARROW keys, J K L work the same, and you can even select clips and Copy (⌘C) and Paste (⌘V) like in a text document.
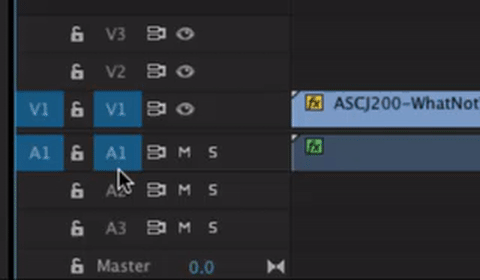
Your clip is now represented on two TRACKS – one for VIDEO (V1), and one for AUDIO (A1). By default, your clip will keep these two tracks LINKED together for purposes of keeping things in sync. Sometimes you may need to UNLINK these, which can be done with ⌘L.
When the need arises, you can place clips onto different tracks – V2 or A2 for instance. Keep in mind that a clip on V2 will play on top of anything in V1 – handy for adding TITLES and LOWER THIRDS (more on them in a bit).
The timeline has its own TOOLS. The SELECTION tool is on by default and will be used the most. The RAZOR is also handy for when you want to split clips into pieces.
There also the AUDIO METERS on the right side. These will be useful for sound mixing later on.
Zooming
As you add more clips to your timeline you may need to change the ZOOM to see everything at once. The bar at the bottom of the timeline can be used slide around, and the ends of this bar can be grabbed to drag in or out to adjust the zoom.
Alternately, and even more handy, is to use + and – to zoom in and out, and the best shortcut in all of Premiere is \ (backward slash, just above the return key). This magically zooms to fit all of your clips in the timeline at once.
Adjusting Track Height
Hover your mouse between the tracks assignments on the left of the timeline and click & drag to make your tracks taller or smaller:
You can also use the vertical bars at the right end of the timeline to do this as well.
8 – Assembling The Cut
Let’s load up another clip in Source Window and set a new I and O for another clip. To add this to the timeline you can drag it over there again, but let’s try another way to learn a few more tricks.
Insert vs Overwrite
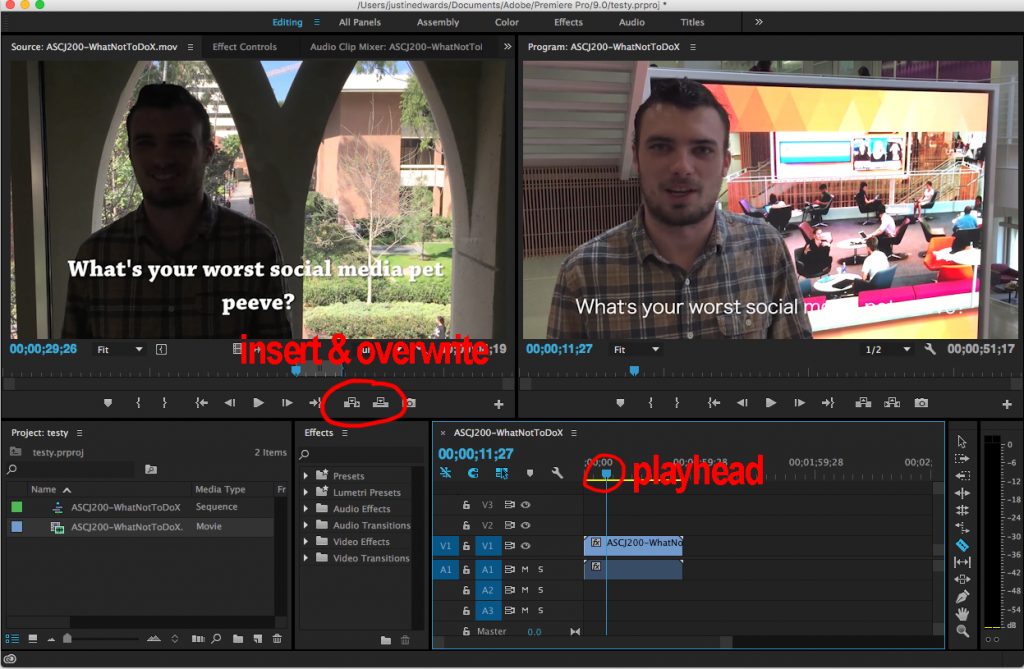
Since editing in Premiere is considered NONLINEAR, you can assemble your cut in any order you like: start in the middle, add to the end, do the beginning, however you choose. INSERT and OVERWRITE help drop clips in the sequence exactly how and where you want them.
Use the comma (,) and period (.) to INSERT or OVERWRITE a clip from the Source Window into the timeline at the timeline’s PLAYHEAD. You can also use the tool buttons in the Source Window TOOLBAR (see image above).
Always remember that the PLAYHEAD in the TIMELINE determines where your new clip will drop in.
INSERTING (,) will drop the clip into the timeline at the PLAYHEAD, and in doing so SPLITS whatever clip is there, PUSHING everything after the playhead down the timeline. Inserting WILL NOT delete any footage currently in your sequence. It will merely push things down to make room.
OVERWRITING (.), on the other hand, will drop the clip into the timeline at the playhead, and WILL DELETE any footage in its way.
Get the hang of using INSERT and OVERWRITE and notice their differences. Once you feel comfortable, you should now have the means to go ahead and assemble your entire cut with what we’ve covered so far, so get to it!
9 – Adding Graphics/Images
Import your graphics and still images to your project and double-click one to open it in the Source Window.
Once there, you can set an IN and OUT for how long you want your image to be in your project. By default it will probably be 5 seconds. From here, either drag it down to your timeline or insert/overwrite it. Drag it to V2 if it needs to play over top of your footage.
Position your timeline PLAYHEAD over the image to get a look at its size and position in the Program Window. It might need adjusted, so let’s do that!
Position and Scale
Double-click your image in the timeline to open it up in the Source Window again. Remember the extra tabs we have here? Click on EFFECT CONTROLS to see your options.
Under the MOTION tab you’ll find POSITION and SCALE. You may need to click the little triangle next to MOTION to drop down these options.
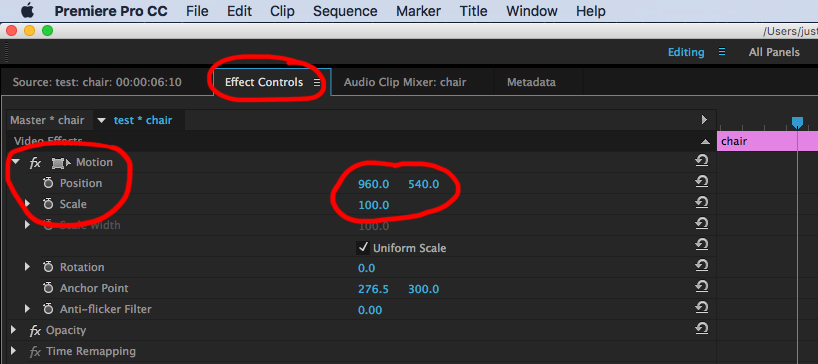
POSITION is represented by PIXELS WIDE and PIXELS HIGH. Premiere will place images in the center of the frame by default.
Since a standard HD video is 1920 pixels wide and 1080 pixels high, a centered image will be positioned halfway across and halfway down, hence 960, 540. You can click and drag these numbers higher and lower to raise or lower your image within the frame. To preview your changes, make sure your timeline’s PLAYHEAD is still over your image.
SCALE will determine the SIZE of your image in the frame. This number is a %, so 100 is the full size of your image, AKA 100%. Keep this in mind if you go over 100 — you will make your image more pixely/blurry the higher you go. Again, keep your timeline’s PLAYHEAD over your image to be able to preview your changes here as you drag the number high or lower.
PRO TIP: Use the Blue Boxes
Another way to adjust size and position is to double-click the image within the Program Window. This will bring up a blue outline with little boxes around your image. In this state you can click and drag the image to reposition it, and click and drag the little blue boxes to adjust the size.
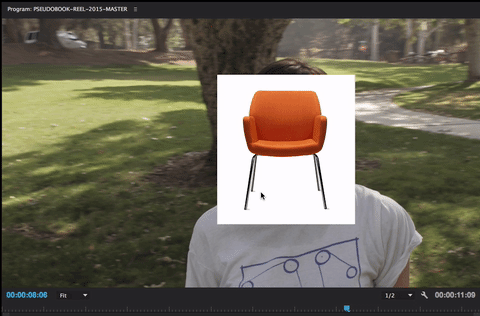
This can also be done with video files as well – double-click them in the Program Window to resize & reposition!
10 – Adding Titles/Lower Thirds
Rather than re-invent the wheel, our wonderful Digital Lounge staff have already created a tutorial regarding adding titles to your video. Check it out here:
11 – Adding Transitions/Fade Ins/Fade Outs
Often times you will want to have a cross-fade between clips or fade in and fade out of clips to black. These tools are easily found in the EFFECTS TAB, which by default is part of the Project Window:
I often use the Effects tab, so I usually pull this tab out and place it next to my Project Window. Just click on the Effects tab and you can drag it to where you like.
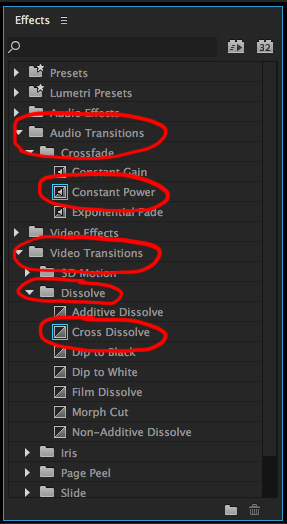
Inside the Effects tab you’ll find folders for Video Transitions and Audio Transitions – two very useful folders you will probably use a lot. Click the triangles next to them to open them until you see Crossfade in the Audio Transitions folder and Dissolve in the Video Transitions folder:
To use any of these effects, simply click and drag them over to the timeline and add them to the ends or beginnings of your clips.
Adding CONSTANT POWER to the front and end of your audio clips will fade in and fade out the audio.
Adding a CROSS DISSOLVE to the front of your video clips will fade in from black. Placing one in between two clips with dissolve between those two clips. Placing one at the end of a clip will fade out to black.
To change the timing of these dissolves, you can double-click on a dissolve to open a window:
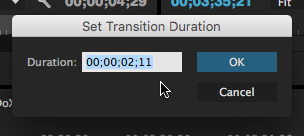
You can also change a dissolve’s length by clicking and dragging the ends of the dissolve:*

*You may need to ZOOM in to get your cursor to grab it, so use + accordingly.
12 – Sound Mixing
As your sequence nears completion, you’ll want to make sure your sound is mixed well before exporting. Your AUDIO METERS (next to the timeline) will help you make sure your video is loud enough, but not too loud. Play back your sequence and watch the meters. Here’s an example:
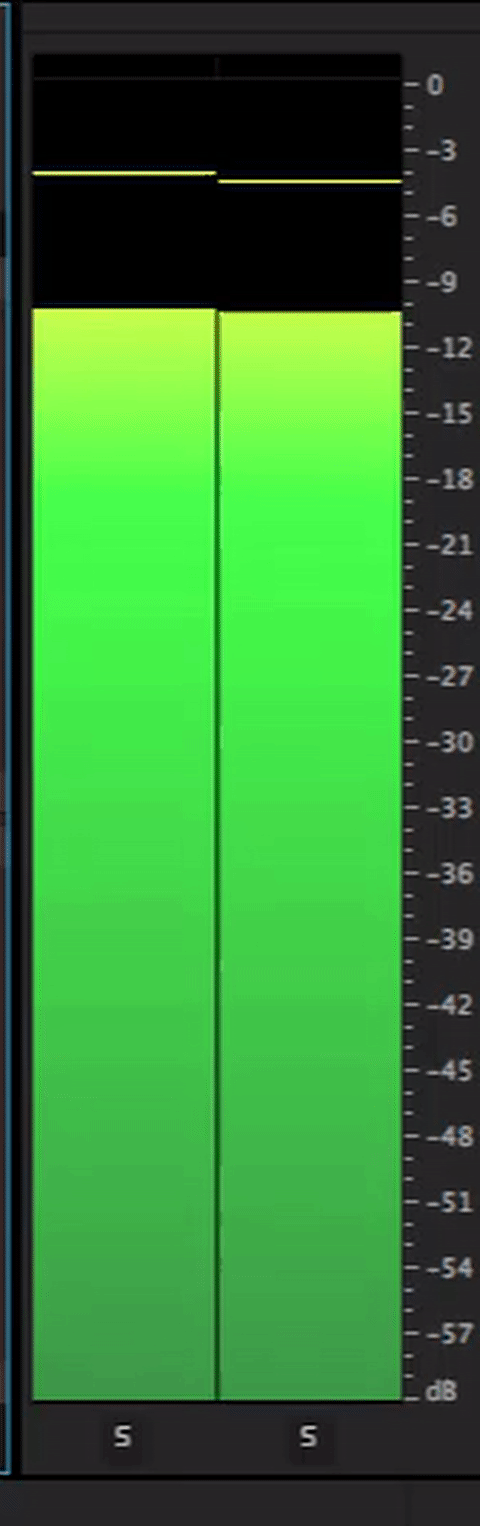
In this example the audio lives around -12 or so before going all the way up to 0 in the end. -12 is great, but going up to 0 is not cool! There’s a reason the meter turns red towards the top – this is the danger zone.
Alternately, if you find your clips are living below -40 or so, you’re probably too quiet and could stand to boost your volume. So how do we adjust our sound mix? On a clip by clip basis.
PRO TIP: Adjust Track Height
To adjust a clip’s volume quickly, your TRACK HEIGHT needs to be tall enough to show the waveform of your clips. You can use a cool new shortcut for this: SHIFT +, which will jump the track heights up for some quick volume adjustments:
Now you can find a volume bar across the middle of your audio clip – sometimes it’s hard to see but it’s in the middle by default. Simply click this bar and raise volume a few decibels (up to +6dB) or lower it down to muted (-∞). This is a quick way to tweak clip volumes – useful for getting music clips lower so you can hear someone talking, for example.
In some cases, you may have a very quiet clip that needs more than just a +6dB boost. In this case you’ll want to use Premiere’s AUDIO GAIN tool. Lucky for us this is a very easy keyboard shortcut away. Select your clip and hit G:
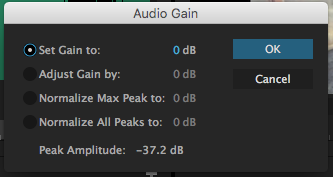
You can also right-click or control-click a clip, or use the top menu CLIP > AUDIO OPTIONS > AUDIO GAIN to get here. Use SET GAIN TO: to boost your clip up by the dB that suits your needs, up to +96dB! Hit OK and watch your clip get remapped to its new audio levels.
Repeat this process for all your clips, keeping an eye on the audio meter to get them in the same neighborhood.
13 – Exporting Your Finished Sequence
Okay so you’re done with a cut, done a pass on the sound mix, and now you want to share this bad boy! We will use FILE > EXPORT > MEDIA… or ⌘M to export your sequence in 5 easy steps:
STEP 1
Pay attention to what window you are in and what file is selected. Premiere will export exactly what is selected or active. So either click into your timeline so your sequence is active, or click on your sequence file in the Project Window.
Use ⌘M or FILE > EXPORT > MEDIA… to launch the Export Window:

STEP 2
There is a lot going on in this window, but we can ignore most of it for now. For starters, you’ll see the same blue PLAYHEAD at the bottom to scrub through your sequence to confirm it’s all there. Let’s first click on the FORMAT dropdown menu and choose H.264:
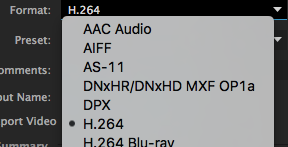
This is a standard codec for sharing anything on the web. It has great image quality and the file size won’t be gigantic.
STEP 3
Next, let’s click on the PRESET dropdown menu:

Lots of options here, but let’s play it safe and just use Premiere’s preset for YouTube 1080p HD.
STEP 4
Next, let’s double check our file name and where Premiere is sending the file by clicking on the blue text by OUTPUT NAME. This will bring up the following window:
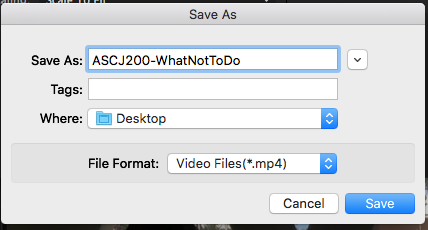
Your SEQUENCE was probably just named after the first clip you dragged into it, so take this opportunity to rename your movie appropriately. To make your file easy to find after the export, go ahead and change the WHERE: to DESKTOP. Save it!
STEP 5
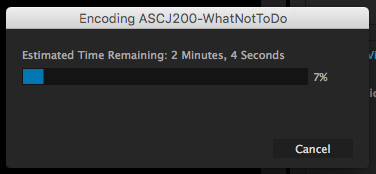
Now you’re ready to rock. Ignore the blue QUEUE button and go straight to EXPORT. You’ll see the status window appear as it encodes your movie:
Congratulations, you made a movie! Go find it on the desktop and bask in its glory!